Although all the different filters are used in the same way there are two very different methods needed internally to support them. These are essentially:
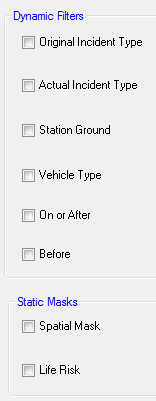
It is possible to filter the data for analysis by any combination of filters as follows:
Dynamic Filters
| Original Incident Type | |
| Actual Incident Type | |
| Station Ground | The station to which the incident report is assigned |
| Vehicle Type | |
| On or After | a date on or after which an incident is open |
| Before | a date before which an incident is open |
Static Masks
| Spatial Mask | an area within which the incident must fall |
| Life Risk | a category based on location and ‘type’ codes |
The source values for the selection of Original Incident Type, Actual Incident Type, Station Ground and Vehicle Type are all read from the Cadcorp SIS 8.0 Workload Modeller Add-in database and as such can be changed at any time by editing the database directly.
To be used a filter must be:
The text boxes in the vertical centre of the Set data filters dialog show the definition of a filter. The filter will only be applied if the tickbox to the left of its name is checked.
With the settings in the Set data filters dialog as shown below, all filters have been defined but Actual Incident Type, Spatial Mask and Life Risk are not being applied, i.e. any analysis undertaken with these filters will be restricted to incidents:
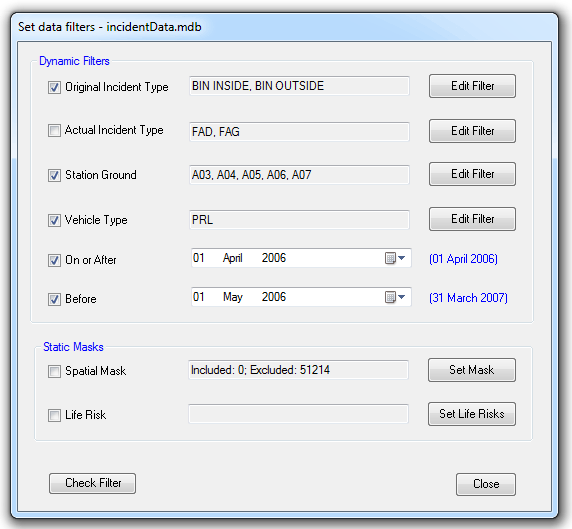
Set data filters dialog
A spatial filter can also be set, e.g. incidents within a specific area.
The spatial mask, however, works in a different manner to the other filters and therefore requires some explanation.
Before clicking Set Mask you should select the area(s), in Map Modeller, to which the analysis is to be restricted. The program will make a spatial filter from the selected areas, load all the incidents as a view points overlay, scan this with the spatial filter and for every incident in the spatial filter will set a ‘SpatiallyIncluded’ value on the incident record in the database and then delete the temporary overlay.
Setting these flags may take a little while as a possibly significant amount of database access is required. The ‘definition text’ for a spatial mask will tell you how many incidents of the total number in the database will be included / excluded if the mask is applied.
Once defined, the spatial mask is very quick to use in analysis as it has been reduced to a simple equality clause in a SQL statement.
Note: The use of a spatial mask is strongly recommended in the modelling functions as some incidents may have incorrect coordinates, e.g. 0,0.
The Set data filters dialog also has a Check Filter button so you can see how many incidents and callouts the filters will pass through for analysis.

Message showing how many incidents and callouts will be passed for analysis
This also gives you the option to create a view in the database (an Access Query) which can be loaded as a View Points overlay (the table has columns for Easting# and Northing#).
So, for example, you can easily create an overlay of incidents:
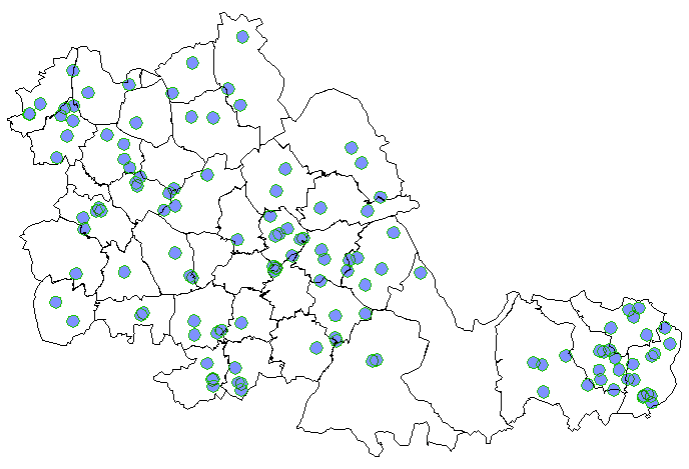
View created using filters
The concept of Incident Type Category has been introduced, e.g. any categories can be defined. The template database has two defined: Primary and Secondary.
The table of Original Incident Types has been expanded to include a category field. So, for example, BIN INSIDE can be categorised as Primary and BIN OUTSIDE as Secondary.
This categorisation has been brought through to the Original Incident Type Filter making it very easy to filter by Incident Category, e.g. all Secondary Incident Types.
Click the Set data filters dialog Original Incident Type - Edit Filter button to display the Filter by Original Incident Type dialog:
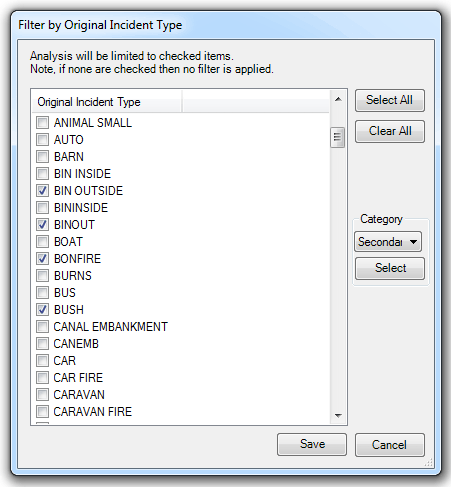
Incident Categories are the basis of incident-based response times for modelling.
Send comments on this topic.
Click to return to www.cadcorp.com
© Copyright 2000-2017 Computer Aided Development Corporation Limited (Cadcorp).