 Multi-Point Routing
Multi-Point RoutingMulti-Point Routing calculates a ‘time-travel’ matrix, i.e. you define a set of points you want to measure from and a set of points you want to measure to. Multi-Point Routing will calculate the least cost route between every FROM point and every TO point.
Beware, route tracing is computationally very intensive and it is easy to request a very large number of routes to calculate, e.g. to calculate how far each of 40 nationwide depots is from the centre of 500 local areas will generate a request to calculate 20,000 routes!
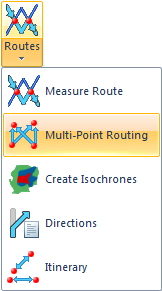
Select Multi-Point Routing.
The Select method of calculation dialog will be displayed:

This dialog has two options:
See Individual calculations for a full description of this option.
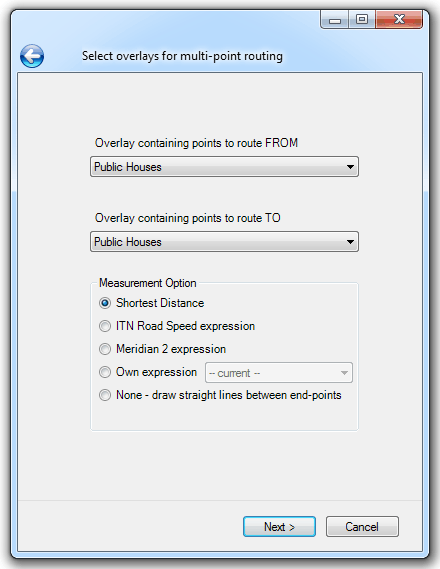
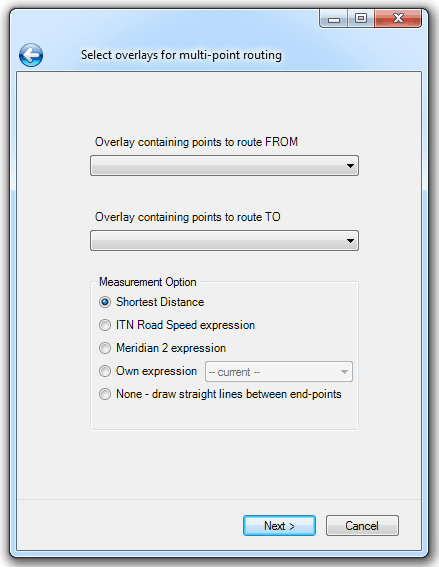
The Select overlays for multi-point routing dialog will be displayed:
Overlay containing points to route FROM:
Overlay containing points to route TO:
Select the required FROM and TO overlays from the drop-down boxes. This can be the same or different overlays, In this example the same overlay, Public Houses is used.
Measurement Option
This entry depends on the data being used, whether it is ITN, Meridian 2 or your Own expression as set in the Settings dialog.
The other possible options are:
Shortest Distance
This is the shortest distance using the road network.
None - draw straight lines between end-points
This is the shortest distance as the crow flies between the two points.
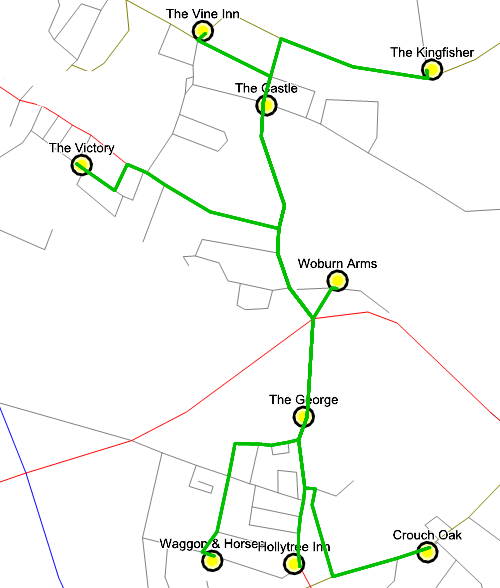
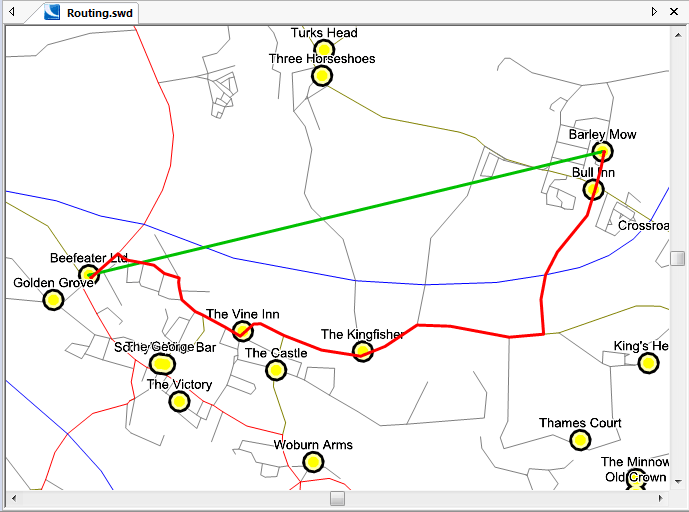
This example screen shows the Shortest Distance as the red line and the None - draw straight lines between end-points as the green line:
Click Next.
The Select unique names and location dialog will be displayed:
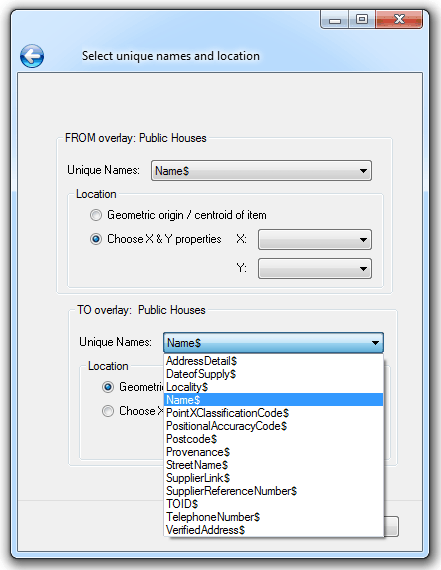
FROM overlay and TO overlay will display the overlays as selected in the previous dialog. In this example both are on the same Public Houses overlay.
The parameters are the same for FROM overlay and TO overlay:
Unique Names
Select the required name from the drop-down list. The drop-down shows all string$ schema items.
Location
Geometric origin / centroid of item
Use this option if the location is the Geometric origin or centroid of the item.
Choose X & Y properties
Enter properties containing valid X and Y data.
Click Next.
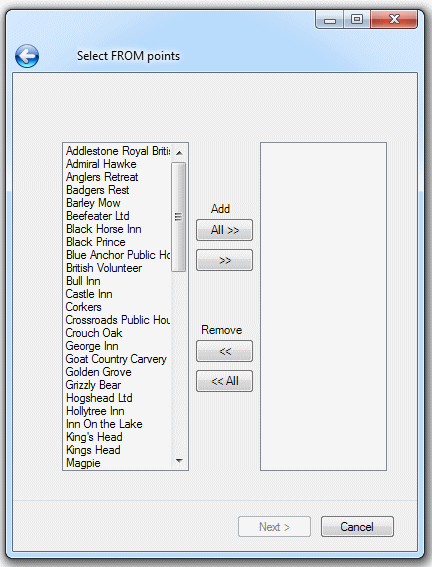
The Select Route Points dialog will be displayed:

Select the FROM and TO locations and click Next.
Note: It is possible that a message to the following effect will be shown. The first is shown when an individual item is too far from the network. The second would be displayed if All have been selected.

If either of these above messages are displayed firstly make sure that the roads network is visible in the map window. However, the normal cause of these messages is that the Snap radius setting in the Select bulk calculation measurement options dialog is too small. These messages give you the opportunity to continue with the current selection(s) and ignore those that are excluded by distance, or you can return to the Select bulk calculation measurement options dialog and adjust the Snap radius.
If you click Yes to the second message a list of locations too far from the network will be shown:
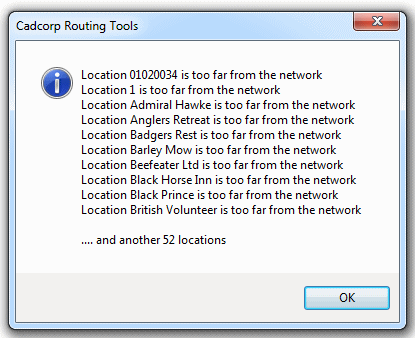
In this case resetting the Snap radius will reduce this list, probably to zero.
When all TO and FROM locations have been selected and any error messages resolved click Next.
The Perform route calculations dialog will be displayed:
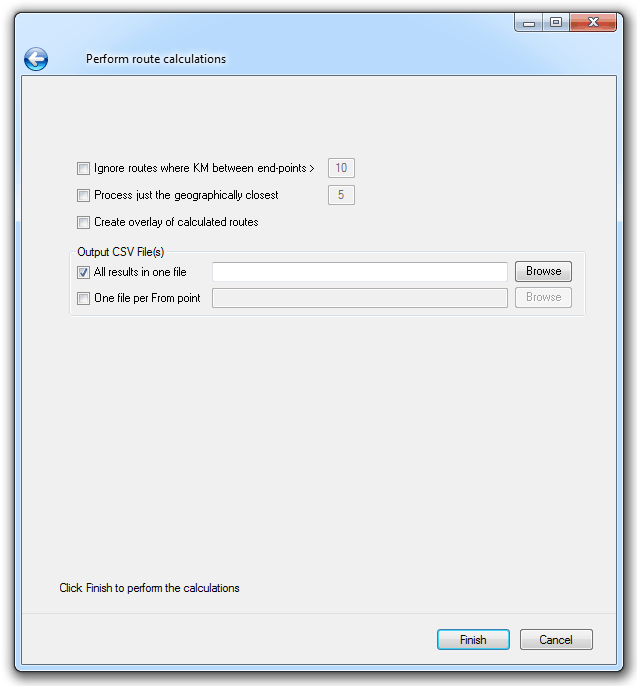
Ignore routes where km between end-points > x
It is important to understand that this limit is applied on the basis of the straight line between the selected FROM and TO points, i.e. ‘as the crow flies’, and not the actual cost of the route as calculated by the routing measurement.
Process just the geographically closest
This option will cause, for each selected FROM point, only routes to the closest N selected TO points to be calculated. But again note that this is based on the straight line between the From and To points and not the route cost as calculated by the routing measurement.
Create overlay of calculated routes
Check this tickbox to create an overlay, called Routes, of the calculated routes.
Output CSV File(s)
All results in one file
Creates the route data as a single CSV file. Click Browse to locate the target file.
One file per From point
Creates the route data as a number of CSV files, one per FROM point. Click Browse to locate the target folder.
Click Finish.
The routing calculation will now be carried out, The progress bar will be shown on the Perform route calculations dialog:
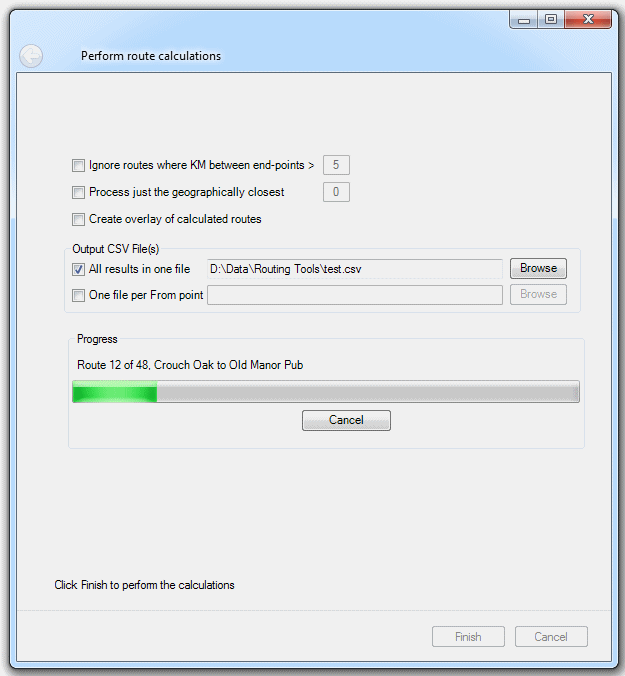
The calculations can be cancelled but note that the cancel button will only interrupt the processing after the current route has been calculated.
The following map window display is the possible result of a Shortest Distance setting (Select overlays for multi-point routing dialog) using the FROM and TO locations in the Select Route Points dialog above.
Note: In most case the bulk calculation mode will be significantly quicker. The limitation with this method is that it cannot create plots of the actual routes calculated and will only draw straight lines between end-points than the Individual calculations mode.
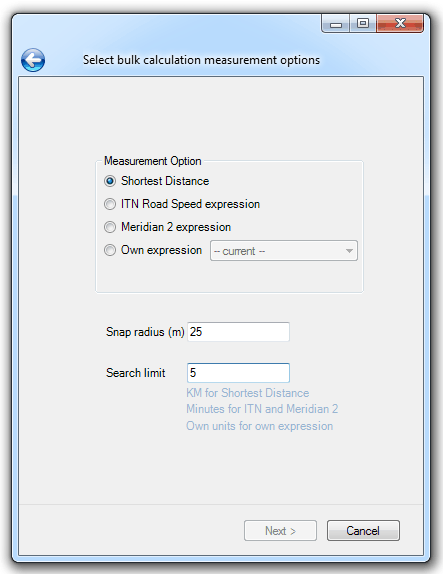
Select bulk calculation measurement options dialog:
Measurement option
This entry depends on the data being used, whether it is ITN, Meridian 2 or your Own expression as set in the Settings dialog.
The other possible option is Shortest Distance, this is the shortest distance as the crow flies between the selected points.
Note: The shortest distance as defined in the Bulk calculation is as the crow flies, this is different to the shortest distance definition in Individual calculation where it uses the road network.
Snap radius (m)
This is the maximum amount in metres by which a point can be snapped. This value can be made as large as you like but the larger the number the greater the possibility that the snap is not to the ‘correct’ location.
Search limit
The search limit varies depending on the data being used and the selection made in Measurement Option:
Click Next.
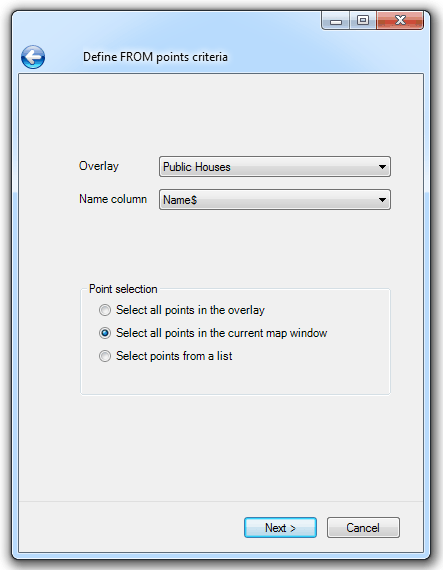
The Define FROM points criteria dialog is displayed:
Select the Overlay and the Name column for the FROM points
Point selection
Choose the required method of FROM point selection.
Select all points in the overlay
All points in the selected overlay.
Select all points in the current map window
All points in the area of the selected overlay displayed in the current map window.
Select points from a list
If this option is selected clicking Next will display the Select FROM points dialog:
Select individual FROM points and click the >> button or click the All >> button to select all.
Note: It is possible that a message to the following effect will be shown. The first is shown when an individual item is too far from the network. The second would be displayed if All have been selected.
If either of these messages are displayed firstly make sure that the roads network is visible in the map window. However, the normal cause of these messages is that the Snap radius setting in the Select bulk calculation measurement options dialog is too small. These messages give you the opportunity to continue with the current selection(s) and ignore those that are excluded by distance, or you can return to the Select bulk calculation measurement options dialog and adjust the Snap radius.
If you click Yes to the second message a list of locations too far from the network will be shown:
In this case resetting the Snap radius will reduce this list, probably to zero.
When all FROM locations have been selected and any error messages resolved click Next to display the Define TO points criteria dialog:
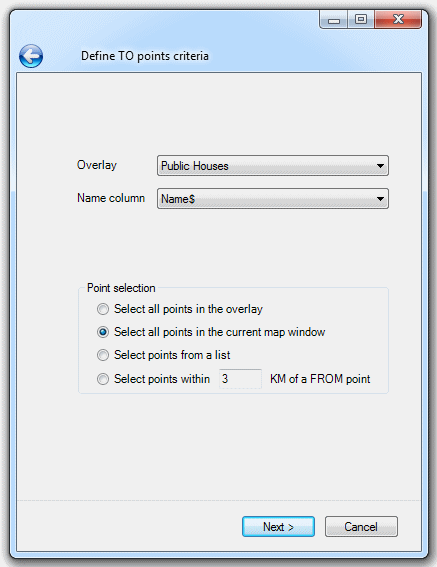
Select the Overlay and the Name column for the TO points
Point selection
Choose the required method of TO point selection.
Select all points in the overlay
All points in the selected overlay.
Select all points in the current map window
All points in the area of the selected overlay displayed in the current map window.
Select points from a list
Allows you to select points from a list.
Selecting this option and clicking Next will display the Select TO points dialog.
The Select TO points dialog is similar to the Select FROM points dialog described above. The TO point selections are made in the same manner as the FROM points and similar messages may be displayed if the Snap radius setting in the Select bulk calculation measurement options dialog is too small.
Select points within X km of a FROM point
Allows you to select points that are within the entered distance in kilometres from FROM points.
Click Next.
The Perform route calculations dialog will be displayed:
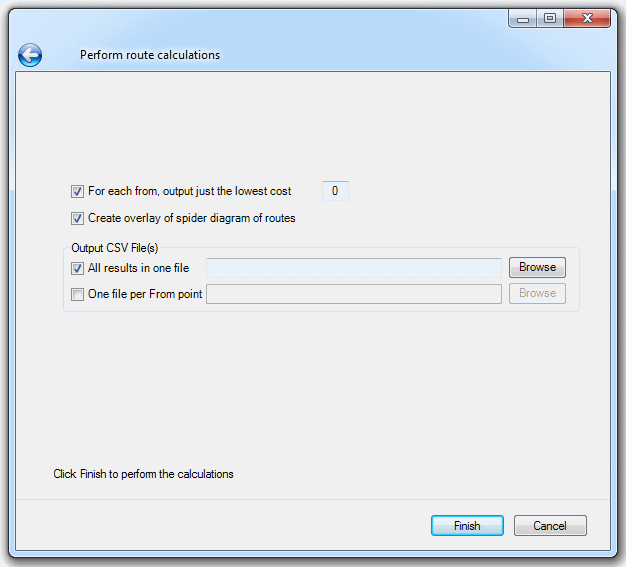
For each from, output just the lowest cost X
Check this tickbox to show just the specified number of the lowest cost routes.
Create overlay of spider diagram of routes
Check this tickbox to create an overlay showing the routes.
Output CSV File(s)
All results in one file
Creates the route data as a single CSV file. Click Browse to locate the target file.
One file per From point
Creates the route data as a number of CSV files, one per FROM point. Click Browse to locate the target folder.
Click Finish.
The new Routes overlay and the CSV file(s) will be created as selected in the Perform route calculations dialog.
The table below shows the output created from the example shown above. The columns are:
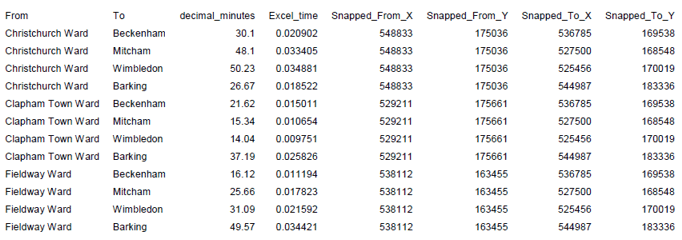
In a distance-based example the columns decimal_minutes and Excel_time are replaced with a column metres.
If the Create overlay of calculated routes tickbox is checked then an internal overlay called Routes will be created containing the LineString items representing the routes calculated.
Send comments on this topic.
Click to return to www.cadcorp.com
© Copyright 2000-2017 Computer Aided Development Corporation Limited (Cadcorp).