 Settings (Routing Settings) Settings (Routing Settings)
Settings allows you to set road speeds for ITN, define your own expression, set no go areas for network routing plus other miscellaneous settings.
Select Settings.
The Routing tools settings dialog will be displayed with the following tabs:
The ITN Road Speeds tab allows you to create an expression for routing based on road-speed values: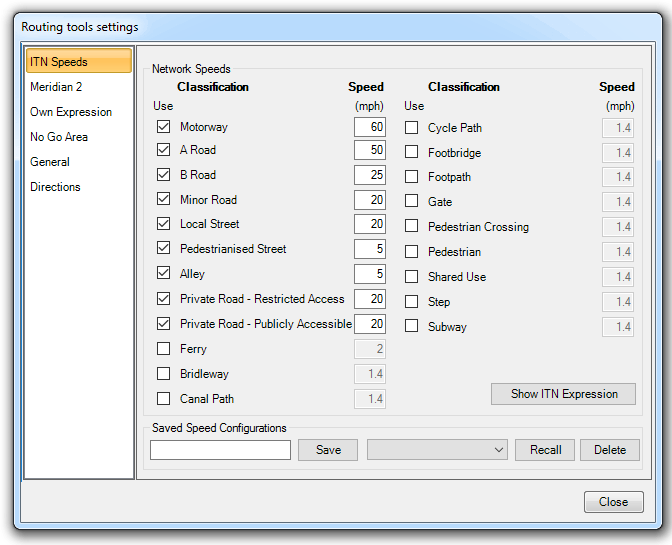
In SIS all the ITN routes are held as topological links with a DescriptiveTerms$ attribute:
Attribute Name: DescriptiveTerms$
Full list of Values: 'Minor Road', 'Local Street', 'B Road', 'A Road', 'Motorway', 'Pedestrianised Street', 'Alley', 'Private Road - Restricted Access', 'Private Road - Publicly Accessible', 'Ferry', 'Footpath'.
These are used for the basis of speed-based routing, e.g. the routing expression embedded within the ITN tools looks at the value of DescriptiveTerms$ for each link and assigns the speed defined in the Routing tools settings dialog.
In the example above, routing would be based on a speed of 60mph for each link classed as a Motorway, 30mph for each link classified as an A Road etc. The length of each link is taken from the link itself, i.e. from the ITN coordinates used to create the link.
Checking the Use tickbox for a particular road classification will cause that classification to be included in the routing expression. If a tickbox is not checked that classification will not be included. For example, if Motorway is not ticked then the routes will not consider Motorways.
Sets of speeds can be saved, e.g. to save a set of ‘Normal’ speeds, enter them in the road speed boxes then enter a name in the box next to Save, e.g. Normal, and click Save. Any number of sets (configurations) can be saved.
To recall a set of speeds, select the name from the Recall drop-down box and click Recall. The set of speeds will be written into the road classification boxes and used by subsequent routing operations if the ITN Road Speeds tab is chosen.
To permanently delete a saved configuration display the name of the configuration in the Recall drop-down box and click Delete.
The Meridian 2 tab allows you to create an expression for routing based on road-speed values:
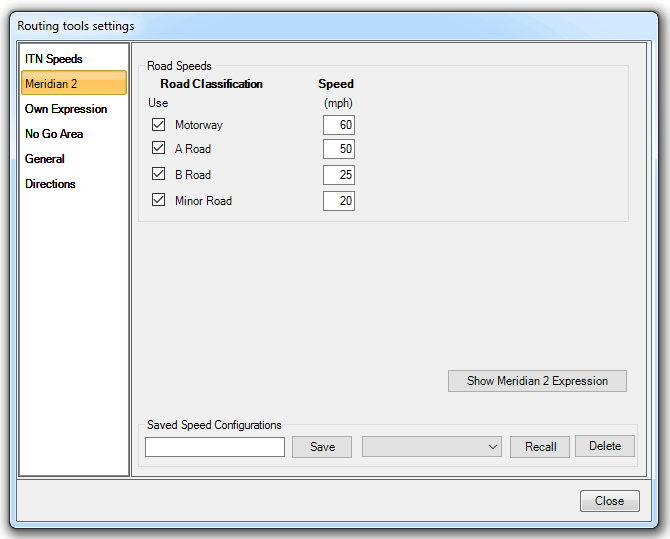
In SIS all the ITN routes are held as topological links with a Desc$ attribute:
Attribute Name: Desc$
Full list of Values: 'Motorway', 'A Road', 'B Road',' 'Minor Road'.
These are used for the basis of speed-based routing, e.g. the routing expression embedded within the Meridian 2 tools looks at the value of Desc$ for each link and assigns the speed defined in the Routing tools settings dialog.
In the example above, routing would be based on a speed of 60mph for each link classed as a Motorway, 50mph for each link classified as an A Road etc. The length of each link is taken from the link itself, i.e. from the Meridian 2 coordinates used to create the link.
Checking the Use tickbox for a particular road classification will cause that classification to be included in the routing expression. If a tickbox is not checked that classification will not be included. For example, if Motorway is not ticked then the routes will not consider Motorways.
Sets of speeds can be saved, e.g. to save a set of ‘Normal’ speeds, enter them in the road speed boxes then enter a name in the box next to Save, e.g. Normal, and click Save. Any number of sets (configurations) can be saved.
To recall a set of speeds, select the name from the Recall drop-down box and click Recall. The set of speeds will be written into the road classification boxes and used by subsequent routing operations if the Meridian 2 tab is chosen.
To permanently delete a saved configuration display the name of the configuration in the Recall drop-down box and click Delete.
If you are not using ITN or Meridian 2 data, or do not want to route using either the shortest distance or ITN Road Speeds o Meridian 2 then you can enter your own expression.
You can either use the Speed-based expression functions to build an expression for a specific overlay or you can enter your own expression directly in the Routing expression box.
You can save an expression with a name so you can recall it later.
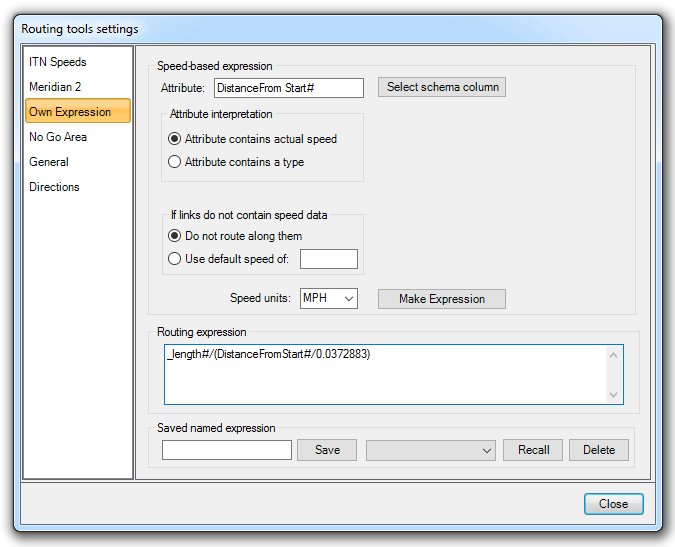
Notes:
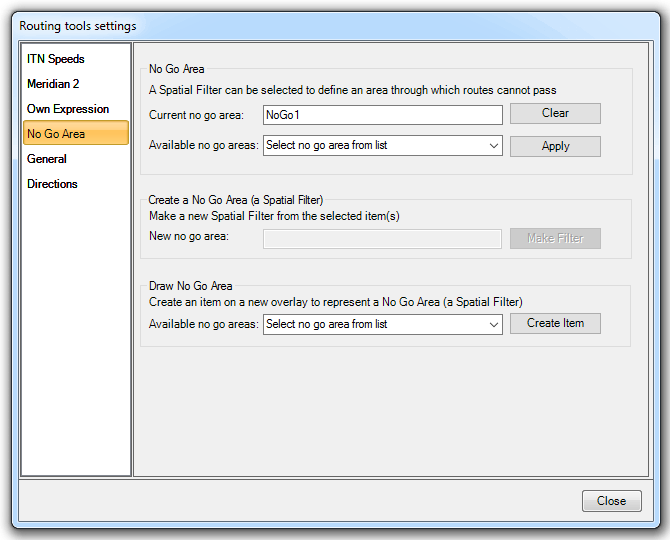
The No Go Area at the top of the Routing tools settings dialog No Go Area tab lets you apply a No Go Area to routing or lift a No Go Area restriction from routing.
To apply a No Go Area:
Notes:
The No Go Area on this tab tells you what No Go Area is currently in effect. To remove this from routing, click the Clear button. Note, this does not remove the spatial filter from the NOL.
Note: The No Go Area is retrieved from the NOL when it is needed. The Routing Tools also remember which No Go Area is in use between commands and sessions.
If you have a No Go Area selected but the relevant named spatial filter cannot be found a Failed message will be shown. This situation can arise if the relevant NOL has not been opened or the NOL was not saved after the spatial filter was created.
It is also possible to draw a No Go Area which is saved in a NOL. The ‘Draw No Go Area’ option will create the selected spatial filter as an item on a new overlay called ‘Recalled No Go Area’.
The two map extracts below show how the shortest distance from A-B can be affected by a No Go Area. The first view shows the shortest route. The second view shows how applying the red No Go Area has changed the shortest route.
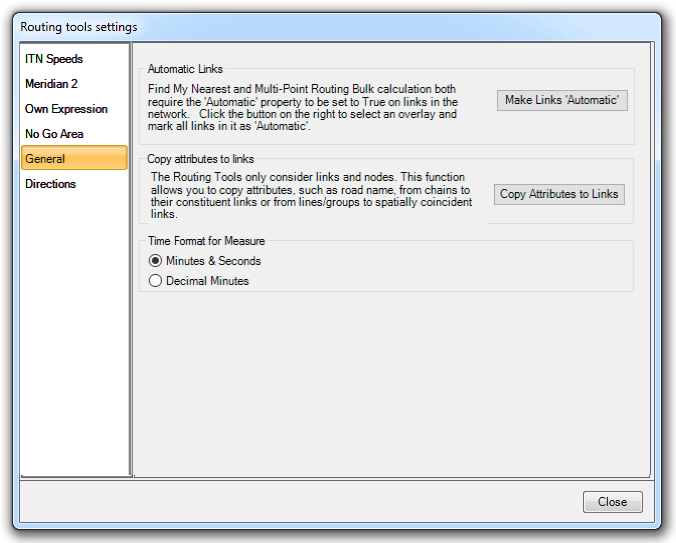
Make Links 'Automatic' - The Nearest command requires the Automatic property to be set to True on all links in the network. Click this button to set all the links to True on the selected network. See Find My Nearest for an example of use.
Copy Attributes to Links - Routing Tools only consider links and nodes. This button allows you to copy attributes, such as road names, from their chains to their constituent links or from LineStrings/groups to spatially coincident links.
The Copy Attributes to Links dialog is displayed:
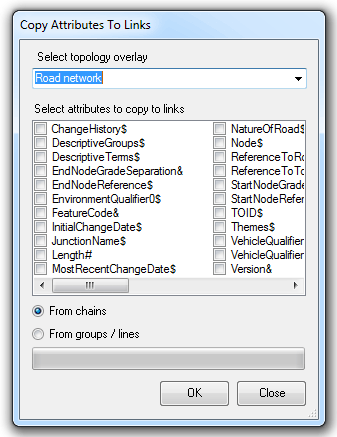
The topological overlay can be selected from the drop-down box and the required attributes to be copied to links selected.
It is possible to set which attributes can be used to define Road Name and/or Road Number so Route Directions can be used on data other than ITN or Meridian 2.
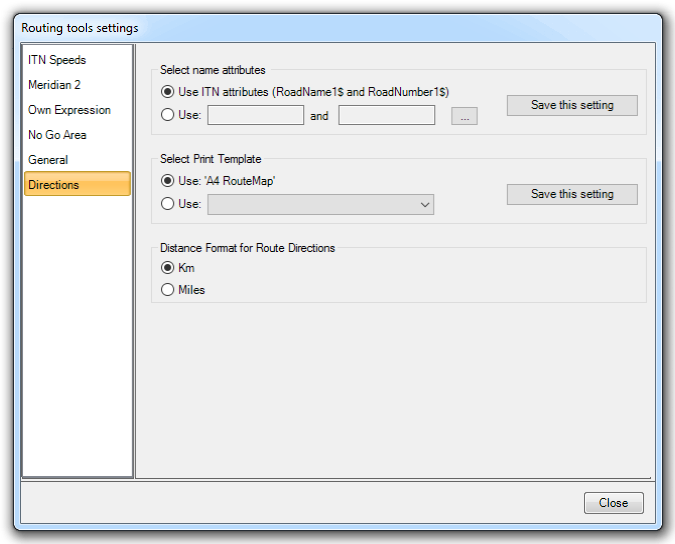
Similarly, it is also possible to specify an alternative print template.
Send comments on this topic.
Click to return to www.cadcorp.com
© Copyright 2000-2017 Computer Aided Development Corporation Limited (Cadcorp).
