This topic provides an example of creating a simple .NET "In-process" GisLink Application.
The complete code used for this example is available as a text file which can be copied and modified as required. To access this page click here.
Notes:
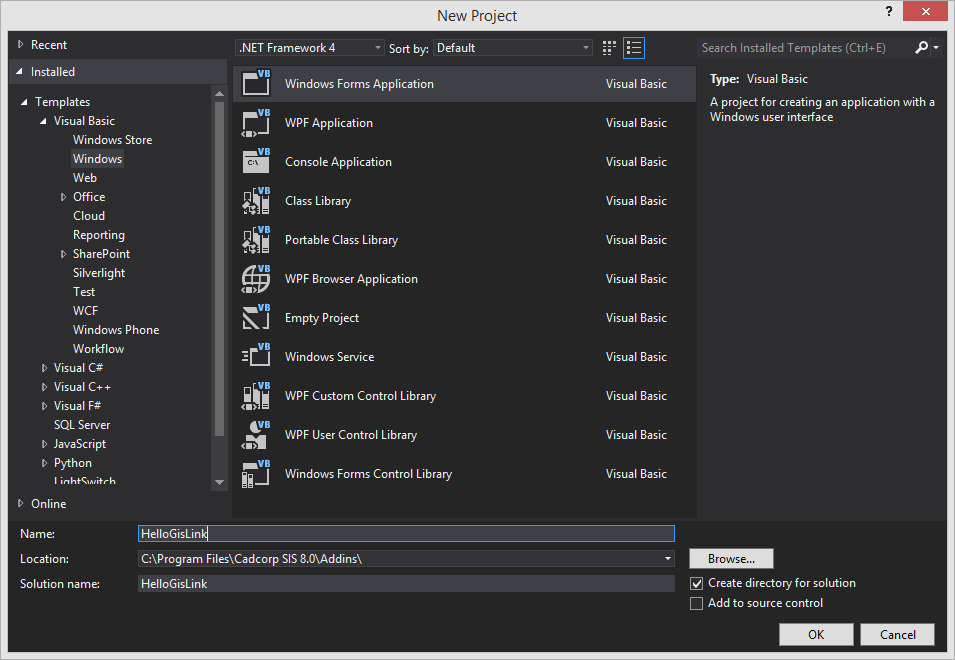
In Visual Studio select New Project....
The New Project dialog will be displayed:
Click image to enlarge
In the New Project dialog select Visual Basic > Windows > Windows Forms Application
Click Browse and set the project location to the Cadcorp SIS Addins folder, i.e. C:\Program Files\Cadcorp SIS 8.0\Addins\.
When development is complete the project folder can be moved if required and a shortcut made to the new location.
Note: Setting the path to the Cadorp folder would require Visual Studio to be run as an administrator.
Enter HelloGisLink in both the Name and Solution name fields of the dialog.
Click OK.
In the Solution Explorer panel right click HelloGisLink and select Properties. The HelloGisLink Properties page will be displayed:
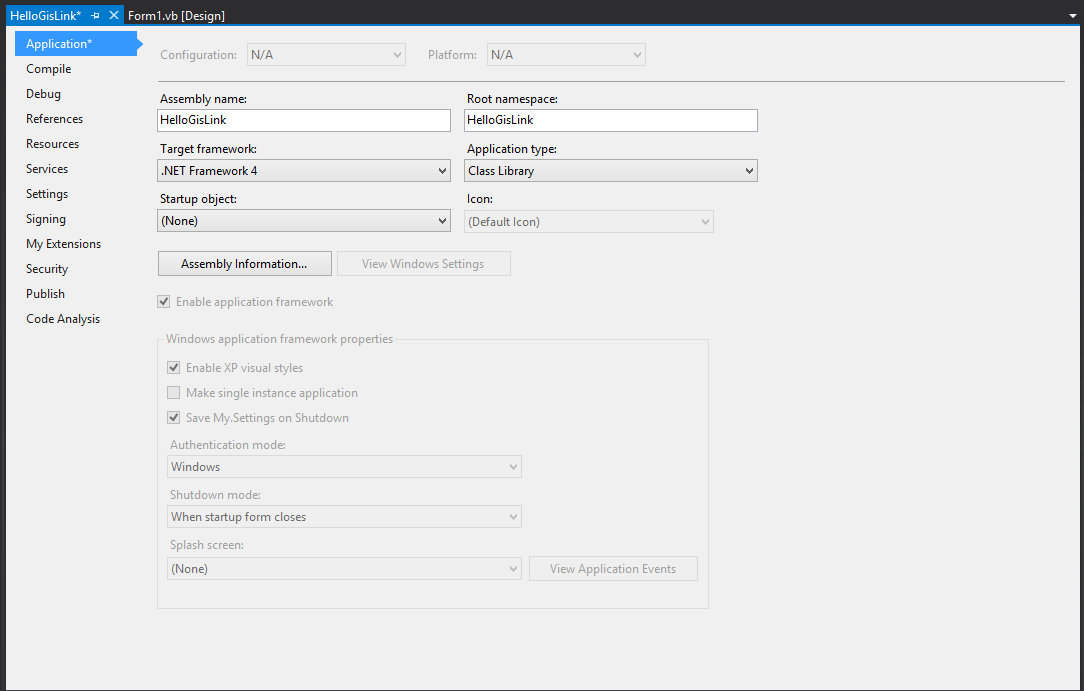
Click image to enlarge
Application tab:
The Target framework should be set to .NET Framework 4.
Set Application type to Class Library.
All other entries can be left at their default settings.
Debug tab:
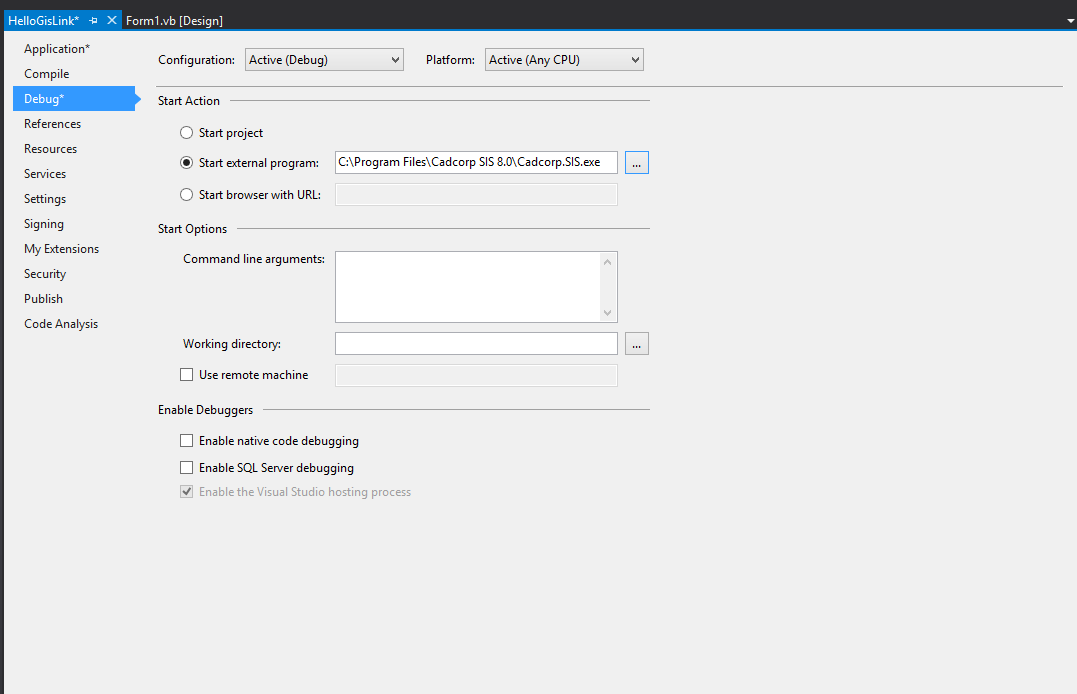
Click image to enlarge
Under Start Action select the Start external program radio button, navigate to your Cadcorp installation folder and select Cadcorp.SIS.exe.
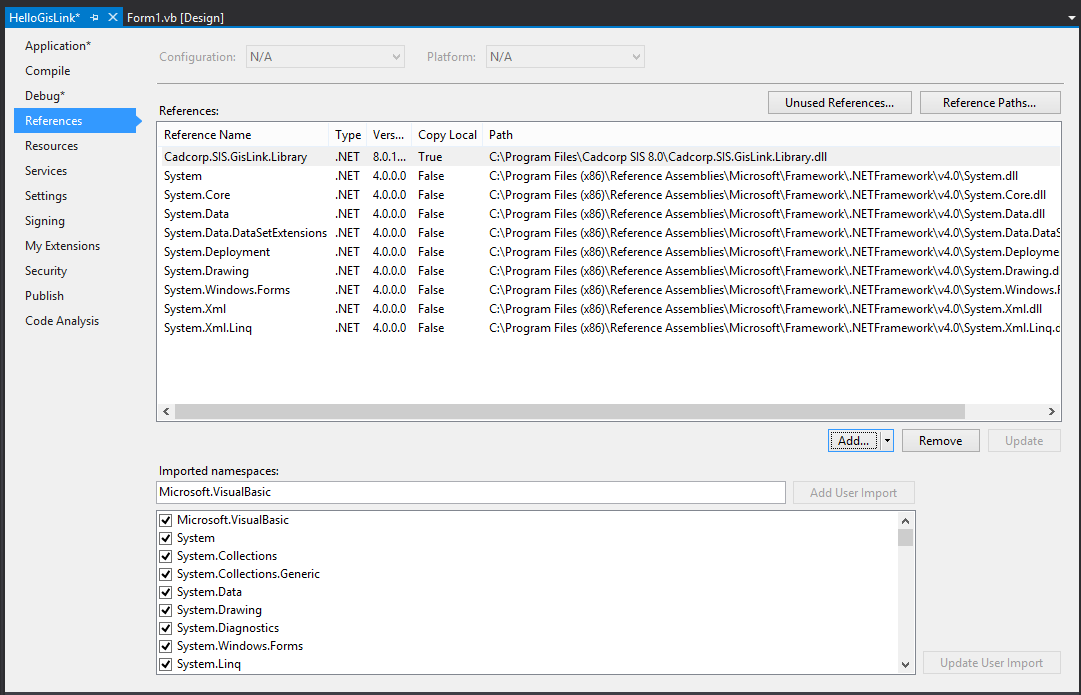
References tab:

Click image to enlarge
Select Add…. Click Browse and navigate to the folder where Cadcorp SIS is Installed. Select Cadcorp.SIS.GisLink.Library.dll and click Add.
The file will appear in the Reference Manager window:

Click image to enlarge
Make sure the Cadcorp.SIS.GisLink.Library.dll tickbox in the Name column is checked.
Click OK.
Setup is now complete and the Properties tab can be closed for now.
Right click HelloGisLink (in the Solution Explorer panel) – Select Add – Select Class…
The Add New Item dialog will be displayed:
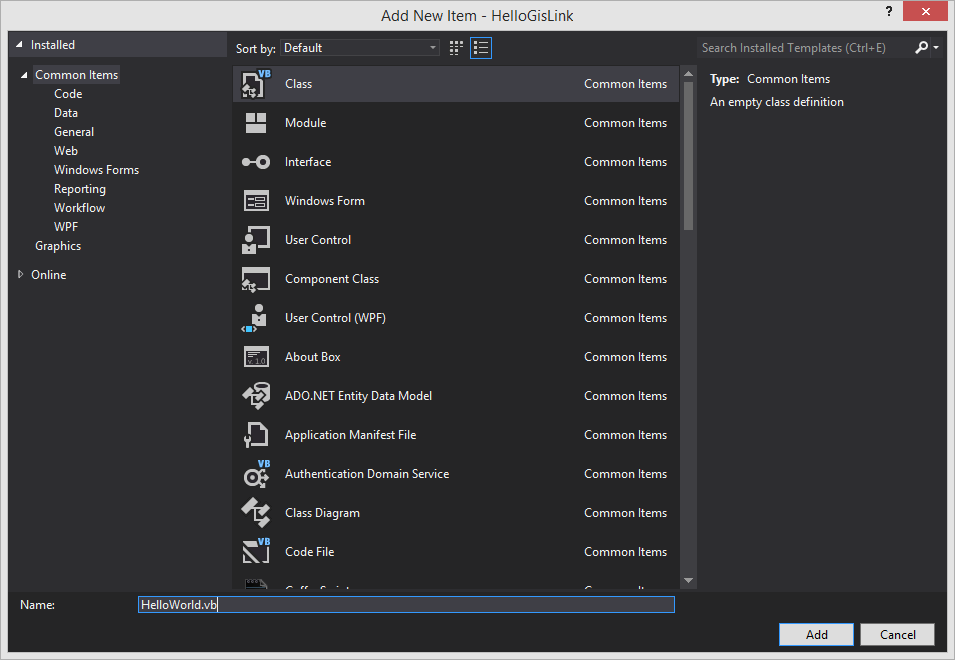
Click image to enlarge
In the Name field enter the class HelloWorld – click Add.
Now add some imports to the HelloWorld class:
Imports Cadcorp.SIS.GisLink.Library
Imports Cadcorp.SIS.GisLink.Library.Constants
Imports System.Windows.Forms
Below the imports and before your HelloWorld class add the following attribute, during start up SIS will look for this attribute to load your Addin.
<GisLinkProgram("HelloGislink")> _
Once you have done this the following code can be added inside your HelloWorld Class:
Public Shared APP As SisApplication

    Private Shared _sis As Cadcorp.SIS.GisLink.Library.MapManager

    Public Shared Property SIS As Cadcorp.SIS.GisLink.Library.MapManager
        Get
            If _sis Is Nothing Then _sis = APP.TakeoverManager
            Return _sis
        End Get
        Set(ByVal value As Cadcorp.SIS.GisLink.Library.MapManager)
            _sis = value
        End Set

    End Property
The code will now appear as below:
Imports Cadcorp.SIS.GisLink.Library
Imports Cadcorp.SIS.GisLink.Library.Constants
Imports System.Windows.Forms

<GisLinkProgram("HelloGislink")> _
Public Class HelloWorld
    Public Shared APP As SisApplication

    Private Shared _sis As Cadcorp.SIS.GisLink.Library.MapManager

    Public Shared Property SIS As Cadcorp.SIS.GisLink.Library.MapManager
        Get
            If _sis Is Nothing Then _sis = APP.TakeoverManager
            Return _sis
        End Get
        Set(ByVal value As Cadcorp.SIS.GisLink.Library.MapManager)
            _sis = value
        End Set

    End Property

End Class
This code will not do anything you can see but it forms the foundation for your GisLink app.
Select the Build drop-down menu – Select Build Solution.
If the build failed then go back and check what you have done so far.
If the build succeeded you now need to find the HelloGislink.dll.
The General tab screen will show the location of the dll:
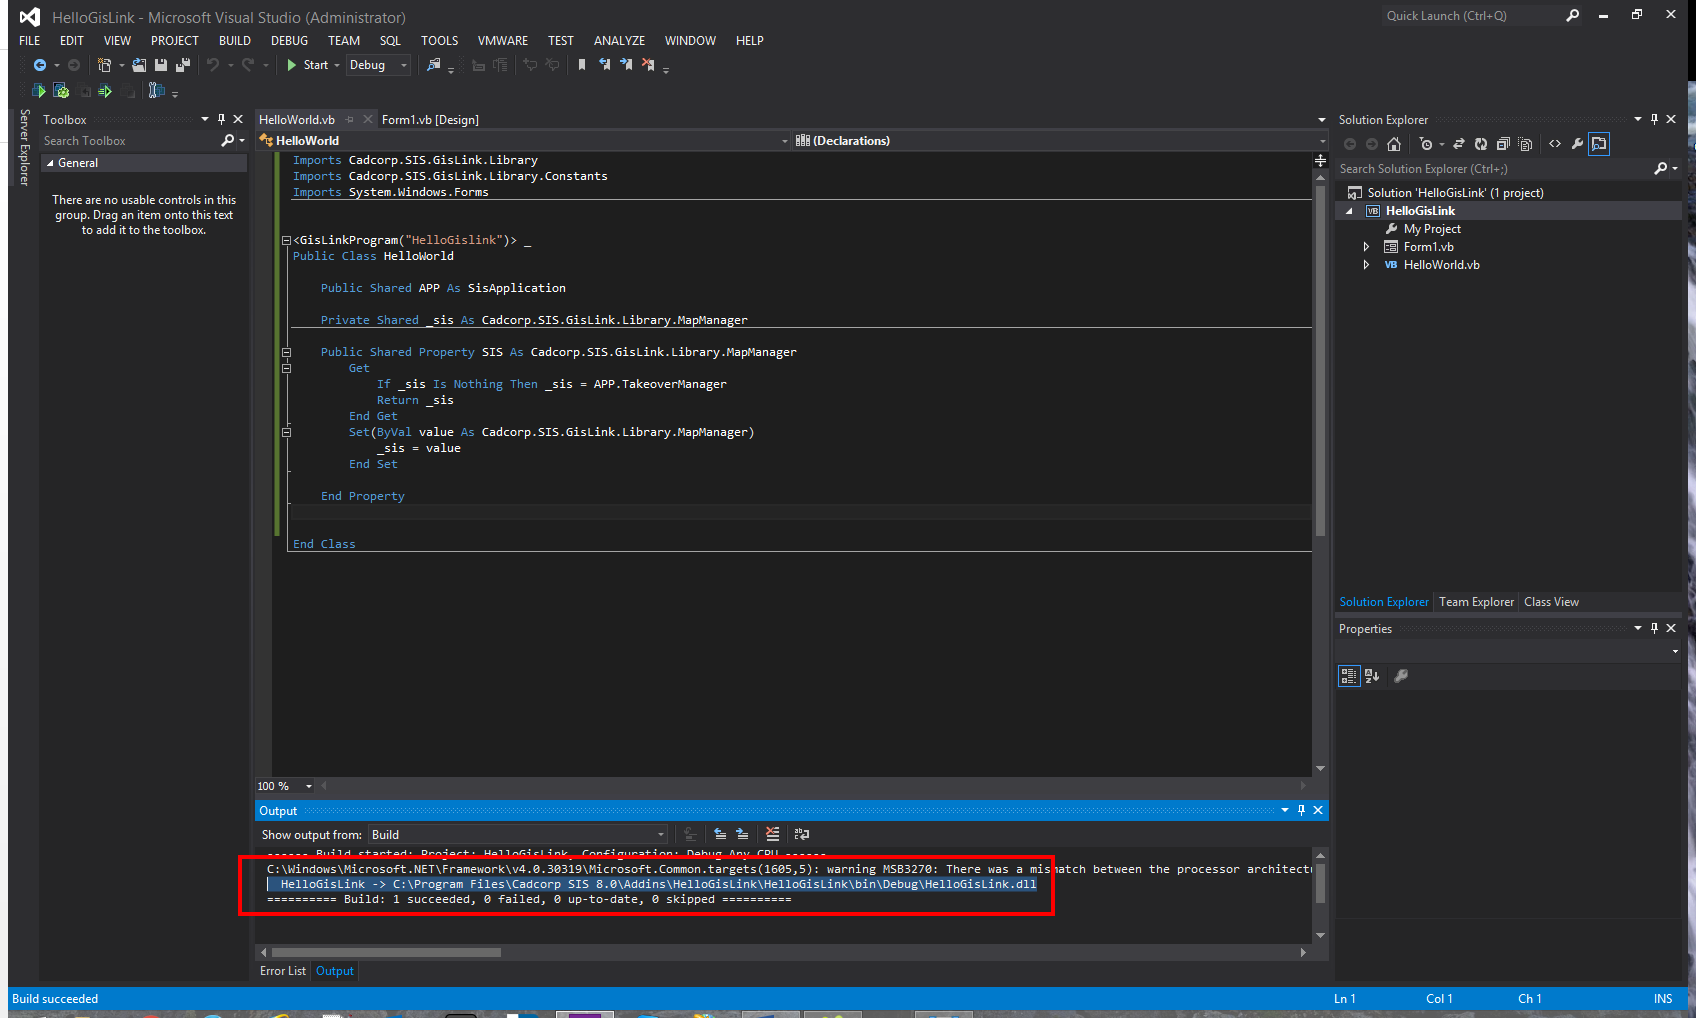
Click image to enlarge
Select HelloGislink.dll, right click and select Create shortcut. Copy this shortcut into the Custom folder located in the SIS installation folder. This is the conventional way of managing GisLink applications in SIS.
Having set up Visual Studio and developed the basis for a GisLink application some UI features can be added
Below End Property add the following new sub procedure:
Public Sub New(ByVal SISApplication As SisApplication)

        APP = SISApplication

        ' This is the application group in Cadcorp SIS desktop Applications Tab
        Dim group As SisRibbonGroup = APP.RibbonGroup
        group.Text = "HelloGislink"

        ' Define a large command button
        Dim BigButton As SisRibbonButton = New SisRibbonButton("Big Button")
        BigButton.LargeImage = True
        BigButton.Help = "Help Text"
        BigButton.Description = "Descriptive Text"
        ' Add the button to the main add-in group
        group.Controls.Add(BigButton)

    End Sub
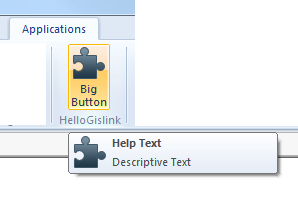
This will add a group container to the SIS Applications tab and fill it with a large button called Big Button. If you hover the mouse over the large button Help Text and Descriptive text will appear
Build the solution and start SIS. The new container and large button should appear in the Applications tab:
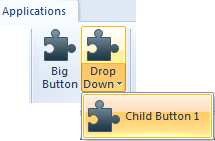
Now add a drop down button with the following code. Place this code below group.Controls.Add(BigButton)
    Dim DropDownButton As SisRibbonButton = New SisRibbonButton("Drop Down")
    DropDownButton.LargeImage = True
    Dim ChildButton1 As SisRibbonButton = New SisRibbonButton("Child Button 1")
    ChildButton1.LargeImage = True
    DropDownButton.SubItems.Add(ChildButton1)
    group.Controls.Add(DropDownButton)
Build the solution and check that is working in SIS (make sure you check the Applications tab):
Now add a container group for a selection of small buttons, add the following to your Hello World Class (below the code for the drop down menu).
World Class (below the code for the drop down menu).
' A container for a group of small buttons
        Dim smallGroup1 As SisRibbonControlGroup = New SisRibbonControlGroup
        ' Populate the first small button group
        Dim SmallButton1 As SisRibbonButton = New SisRibbonButton("My Small Button")
        SmallButton1.Help = "Help Text"
        SmallButton1.Description = "Descriptive Text"
        smallGroup1.Controls.Add(SmallButton1)

        Dim SmallButton2 As SisRibbonButton = New SisRibbonButton("My Small Button")
        SmallButton2.Help = "Help Text"
        SmallButton2.Description = "Descriptive Text"
        smallGroup1.Controls.Add(SmallButton2)

        Dim SmallButton3 As SisRibbonButton = New SisRibbonButton("My Small Button")
        SmallButton3.Help = "Help Text"
        SmallButton3.Description = "Descriptive Text"
        smallGroup1.Controls.Add(SmallButton3)
        ' Add the button group to the main add-in group
        group.Controls.Add(smallGroup1)
Again save and build the solution, check it is working in SIS.
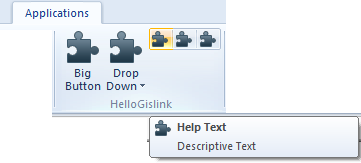
A basic SIS GisLink User Interface has now been created:
You have produced a simple UI for your Gislink Addin, now proceed to add some functionality. If you haven’t already done so find or create your own SWD, you will need this to test your functions.
Add the following sub statement to your HelloWorld class.
Private Sub AddSomeData(ByVal sender As Object, ByVal e As SisClickArgs)

        'make an object from e.MapManager
        SIS = e.MapManager

        'the first parameter provides a file path the second determines if the swd is
        'is loaded as a editable or read only. 0 = editable 1 = read-only
        SIS.SwdOpen("C:\your file path\yourSWD.swd", 0)

        'release the control over SIS
        SIS.Dispose()
        SIS = Nothing

    End Sub
This will Load the SWD as defined above into SIS, but you need a way to run it.
Go back to the BigButton you made at the start
The line of code where the button is defined should look like this
Dim BigButton As SisRibbonButton = New SisRibbonButton("Big Button")
It needs a click handler, modify the line so that it looks like this
Dim BigButton As SisRibbonButton = New SisRibbonButton("Big Button", New SisClickHandler(AddressOf AddSomeData))
Build and test in SIS, if you click BigButton SIS will automatically load your desired SWD.
Now add some functionality to the loaded SWD. This is a simple example but it should give you an idea of the kind of flexibility and power that GisLink addins can have. Add the following sub statement to your HelloWorld class
Private Sub ExportImages(ByVal sender As Object, ByVal e As SisClickArgs)

        SIS = e.MapManager

        '              file path, resolution of the output image
        SIS.ExportGif("c:\your path here\map.gif", 600, 400)
        SIS.ExportPng("c:\your path here\mapb.png", 1024, 1024)
        SIS.ExportJpeg("c:\your path here\mapd.jpg", 1024, 1024)

        SIS.Dispose()
        SIS = Nothing

    End Sub
Add the appropriate click handler to your drop down menu you made earlier, it should look something like this:
Dim ChildButton1 As SisRibbonButton = New SisRibbonButton("Child Button 1", New SisClickHandler(AddressOf ExportImages))
Start SIS and select the View tab. In the Show/Hide group tick Developer. Select the small arrow in the bottom right corner of the Developer Control Bar window to show the right-hand pane of the control bar. Test your new functionality and confirm the GisLink function is displayed in the right-hand pane.
It is good practice to surround functionality with try and catch blocks just in case anything goes wrong. This will then look something similar to the following:
Private Sub ExportImages(ByVal sender As Object, ByVal e As SisClickArgs)

        SIS = e.MapManager

        Try

            '              file path, resolution  of the output image
            SIS.ExportGif("c:\testSWD\map.gif", 600, 400)
            SIS.ExportPng("c:\testSWD\mapb.png", 1024, 1024)
            SIS.ExportJpeg("c:\testSWD\mapd.jpg", 1024, 1024)

        Catch ex As Exception
        End Try

        SIS.Dispose()
        SIS = Nothing

    End Sub
Add try and catch blocks to both your functions.
You should now have everything you need to begin developing your own GisLink applications.
Once you are satisfied with your GisLink application you can select the Build drop-down tab and select Configuration Manager. In the Configuration Manager dialog open the Active solution configurations drop-down and select Release. Open the Active solution platform drop-down and select the architecture that matches your SIS installation (the lib you referenced at the start of this procedure) if the lib has x86 in the name it is 32bit if not it is 64bit). Remember to create a new shortcut in the Custom folder.
Send comments on this topic.
Click to return to www.cadcorp.com
© Copyright 2000-2017 Computer Aided Development Corporation Limited (Cadcorp).