The means of adding an ActiveX Control will be specific to the ActiveX Control Container program being used. If the desired ActiveX Control Container does not appear here then consult its documentation.
Note: An ActiveX Control design-time licence is required in order to create applications.
All ActiveX applications and GisLink Add-Ins should target .NET Framework 4.5.
Cadcorp SIS ActiveX applications must target either x86 or x64 systems. These applications will not work with ‘Any CPU’.
Use the Visual Studio.NET Build Configuration Manager to set the project’s target platform to x86 or x64.
When referencing the Cadcorp SIS ActiveX component it is necessary to select the relevant x86 or x64 installation.
Because Visual Studio is a 32-bit application, it can be awkward to create an application from scratch using the 64-bit SIS COM component. It is therefore recommended that you construct your ActiveX application using 32-bit SIS. If you require a 64-bit application then create this from the working 32-bit project as follows:
The recommended way to do this is to use the Visual Studio Form Designer:
Note: If you encounter problems at step 4 it is worth trying the following:
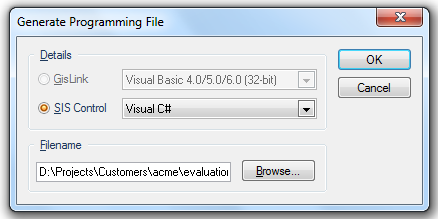
Many SIS methods take parameters as arguments so it is necessary to add a file of SIS Constants to your project.
Right click In the right-hand pane of the Developer Control Bar and select Generate Programming File….
Add the resultant file to your Visual Studio project.
To check for a licence you need to supply:
You also need to decide whether to check for a local licence or a network licence.
The function below performs a licence check at Modeller level; it checks for either the server defined in CADCORP_LICENCE_SERVER_LIST or for a local licence.
        private bool isLicenced()
        {
            bool result = false;

            sis.LicenceKey = "PutYourLicenceKeyHere";
            sis.LicenceSuffix = "PutYourLicenceSuffixHere";

            // see if CADCORP_LICENCE_SERVER_LIST is set
            string sysVarLshost = Environment.GetEnvironmentVariable("CADCORP_LICENCE_SERVER_LIST");
            if (string.IsNullOrWhiteSpace(sysVarLshost))
            {
                // CADCORP_LICENCE_SERVER_LIST not set so set for local licence
                sis.SetStr(Cadcorp.SIS.Constants.SIS_OT_SYSTEM, 0, "_SentinelRMSServerList$", "no-net");
            }
            else
            {
                // CADCORP_LICENCE_SERVER_LIST set so set which server for licence
                sis.SetStr(Cadcorp.SIS.Constants.SIS_OT_SYSTEM, 0, "_SentinelRMSServerList$", sysVarLshost);
                // allow for a longer timeout
                sis.SetInt(Cadcorp.SIS.Constants.SIS_OT_SYSTEM, 0, "_SentinelRMSTimeoutInterval&", 60);
            }

            // try to set the licence level
            sis.Level = Cadcorp.SIS.Constants.SIS_LEVEL_MODELLER;
            if (sis.Level == Cadcorp.SIS.Constants.SIS_LEVEL_MODELLER) result = true;

            return result;
        }
A file can be loaded into the SWD with either the InsertDataset method (results in a new read-only overlay) or the ImportDataset method (results in a new editable copy of the dataset). Multiple files can be loaded into multiple overlays in the SWD by repeatedly calling the relevant method.
The following code inserts an open streetmap tile (hardcoded file name) into the swd on top of any existing overlays:
int overlayNo = sis.GetInt(Cadcorp.SIS.Constants.SIS_OT_WINDOW, 0, "_nOverlay&");
sis.InsertDataset(@"d:\temp\acme\map.osm", (short) overlayNo);
These files load with their own in-built projection.
Shape files are loaded the same way as any file-based dataset, i.e. see section above for Open Streetmap. If there is no .prj present then the files will load in as the current projection – which will be WGS84 unless specified otherwise.
A dataset can be re-projected after loading by setting the dataset projection using the method:
sis.SetDatasetPrj(datasetNo, ProjectionString)
However, this must be used with care and an understanding of the units in the dataset.
Some examples how to use this method are:
sis.SetDatasetPrj(datasetNo, "WGS 84.World Mercator”)
sis.SetDatasetPrj(datasetNo, "ETRS89.ETRS-LCC-EPSG-3034”)
sis.SetDatasetPrj(datasetNo, "OSGB 1936.British National Grid”)
Note: These examples are for illustration purposes only and may not be generically useful.
These are overlay properties of type double and can be set thus:
sis.SetFlt(Cadcorp.SIS.Constants.SIS_OT_OVERLAY, overlayNo, "_scalemin#", 2500.0);
sis.SetFlt(Cadcorp.SIS.Constants.SIS_OT_OVERLAY, overlayNo, "_scalemax#", 500000.0);
The view scale can be set as shown:
sis.SetFlt(Cadcorp.SIS.Constants.SIS_OT_ WINDOW, 0, "_displayScale#", double_value);
The view extent can be set thus:
sis.SetViewExtent(x1, y1, 0, x2, y2, 0);
To change the centre of the view you calculate a new extent and set that.
Note: Extent and scale are not independent. If you change the scale then the extent also changes and vice-versa.
The current view can be exported to a file using any of the following methods:
sis.ExportBds
sis.ExportBmp
sis.ExportEcw
sis.ExportGif
sis.ExportJpeg
sis.ExportPng
sis.ExportRaster
sis.ExportTiff
sis.ExportWmff
Send comments on this topic.
Click to return to www.cadcorp.com
© Copyright 2000-2017 Computer Aided Development Corporation Limited (Cadcorp).