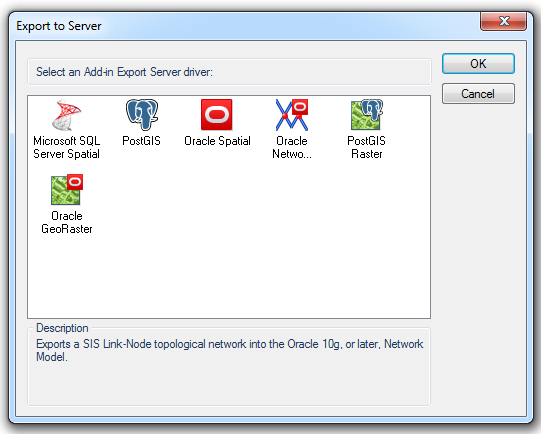
Export to Server [File-Export] exports the spatial feature and its attributes to a database.
Note: You should ensure that the target database has been correctly set up before exporting data to it. Check with your database administrator if in doubt.
 Microsoft SQL Server Spatial
Exports SIS data into a table in Microsoft SQL Server Spatial using the SQL Server 2008, or later, Spatial implementation.
Ensure that the data you want to export is in an internal overlay. Check that the names of the overlay and the schema column are compatible with Microsoft SQL Server default naming conventions. Ensure that the data conforms to the OpenGIS Simple Features Specification. Adjust the schema to suit your requirements. See Exporting to Microsoft SQL Server for details of Microsoft SQL Server naming conventions.
.png)
Enter the following:
Server
Select a server name from the drop-down list, or type the location of the server where the database you want to access is located. Selecting the database on the server is a separate action. Click Refresh to refresh the list.
Use Windows NT Integrated security
Select if the provider is to request a secure (or trusted) connection to a Microsoft SQL Server running in Windows NT. When selected, SQL Server uses integrated login security to establish connection using this data source, regardless of the current login security mode at the server. Any login ID or password supplied is ignored. The SQL Server system administrator must have associated your Microsoft Windows network ID with a SQL Server login ID.
Use a specific user name and password
Select to use a supplied user name and password to authenticate your logon information to the data source.
User name
The user ID to use for authentication when you log on to the data source.
Password
The password to use for authentication when you log on to the data source.
Save password in Options database (encrypted)
Check this tickbox if you want SIS to store the password in the Options database. The password will be stored in encrypted form for security.
Database
Type the database name that you want to access or select it from the drop-down box.
Click Next.
The SIS Overlay dialog will be displayed:
Select the required overlay to export to an SQL Server Spatial Layer, and click Next.
The SQL Server Spatial Layer dialog will be displayed:
Enter the following:
Table Name
The name of the SQL Server spatial layer/table defaults to the overlay name. You can change this to any SQL Server compliant table name.
Geometry Column
The name for the column in the table is GEOMETRY, and is type GEOMETRY.
Feature ID Column:
The name of the Feature ID column.
Create a Spatial Index
Check this tickbox if you wish to create a spatial index to optimize spatial queries.
Use Extents of Data as Bounding Box
By default the extents used to create the spatial index covers the extents of the Coordinate Reference System. If instead you wish to use the overlay extents check this tickbox.
Click Finish to start loading data.
 PostGIS
Exports SIS data into a table in POSTgreSQL using the PostGIS Spatial Object-Relational Model.
Ensure that the data you want to export is in an internal overlay. Check that the names of the overlay and the schema column are compatible with PostGIS default naming conventions. Ensure that the data conforms to the OpenGIS Simple Features Specification. Adjust the schema to suit your requirements. See Exporting to PostGIS for details of PostGIS naming conventions.
Users should ensure that the overlay being exported is compatible with the existing PostGIS table. SIS will not add new attributes if the table definitions do not match.
When appending large volumes of data, PostGIS recommend that indexes on the target table are dropped and recreated after the append process has completed. This allows for faster uploading, and ensures that the spatial index does not degrade. Contact your database administrator for details.
Enter the following:
Host
The PostgreSQL database server host.
Port number
The PostgreSQL database server port.
Database
Specify the database name to connect to.
User name
The PostgreSQL database user name.
Password
The password for the specified PostgreSQL user name.
Click Next.
The SIS Overlay dialog will be displayed:
Select the required overlay to export to a PostGIS Spatial Layer, and click Next.
The PostGIS Spatial Layer dialog will be displayed:
Select either:
If you selected Create a new PostGIS Spatial Layer, click Next and the PostGIS Spatial Layer Properties dialog will be displayed:
Enter the following:
Layer Table Details
Table Name:
The name of the PostGIS spatial layer defaults to the overlay name. You can change this to any PostGIS compliant table name.
Geometry Column
The name for the column in the PostGIS table is GEOMETRY, and is type geometry. The name of the column can be changed.
Geometry ID Column
The name of the ID column.
Co-ordinate System
The coordinate system associated with the spatial layer defaults to the coordinate system for the overlay.
Create a Spatial Index
Check this tickbox if you wish to create a spatial index to optimize spatial queries.
Details...
Click the Details... button to display the Co-ordinate System Details dialog:
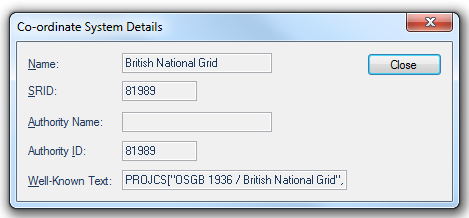
Click Close.
Click Finish.
If you selected Append to an existing PostGIS Spatial Layer select the existing layer from the list in the PostGIS Spatial Layer dialog, and click Finish.
.png) Oracle Spatial
Oracle SpatialExports SIS data into a table in Oracle using the Oracle 9i, or later, Spatial Object-Relational Model.
Ensure that the data you want to export is in an internal overlay. Check that the names of the overlay and the schema column are compatible with Oracle naming conventions. Ensure that the data conforms to the OpenGIS Simple Features Specification. Adjust the schema to suit your requirements. See Exporting to Oracle for details of Oracle naming conventions.
Users should ensure that the overlay being exported is compatible with the existing Oracle table. SIS will not add new attributes if the table definitions do not match.
When appending large volumes of data, Oracle recommend that indexes on the target table are dropped and recreated after the append process has completed. This allows for faster uploading, and ensures that the spatial index does not degrade. Contact your database administrator for details.
.gif)
Enter the following:
User name
The Oracle user name.
Password
The password for an Oracle username.
Server
The Oracle server to use. This name is sometimes referred to as the 'Net Service Name' or 'Host String'.
The Select SIS Overlay dialog will be displayed:

Select the required overlay to export to an Oracle Spatial Layer, and click Next.
The Select Oracle Spatial Layer dialog will be displayed:
Select either:
If you selected Create a new Oracle Spatial Layer, click Next and the Configure Oracle Spatial Layer dialog will be displayed:
Enter the following:
Name
The name of the Oracle spatial layer defaults to the overlay name. You can change this to any Oracle compliant table name.
Geometry Column
The name for the column in the Oracle table is GEOMETRY, and is type MDSYS.SDO_GEOMETRY. The name of the column can be changed.
Co-ordinate system
The coordinate system associated with the spatial layer defaults to the coordinate system for the overlay.
Create a Spatial Index
Check this tickbox if you wish to create a spatial index to optimize spatial queries.
Details
Click the Details button to display the Co-ordinate System Details dialog:
Click Finish
If you selected Append to an existing Oracle Spatial Layer select the existing layer from the list in the Select Oracle Spatial Layer dialog, and click Finish.
 Oracle Network Model
Exports a SIS Link-Node topological network into the Oracle Network Model.
.gif)
Enter the following:
User name
The Oracle user name.
Password
The password for the Oracle username.
Server
The Oracle server to use. This name is sometimes referred to as the 'Net Service Name' or 'Host String'.
Save password in Options database (encrypted)
Check this tickbox if SIS should store the password in the Options database. The password will be stored in encrypted form for security.
Click Next.
The SIS Overlays dialog will be displayed:
Select the overlays to export as an Oracle Network and click Next.
The Network Properties dialog will be displayed:
Enter the following:
Network details
Name
The name for the spatial layer being created in Oracle.
Co-ordinate System
SIS will automatically detect the coordinate system of the overlay being exported.
Direction
This parameter gives the option to add directions to the network, or alternatively ignore any directions.
Consider for example the following as the non-directed data:
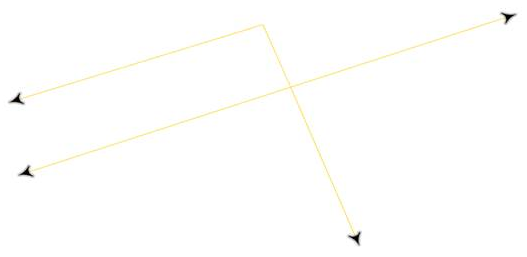
The Direction entries will be as follows:
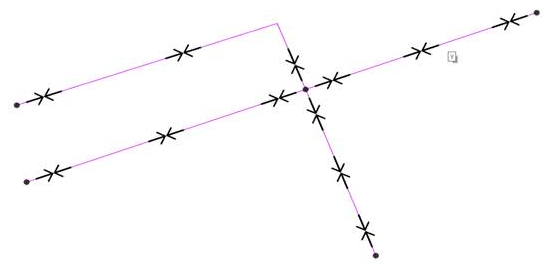
Directed
This option adds a direction to links in BOTH WAYS:
Undirected
This option will ignore any directions you may have.
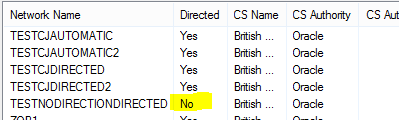
Automatic detection by examination of link attributes.
in the following table the network TESTNODIRECTIONDIRECTED is listed as not directed. In this case the data will look the same as the original. No directions added.
Create Spatial Indices
Check this tickbox to create spatial indices to facilitate searches.
Details...
Click to display the Co-ordinate System Details dialog:
Table names
Automatic naming
Tick for SIS to provide names.
Table name
Nodes and Links if Automatic naming is not selected.
Geometry column
Nodes and Links if Automatic naming is not selected.
Cost column
Nodes and Links if Automatic naming is not selected. The Cost column refers to the cost of the link based on its length, Nodes although points, may also have a cost associated.
Click Finish.
 PostGIS Raster
Exports to PostGIS Well Known Text (WKT) Raster database.
Enter the following:
Host
The name, or IP address, of the server hosting the database.
Port number
The number of the port to which the database listens, set during installation.
Database
The name of the database.
User name
The user name ID with which to log on to the database.
Password
The password with which to log on to the database.
Click Next.
The PostGIS Raster dialog will be displayed:
Enter the following:
Raster Details
Table
You can enter any PostGIS compliant table name.
Column
The name for the column in the PostGIS table is raster, and is type raster. The name of the column can be changed.
Drop table if exists
If you check this tickbox and the table exists in the database it will be dropped. The default setting is checked.
CRS
The coordinate system associated with the spatial layer defaults to the coordinate system for the overlay.
Details...
Click to display the Co-ordinate System Details dialog:
Raster size
Pixel
Pixel size in image.
Image - Width:
Size of image width in pixels.
Image - Height
Size of image height in pixels.
Create Pyramid
Check this tickbox if you wish to create a pyramid data structure. It is recommended that the ticked (default) setting is selected.
Click Finish.
 Oracle GeoRaster
Exports to an Oracle 10g, or later, GeoRaster database.
Enter the following:
User
The Oracle user name.
Password
The password for the Oracle user name.
Server
The Oracle server to use. This name is sometimes referred to as the 'Net Service Name' or 'Host String'.
Save password in Options database (encrypted)
Check this tickbox if SIS should store the password in the Options database. The password will be stored in encrypted form for security.
Click Next.
The Oracle Spatial GeoRaster dialog will be displayed:
Enter the following:
GeoRaster details
Name
The name for the spatial layer being created in Oracle.
CRS
SIS will automatically detect the coordinate system of the overlay being exported.
Details
Click to display the Co-ordinate System Details dialog:
GeoRaster size
Pixel
Pixel size in image.
Image - Width:
Size of image width in pixels.
Image - Height
Size of image height in pixels.
Create Pyramid
Check this tickbox if you wish to create a pyramid data structure. It is recommended that the ticked (default) setting is selected.
GeoRaster table naming
Automatic
Check this tickbox for SIS to provide name.
Table
Name if Automatic is not selected.
Column
Name if Automatic is not selected.
Raster Data Table:
Name if Automatic is not selected.
Send comments on this topic.
Click to return to www.cadcorp.com
© Copyright 2000-2017 Computer Aided Development Corporation Limited (Cadcorp).