Building XYZ Tile Caches
This is an open source tile cache structure.
This section details the use of the XYZ Tile Cache option as far as possible in the order that the dialogs will be encountered.
Starting the Tile Cache Wizard
To start the process select the Fill Tile Cache button:

This will display the Regular Tile Cache dialog to allow you to select from the following options:
- Select and re-populate existing cache
- Select and edit existing cache
- Create new cache
- Copy a cache definition
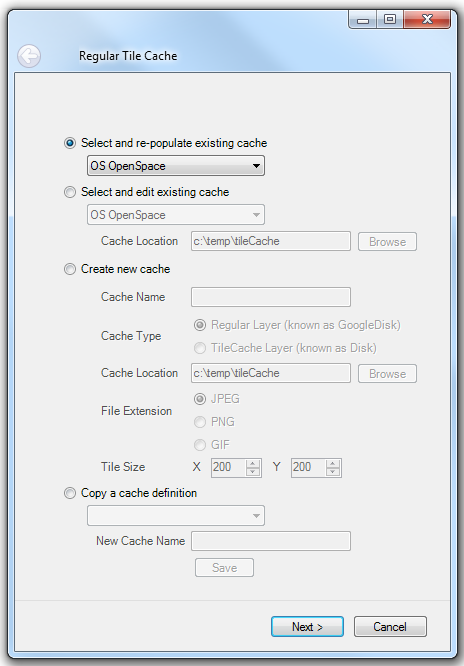
Select and re-populate existing cache
Use this option when updating parts of a cache where no cache parameters have changed. You will need to subsequently define only the areas to be built and at what resolutions.
Select and edit existing cache
Edit a cache’s parameters (WMS URL, layers, extent) and then define which areas are to be built, define the cache’s resolutions and at which resolutions to build.
Create new cache
Set up a new tile cache, i.e. enter cache name, type, location and file extension before proceeding to WMS URL etc.
Copy a cache definition
This option allows you to create and save a new cache based on the definition of an existing cache.
When the new cache name has been saved this new cache will appear in the Select and re-populate existing cache and Select and edit existing cache drop-down boxes.

This option will not cause the Next button to become active. When the selection has been made click Next.
The next dialog to appear will depend on the selection made in the initial Regular Tile Cache dialog.
If Select and re-populate existing cache is selected the next dialog to be displayed will be the Define Build Extent(s) dialog, followed by the Build Cache dialog.
If Select and edit existing cache or Create new cache are selected you will need to proceed through the following dialogs:
- WMS Server dialog - Enter the address of the WMS Server you want to populate the tile cache
- OGC WMS Layers dialog - Select the OGC WMS Layers
- Define Cache Extent dialog - Define the cache's resolutions
- Define Build Extent(s) dialog - Define the extent(s) for the build
- Select Cache Resolutions dialog - Set the resolutions for the cache
- Build Cache dialog - Define or edit resolutions and select which ones are to be built
WMS Server dialog:
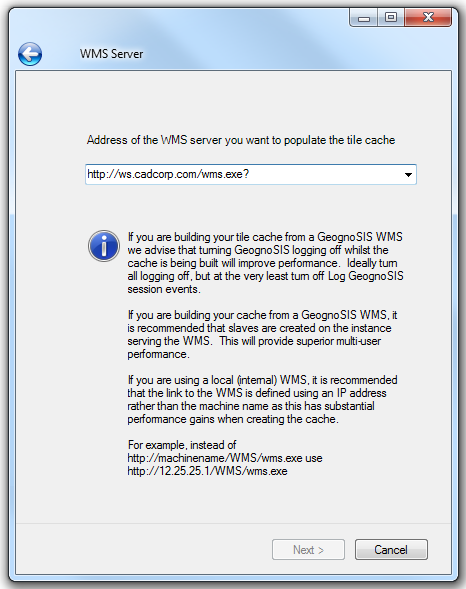
Enter the address of the WMS Server you want to populate or select it from the drop-down list.
Click Next.
OGC WMS Layers dialog

If the WMS is available then you will be prompted to select the OGC WMS Layers.
|
|
The tree of layers has been expanded to the first level and highlighted so in most cases you need to only click the > button to select the top level layer. |
Click Next.
Define Cache Extent dialog
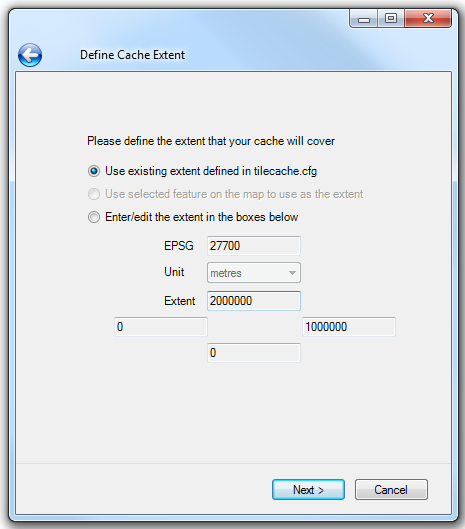
Use existing extent defined in tilecache.cfg
The extent already defined in tilecache.cfg
Use selected feature on the map to use as the extent
The extent defined by the item selected when the Fill Tile Cache Wizard was started. (This will be greyed-out) if none was selected).
Enter/edit the extent in the boxes below
The extents boxes on this dialog will be displayed whichever one of the three extent options you select. These boxes define the cache extent, the values will differ according to the extent selection made.
The EPSG code shown is derived from the current map view or the selected item if that option is chosen. If this does not match the one defined in tilecache.cfg then a warning will be displayed beneath the Extents boxes.

This does not prevent you continuing but the tile cache you are defining is unlikely to work without extensive work required to set up tile caches.
Click Next.
Define Build Extent(s) dialog
-option1.png)
Build tiles for the whole cache extent
Typically use this option when creating a new tile cache from scratch.
Enter an extent below to define the extent to build
Define a rectangular sub extent by entering minimum and maximum X and Y values in the Extents boxes which will become active.
Click the button below to define a build rectangle for each item selected in SIS
SIS is active so you can select items by any appropriate manner and then click Fetch items selected in SIS.
This option allows multiple areas to be set up as build extents for this run of the Fill Tile Cache wizard, for example:

If your build extent is greater than your cache extent, some built tiles are likely to be named with negative numbers. This is not unusual - it simply means that the tile is to the left/below of the bottom/left-most point of the cache extent.
Select Cache Resolutions dialog
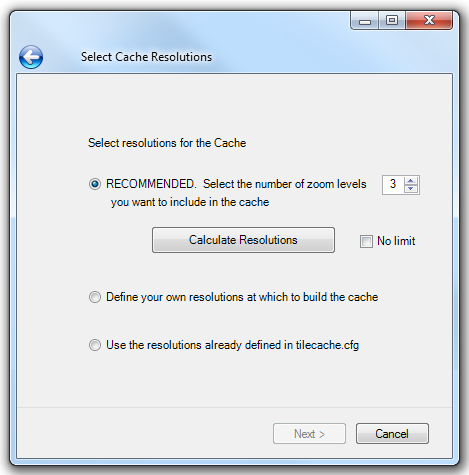
RECOMMENDED. Select the number of zoom levels you want to include in the cache
Select how many zoom levels you want, up to 14, or check the No limit button to remove the limit on the number of resolutions, and click the Calculate Resolutions button.

This button will adjust the cache extent if it is not suitable, i.e. the extent has to be a whole number of tiles in X and Y.
Potential resolutions are calculated in positive increments of 0.1 starting at 0.1.
The calculation of the range of potential resolutions is limited as follows:
- The lowest resolution will have an equivalent scale of > 1:200.
- The highest resolution will yield at least two tiles in the shortest side of the cache extent.
If there are more potential resolutions than requested, and the No limit tickbox has not been checked, then this button will return the highest, lowest and the remaining number of required values evenly spread across the range.
Define your own resolutions at which to build the cache
A blank grid for up to 8 resolutions will be set up.
Use the resolutions already defined in tilecache.cfg
A grid of resolutions as defined in the tilecache.cfg file will be displayed.
Click Next.
The Build Cache dialog will be displayed.
Build Cache dialog
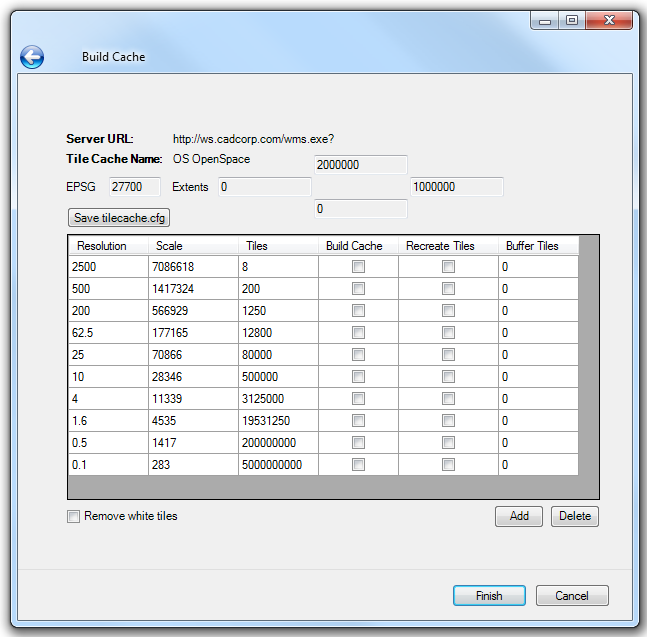
The tile cache grid will contain six columns:
- Resolution – you can edit this value to set any resolution you want;
- Scale – a read-only column, the value is calculated from the resolution;
- Tiles – a read-only column, it shows the number of tiles required to fill the cache. The value is calculated from the resolution, the cache extent and the number of buffer tiles.
- Build Cache – tick this for the wizard to initiate a build of this resolution after Finish is clicked;
- Recreate Tiles – tick this to set a flag so the tile-creation scripts will create new tiles to overwrite any existing tiles. When repopulating a tile cache this box will be ticked by default;
- Buffer Tiles – this lets you define a margin of N tiles around the tile extent;
The grid contents of the Build Cache dialog will show one of the following:
- The existing tile cache’s resolutions if you are repopulating a tile cache;
- Resolutions defined by the Calculate Resolutions button;
- Blank grid for you to define you own resolutions.
The Server URL, Tile Cache Name, EPSG and Extents are shown as confirmation.
The Build Cache dialog allows you to define or edit resolutions and select which ones are to be built.
The grid can be sorted in Resolution ascending or descending order by clicking the Scale column header.
The values in the Resolution column can be selected and changed if required. The Scale and Tiles values will then be recalculated and redisplayed.
To add a new resolution to a grid click the Add button, enter a Resolution number in the left-hand cell of the new line. The Scale and Tiles values will then be calculated and displayed.
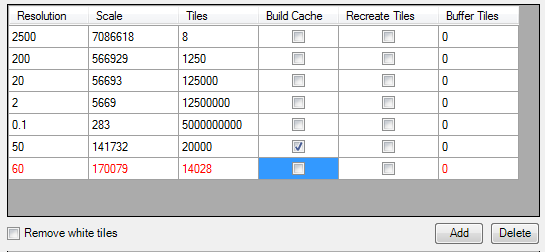
If you enter a resolution which is not valid, i.e. will not create a whole number of tiles to exactly fill the extent in X and Y, then the row values will be shown in red and you will not be able to select this row to build.
If you wish to delete a selected resolution value from the grid, select the resolution and click the Delete button.
Check the Remove white tiles tickbox if you wish to remove tiles containing no data.
To save the set of resolutions click the Save tilecache.cfg button.
Saving tile cache parameters
All tile cache parameters entered so far are stored only in the wizard. These parameters will be saved, in tilecache.cfg, when you click Finish in the Build Cache dialog to initiate the build processes.
The Save tilecache.cfg button allows you to save these changes without having to build tiles, i.e. you can save tilecache.cfg and then cancel the wizard.
Click Finish.
Building the cache
To initiate a build click Finish in the Build Cache dialog. This will:
- Save the tile cache parameters to tilecache.cfg;
- The tile cache parameters will be saved, in tilecache.cfg.
- If the tile cache extent does not match the extent in tilecache.cfg then this will be updated. The tilecache.cfg must also be saved for this to take effect.
The Number of processes message will be shown before the wizard closes: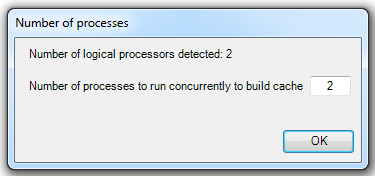
The Number of processes prompt is used for two purposes:
- To run multiple processes to reduce elapsed build time;
- To split each build area into a number of strips for independent builds. This can improve the efficiency of building non rectangular areas:
Suppose the dashed-blue area item shown below is selected as a build area: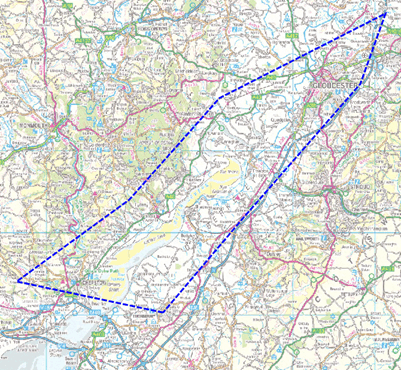
And suppose you choose to build in 10 processes.
As this is an area item the wizard will try to reduce caching in unwanted parts of the overall extent. It does this by setting the build extent of each strip as shown in the grey boxes below: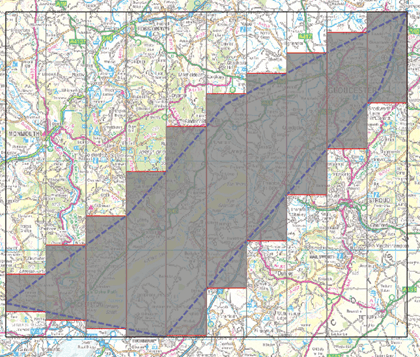
The following notice will be displayed during the build process to inform you of what is happening and how long the build will take. The build process will be shown in a DOS box which will close on completion. When the build has completed click Close.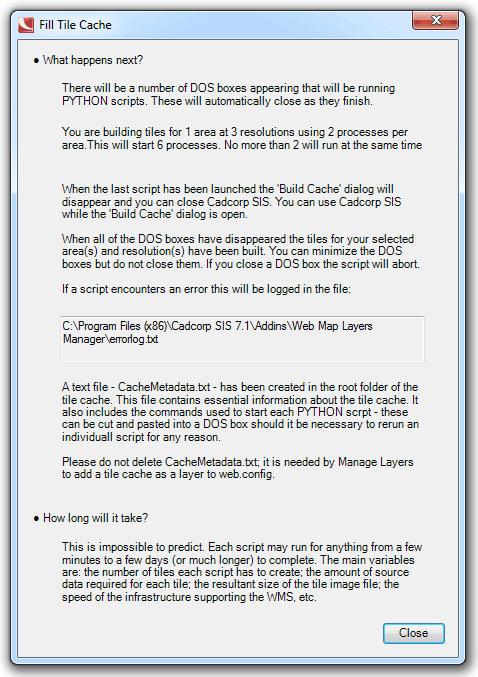
Areas, Resolutions and Processes
The wizard can build tiles for:
- Multiple areas
- Multiple resolutions
- With multiple concurrent processes
For each area it builds each selected resolution with the specified number of processes. So if there are 5 areas, 3 selected resolutions and 10 concurrent processes the wizard will the invocation of 150 processes (5x3x10).
These build processes are independent of the wizard. The wizard will close as soon as it has invoked the last of the processes it has calculated are required.
If a process fails for any reason the error message can be found in a file called errorlog.txt to be found in the AddIn installation folder.
Tile cache metadata
Each time the Fill Tile Wizard is run it writes out a new file called CacheMetadata.txt to the root folder of the tile cache.
The wizard also appends to this file the command line for each build process. This makes it easy to rerun a build command should debugging be necessary.
The tile cache metadata file is required by Cadcorp Web Map Layers Manager to add a tile cache overlay to tilecache.cfg as it contains the information relating to the cache type, and all the resolutions and tile totals that have been built.
Sample tile cache metadata file
Tile Cache Name: OSGB
Tile Cache Type: GoogleDisk
WMS Address:http://localhost/wms/wms.exe?
EPSG Code: 27700
Tile Cache Extent: 0, 0, 1000000, 2000000
Tile Size: 200, 200
DPI: 72
Extension: jpeg
Resolutions: 2500, 1000, 500, 200, 100, 50, 25, 10, 5, 2, 1, 0.5, 0.2, 0.1
Scales: 7086618, 2834647, 1417324, 566929, 283465, 141732, 70866, 28346, 14173, 5669, 2835, 1417, 567, 283
Tiles: 8, 50, 200, 1250, 5000, 20000, 80000, 500000, 2000000, 12500000, 50000000, 200000000, 1250000000, 5000000000
Build started: 24/07/2012 11:34:47
"D:\Projects\GisLink\SIS 7.1\WebMapManagers\trunk\WebMapLayersManager32\bin\x86\Debug\tilecache_seed.py" "OSGB" 0 2 -p 0 -b "346338.71,193146.93,350828.73,197352.01" -f
Build started: 24/07/2012 11:34:47
"D:\Projects\GisLink\SIS 7.1\WebMapManagers\trunk\WebMapLayersManager32\bin\x86\Debug\tilecache_seed.py" "OSGB" 0 2 -p 0 -b "350828.73,192197.12,355318.76,200607.28" -f
Build started: 24/07/2012 11:34:47
"D:\Projects\GisLink\SIS 7.1\WebMapManagers\trunk\WebMapLayersManager32\bin\x86\Debug\tilecache_seed.py" "OSGB" 0 2 -p 0 -b "355318.76,191247.30,359808.79,203862.55" -f
Build started: 24/07/2012 11:34:47
"D:\Projects\GisLink\SIS 7.1\WebMapManagers\trunk\WebMapLayersManager32\bin\x86\Debug\tilecache_seed.py" "OSGB" 0 2 -p 0 -b "359808.79,190326.49,364298.81,208817.86" -f
Build started: 24/07/2012 11:34:47
"D:\Projects\GisLink\SIS 7.1\WebMapManagers\trunk\WebMapLayersManager32\bin\x86\Debug\tilecache_seed.py" "OSGB" 0 2 -p 0 -b "364298.81,190488.08,368788.84,213869.14" -f
Serving out tiles by IIS
After a tile cache has been built the tiles that have been created need to be served out by IIS. This is required for Cadcorp Web Map Layers to use the tiles across HTTP. If possible, it is recommended that the tiles are stored within a sub folder of Cadcorp Web Map Layers as the files will then be automatically accessible across http and the permissions are correct.
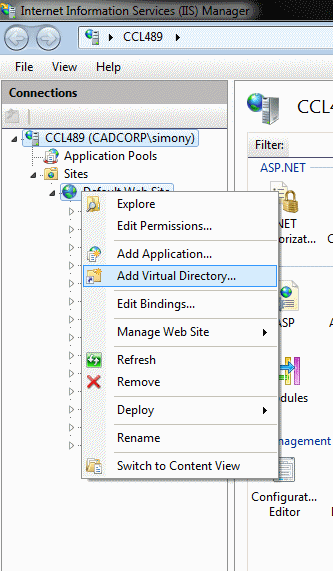
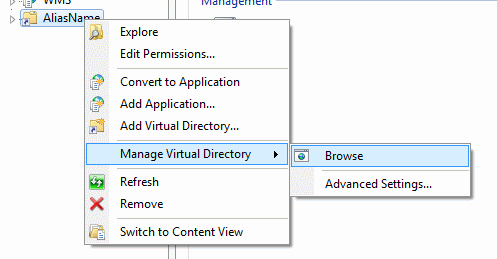
If required, the location of the cache can be elsewhere on the machine or even elsewhere on the network providing IIS can access the location. If the folder is not located within a current IIS application a virtual directory must be created. To do so open IIS Manager and right click on Default Web Site or another site that is to be used, and select Add Virtual Directory.
This will display the Add Virtual Directory dialog:
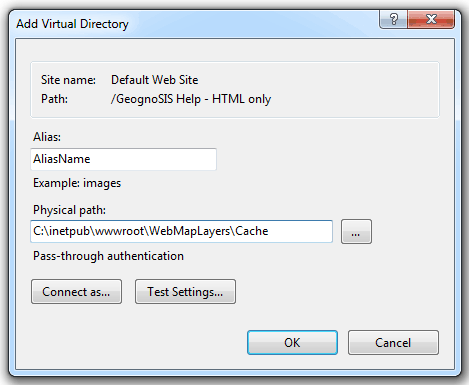
It may be required to use the Connect as... dialog to set credentials to a specific user:
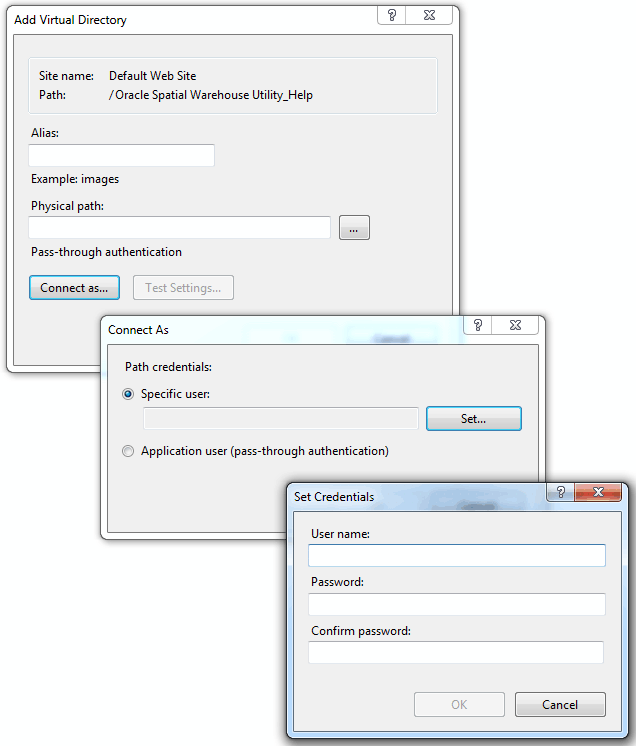
The Test Settings button in the Add Virtual Directory dialog will reveal if the permissions have been set correctly. Once set up it is possible to use the Browse option to find the required URL needed to load the cache into .Web Map Layers 8.0.
|
|
It is possible to move all the files, maintaining the same folder structure, to a new location if required. However this process can take many hours to complete if a large amount of files are being moved. This new location must be accessible by IIS and have the correct permissions, as stated above. Assigning the permission to an empty folder is much quicker than assigning permissions to a folder with a large number of images, therefore it is recommend that you change the permission before copying the files. |
The Error Log
The Python scripts that are responsible for building the Tile Cache log any errors they enocunter to a file called errorlog.txt in the scripts root folder, usually Cadcorp SIS 8.0\Addins\Web Map Layers Manager. This should help you identify the reason the script did not finish successfully.
Further, the metadata file created by the script also contains the commands run by the python script, so you can easily re-run a failed script. An example of the metadata file is given further up on this page.
Send comments on this topic.