Getting started with GeognoSIS SOAP
Here we show you how to build a simple Cadcorp GeognoSIS web application using Microsoft Visual Basic and ASP.NET.
Note: The same principles hold true for other languages like Microsoft C#. Only the specifics of the language will be different.
Before you develop and test a web application, create a suitable SIS Workspace Definition (SWD) containing the data you want to display in the web browser.
For this example let us call it web.swd.
TIP: See About SWDs 
The first task is to set up the development environment.
Visual Studio.NET packages up code, configuration files and other resources required for an application into a project.
- Select a New Project within Visual Studio.NET.
- Select Visual Basic Projects and choose the ASP.NET Web Application option.
- Specify the location where the project will be stored (eg http://localhost/GB).
- Visual Studio creates a folder called GB in your localhost directory and automatically configures a corresponding virtual directory. The localhost directory is usually c:\inetpub\wwwroot. It also creates some template code and configuration files.
- Copy web.swd into this directory.
After creating the development environment, add a reference to the Cadcorp GeognoSIS service.
- In the Solution Explorer, right-click on References and choose Add Web Reference.
- In the dialog shown, type the following into the URL text box: (ensure you enter your own GeognoSIS Admin port number if different from 4326)
http://localhost:4326/GeognoSIS/GeognoSIS.wsdl - When the WSDL file has been located, use the Add Reference button to include a reference to GeognoSIS in the web project. The reference will be localhost by default.
- After it has been added, a Web Reference library appears in the Solution Explorer.
- Select the web reference and look at the properties form. The URL Behaviour in Visual Studio 2005 is set to the required setting of Dynamic by default.
- The location of the Cadcorp GeognoSIS service will be included in the configuration file Web.config and may be edited freely after deployment.
The next step is to create the map window in which the SWD data is to be displayed. Visual Studio will have created a blank web page called Default.aspx.
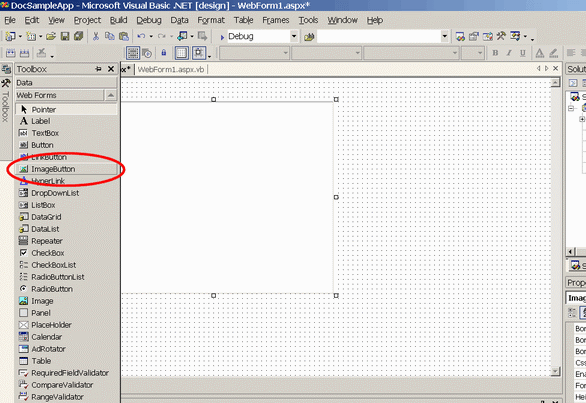
On this form, add an image button control object from the Web Forms toolbox.
The control is named ImageButton1 by default.

Now you can add the Visual Basic code to render the SWD in a web browser.
Add code so the file reads as follows:
Imports GB.localhost

Public Class WebForm1
  Inherits System.Web.UI.Page
' The object that contains the reference to the GeognoSIS service
Dim oSis As GeognoSIS
… Web Form Designer generated code…
Private Sub Page_Load(ByVal sender As System.Object, ByVal e As System.EventArgs) _
Handles MyBase.Load
' Put user code to initialise the page here
If oSis Is Nothing Then
oSis = Session.Item("Sis")
RenderSis()
End If
End Sub
' This method redraws the current map image
Private Sub RenderSis()
Dim md As SisMimeData
md = oSis.Render(ImageButton1.Width.Value, ImageButton1.Height.Value, _
"image/png")
Session("render") = md
End Sub
End Class
For the image button on our form to be able to render the SWD, create a new Web Form called Render.aspx.
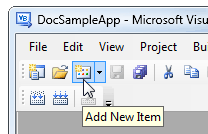
- Click the Add New Item button on the toolbar.

- Create a new Web Form called Render.aspx.
- Edit the Visual Basic code behind Render.aspx as follows:
Imports GB.localhost
Public Class Render
    Inherits System.Web.UI.Page
        …Web Form Designer generated code…
 Private Sub Page_Load(ByVal sender As System.Object,
ByVal e As System.EventArgs)_
    Handles MyBase.Load
' Put user code to initialise the page here
    Dim md As SisMimeData
' Retrieve the image created by the last call to Render (in WebForm1.aspx)
md = Session("Render")
        If Not md Is Nothing Then
Response.AddHeader("Content-Type", md.mimeType)
Response.BinaryWrite(md.data)
        End If
    End Sub
End Class
Add code to initialise GeognoSIS
Add New Item (Global Application Class) Global.asax and edit the code as follows (note that only the Session_Start method is shown):
Imports System.Web
Imports System.Web.SessionState
Imports GB.localhost
Imports System.Net
Public Class Global
    Inherits System.Web.HttpApplication
…other auto-generated methods…
    Sub Session_Start(ByVal sender As Object, ByVal e As EventArgs)
' Fires when the session is started
Dim oSis As New GeognoSIS
oSis.Credentials = New NetworkCredential("username", "password")
oSis.LoadSwd(Server.MapPath("web.swd"))
' web.swd is the name of the SWD that contains the data to be shown.
Session.Item("Sis") = oSis
    End Sub
End ClassThe final step after entering all code is to inform the image control that is to be rendered.
To do this, select the control ImageButton1 and set its ImageURL property to Render.aspx.
The web project is now ready to run.
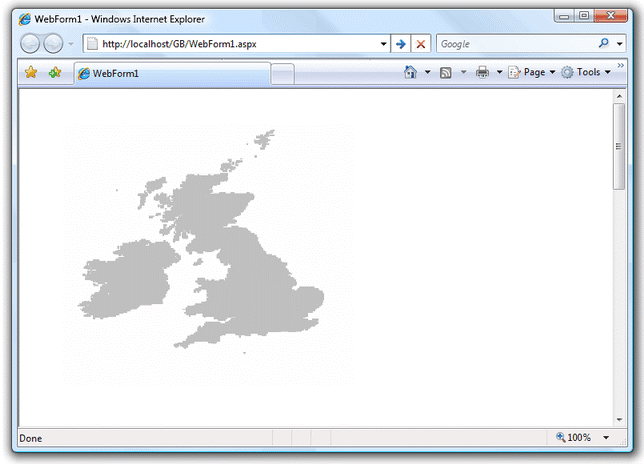
Press F5 to compile and run the site; you should now see a browser window containing a map image drawn from your SWD.
Deploying the application
Once an application has been developed and successfully tested, you can deploy it by transferring it to the Cadcorp GeognoSIS server.
- On the web server, create a virtual directory and copy all files from your development machine into the directory.
- Edit web.config to point to the location of the Cadcorp GeognoSIS service the deployment web server will use. This does not have to be running on the deployment server. The default set by Visual Studio is to refer to Cadcorp GeognoSIS on the deployment machine though this is unlikely to be appropriate for the deployment server.
- If using IIS, open the virtual directory’s properties using IIS Manager. In the Properties/Directory tab > Application Settings > click Create to create an application name. By default this is the name of the folder but this can be changed.
- Apply the changes and exit.
- Using a web browser either on the server or an existing computer on the network, access the starting project web page by entering the IP address of the server, the application name and the start up web page. For eg: http://12.0.0.321/GB/WebForm1.aspx