ActiveX Data Objects
Connects to a OLE-DB Data Source using Microsoft ActiveX Data Objects.
Note: This option is recommended for use with databases not supported via a direct database driver such as Oracle, PostGIS, SQLServer and MS Access.
Either select a currently open ActiveX Data Objects/OLE DB Data Source if a list is displayed in the ADO/OLE DB Data Source panel, or click Connect... to open a new one.
To select the required data click Connect....
If you select a currently open ActiveX Data Objects/OLE DB Data Source click Next.
Clicking Connect...
Clicking Connect will display the Data Link Properties dialog.
The Provider tab allows you to select the data you wish to connect to.
Click the Connection tab or Next to display the Connection tab.
1. Specify the source of data
Use data source name - Select the required data source from the drop-down list:
- dBASE files
- Excel files
- MS Access Database
Use connection string - Select the file data source that describes the driver that you wish to connect to.
Clicking this option will activate the Build button which will display a Select Data Source dialog, this dialog has two tabs:
File Data Source
Use any file data source that refers to an ODBC driver which is installed on your machine.
You can enter the data source name or navigate to a folder. Alternatively clicking the New... button allows you to select a driver for which you want to set up a data source.
Machine Data Source
The source is specific to this machine and cannot be shared. "User" data sources are specific to a user on this machine. "System" data sources can be used by all users on this machine, or by a system-wide service.
Clicking the New... button allows you to create a new data source of "User" or "System" type.
2.Enter information to log on to the server
User name/Password - Enter User name and Password to log on to server.
Options to blank password and save password are provided.
3. Enter the initial catalog to use
Enter the pathname of the initial catalog.
To test the connection click Test Connection, the following confirmation should be displayed:
Click the Advanced tab.
Network settings
Impersonation level - The degree of authority SIS grants other applications to use its identity when it calls them, these levels can be:
- Anonymous - The client is anonymous to the server.
- Identify - The server can obtain the client's identity.
- Impersonate - The server can impersonate the client while acting on its behalf (with restrictions).
- Delegate - The server can impersonate the client while acting on its behalf, whether or not on the same computer as the client.
Protection level - Depends on the type of security level you choose, a low setting will allow very minimal protection. A high-level setting will protect you most securely by blocking unfamiliar components.
Other
Connect timeout - Enter the required timeout in seconds.
Access permissions - Check the tickbox for the required permission(s).
Data Link Properties dialog, All tab.
The settings made in the previous tabs are displayed.
To edit these values, select the Name and click Edit Value... to display the Edit Property Value dialog:
Click OK on the Edit Property Value dialog and OK on the Data Link Properties dialog.
The ADO/OLE DB Data Sources dialog will be displayed with the data source shown:
Highlight the Data Source and click Next.
The Recordset dialog will be displayed:
Database Tables/Columns
Displays the tables and columns available in the connected database. Highlight the required table or column in this pane. Database names are case sensitive, use upper-case names for interoperability.
Add/Remove
Click the Add button to add the selected column to the chosen list. If a table is selected then all its columns will be added.
The Remove button removes a selected column from the Selected columns list.
Selected columns
Displays the selected database table columns. Move the horizontal slider to the right to reveal the Alias column:
This column is used to map the database column name onto a SIS property/attribute name. If the recordset is being used as part of a database-based dataset, then you can enter existing property names (e.g. _shape$) to redefine the created items' properties.
SQL Where
Enter the SQL syntax clause that can be used to join several different tables, or restrict which rows are imported. Do not use the WHERE SQL keyword.
Click Next.
The View Geometry dialog will be displayed:
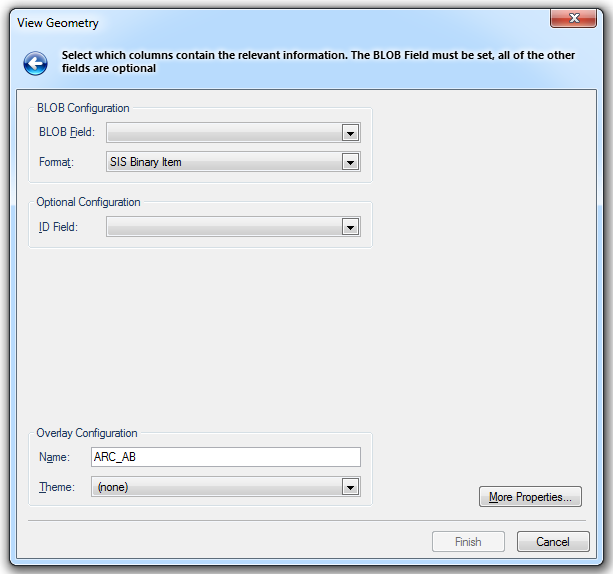
BLOB Configuration
BLOB Field
The field that contains the BLOB (Binary Large OBjects) string. Select from drop-down list.
Format
This is the format of the BLOB string. SIS Binary Item is the default setting. If the original overlay was created using a non-default setting, such as GeoJSON or OGC Well Known Binary format, you have to select this from the Format drop-down list to open the overlay.
The following formats are currently supported.
- ESRI Shape
- GeoJSON
- OGC Geography Markup Language
- ODC Well Known Binary
- OGC Well Known Text
- SIS Binary Item
- SIS V6 ASCII.
Optional Configuration
ID Field
The field that contains the item ID.
Overlay Configuration
Name
This is the overlay name.
Theme
This drop-down shows any Themes associated with the overlay:
If you do not want to modify the dataset's Coordinate Reference System, Scale, etc. Click Finish.
If you do want to make some changes click the More button.
The View Geometry dialog will be displayed:
Coordinates:
Displays the coordinate reference system that the dataset items are defined in. To view or edit the coordinate system details drop-down the combo-box list, and press the right arrow at the bottom to display the Coordinate Reference System dialog.
Feature Table:
This is the feature table to use for feature-coded items in this dataset. Feature-coded items get information about their feature code either from this feature table, or, if set, their own Feature Table property.
Scale:
The default viewing scale for this dataset. This will affect how Text items convert their point heights into world sizes.
Properties... button
Click the Properties... button to display the resizable Cadcorp View Geometry dialog showing the values of properties which may be viewed or edited:
.gif)
Click OK to return to the second View Geometry dialog.
On completion click Finish on the initial View Geometry dialog.