Scale Bar - Print Templates
Scale bars are commonly found on any map- it ‘translates’ real distances into easily understandable map distances.
- Select the Scale Bar required from the tree structure.
- Your selection can be seen in the preview pane below with its length in real world units relative to the Map Frame.
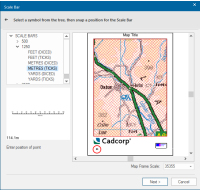
- Click the position on the template where you want to place the scale bar.
- If you make a mistake or change your mind on the posisiton, click Back to go back a stage then Next to return to this option afresh.
- You can also edit the position using local commands on the template Map Frame.

Create Scale Bars
Several default scale bars are included in the Cadcorp SIS Desktop (standard) library. The easiest way to create one would be to edit an existing scale bar.
There is no ‘correct’ way to create scale bars.
Usually the main scale runs to the right and the extension scale (which is in smaller units) runs to the left. More than one type of scale can be used on a map (e.g. miles and kilometres).
Note: We recommend creating a scale bar in paper size at scale 1:1, also ensure the dataset scale is set to 1.
Scale bars are themselves scaled based on the scale factor assigned in a print template wizard.
This means real coordinates are used, i.e. centimetres, inches, metres etc using a Paper projection.
Before you begin, use the Toggle ‘*’ Objects command on the Libraries Control Bar's default local menu so you can see the *SB folder.
- Locate a scale bar similar to the scale bar you require.
- Copy it into the current library.
- Now rename the *SB folder to SB to allow editable access to the library.
- Set up an SWD with the Paper projection.
- Choose Point (Create > Simple) and choose the scale bar you require (from the SB folder).
- Insert a scale bar point.
- Select it and from the local menu, choose Explode Symbol. This changes it into its component parts.
- Edit it by changing text values, size and colour and the dice or tick marks.
- Other useful commands for editing scale bars are Divide Distance [CAD > Divide] to divide a line into segments, and Measure Distance (Home > Measurement) to confirm the scale bar lengths.
- Finally to save the scale bar and include it in the scale bar folder, select all and choose Symbol (Create > Miscellaneous).
- Click on the point for the symbol center.
- When prompted for a folder and name, use the *SB folder and assign the scale bar a new name. The scale bar appears in the Print Wizard options.
- Remember to save this in a named library if you wish to re-use it.
- The Scale Bar item will stretch its Symbol to match the scale of the Map Frame item. If the Map Frame scale is changed, the Scale Bar item will also be automatically resized.

Edited scale bar for a 1:1250 map |