About Filters
All three analysis tools (Incidents, Attendance and Utilisation) can work on the whole dataset.
However to provide greater flexibility and return more useful results, the data can be fine-tuned by applying a set of filters.
To set these filters click Set Filters :

The Set data filters window opens: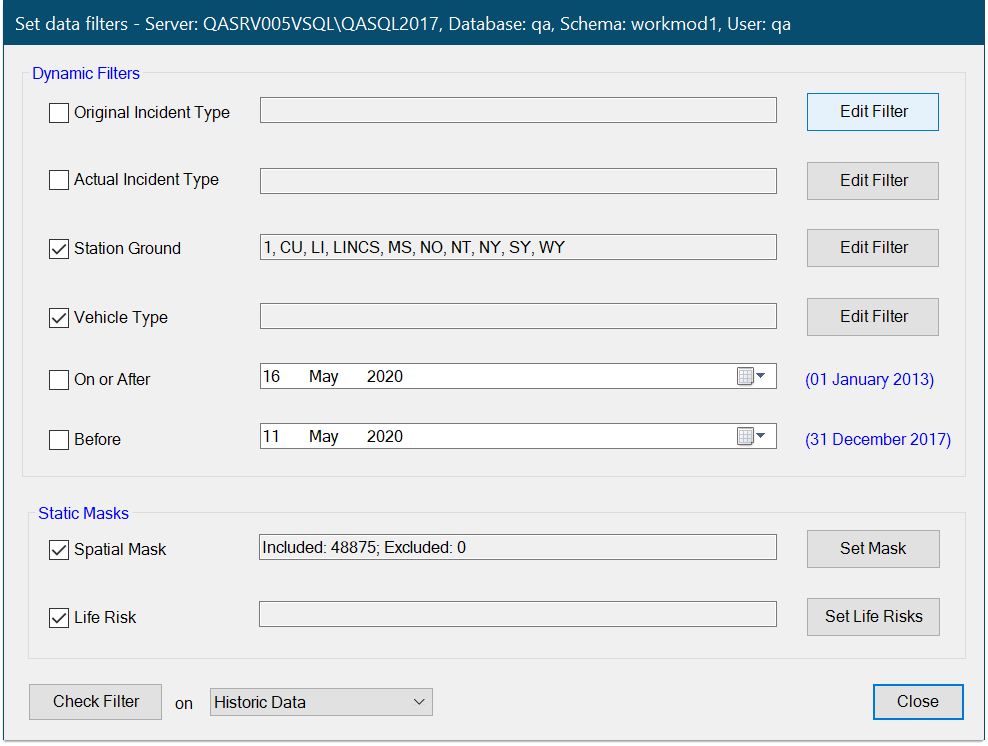
Although all filters are used in the same way, there are two very different methods needed internally to support them.
- Dynamic filters use fields populated when the data are loaded; the values in these fields do not change which means the filter can be set and reset dynamically.
- Static filters are applied to the data after it has been loaded from the database. Static filters rely on using SIS Desktop to set a spatially-related value in a field.
For example:
INCIDENT_TYPE = ‘FDR’ OR INCIDENT_TYPE = ‘FAE’
Filters can be set or reset at any time but bear in mind this is a time-intensive operation (every incident record in the database has to be updated).
Static filters are so called because they remain fairly static and are changed relatively infrequently.
Dynamic Filters
| Field | Description |
|
Original Incident Type |
Type of incident recorded as the appliance is dispatched. This is usually defined by the dispatcher based on the emergency call. |
|
Actual Incident Type |
Incident type added afterwards to confirm the actual incident classification. This may or may not be different to the Oriinal Incident Type. |
|
Station Ground |
The station to which the incident report is assigned |
|
Vehicle Type |
Type of vehicle used for incident response |
|
On or After |
a date on or after which an incident is open |
|
Before |
a date before which an incident is open |
Static Masks
| Field | Description |
|
Spatial Mask |
Restricts analysis to incidents in a specified area (pre-selected in the SIS Map Window). |
|
Life Risk |
Displays the Incident Life Risks dialog to set the life risk categories. |
Note: All displayed values come directly from the Workload Modeller Add-in database; they can be changed any time by editing the database directly.
A note on Spatial Masks
Spatial Masks are geometry features in the SWD or Map Window  and define areas within which you want to use filters.
You can use any existing feature or draw your own on the map. Ensure it is selected when you press the Set Filters command.
Now enable Spatial Mask and click Set Mask.
Before clicking Set Mask, select the area(s) inside the Map Window to which the analysis should be restricted.
Workload Modeller:
- Creates a spatial filter from the selected areas
- Loads all the incidents as a view points overlay
- Scans this with the spatial filter and for every incident in the filter, sets a ‘SpatiallyIncluded’ value on the incident record in the database
- Finally deletes the temporary overlay.
Note: A spatial filter (e.g. incidents within a specific area.) is distinctly different from a spatial mask.
Setting these flags may take a little while as a possibly significant amount of database access is required.
The ‘definition text’ to the right shows you how many incidents of the total number in the database are included / excluded if the mask is applied.
TIP: We strongly recommend using a spatial mask in the modelling functions as some incidents may have incorrect coordinates (e.g. 0,0)
Set Life Risks
(Content will be updated. Please check back.)