Getting started using Microsoft Visual C#
Note: This section assumes a simple knowledge of Visual C#, the Microsoft Foundation Classes and C#. For more help, see relevant documentation.
SISCONST.VS
The ActiveX Control constants available to Visual C# are contained in an automatically generated C/C# header file with the .VS extension.
The SISCONST.VS file is created as follows:
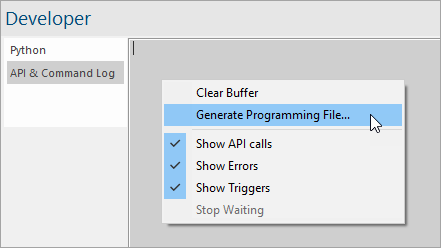
- Run a Cadcorp SIS application that can be customised using GisLink and select the Developer Control Bar.
- Select the Generate Programming File command (right-button) in the Developer Control Bar.
- The Generate Programming File dialog will be displayed:
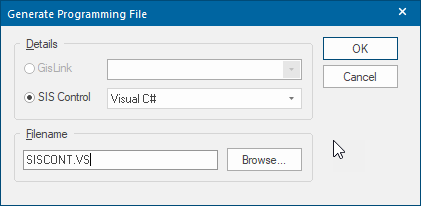
- Check the SIS Control radio button and choose Visual C# from the drop-down list.
- Fill in the Filename: field (either by typing a filename or choosing one using the Browse button). The file will typically be called SISCONST.VS but you can choose any name.
- Press the OK button to automatically generate the file.
Adding the ActiveX Control to a Visual C++ Project
- Create a new Visual C++ Project Workspace using the "MFC AppWizard (exe)" option.
- On the MFC AppWizard Step 1, choose the Dialog based option. On the MFC AppWizard Step 2, choose the ActiveX Controls option.
- Press Finish to create the template application.
- Select the Project/Add To Project/Components and Controls... command and choose the Registered ActiveX Controls "folder". The list should contain the ActiveX Control. If the ActiveX Control is not in the list then check that it is correctly installed and registered.
- Having found the ActiveX Control in the list, select it and then press the Insert button.
- Press OK in the Confirm Classes dialog, editing the class and filenames first if required.
- Press the Close button in the Components and Controls Gallery dialog.
- Select the Resources tab in the Project Workspace.
- Find and select the application dialog: this will be called IDD_<you_application_name>_DIALOG.
- Make the Controls toolbar visible. The Controls toolbar should contain the ActiveX Control globe icon.
- Press this icon to allow you to create an instance of the ActiveX Control on your dialog.
- Press the mouse key over the dialog and hold it down to drag out the ActiveX Control to the desired size. Releasing the mouse key will create the ActiveX Control. Use the right-mouse Properties command to change the id of the ActiveX Control to "IDC_SIS".
- Select the View/Class Wizard... command or press Ctrl-W and choose the Member Variables tab. Select IDC_SIS from the Control IDs list and press the Add Variable... button. Append "sis" to the "m_" string in the Member Variable Name: field, and press OK. Press OK on the MFC ClassWizard dialog to accept the changes.
- Go to the Class View tab of the Project Workspace and double-click on the OnInitDialog method of the C<your_application_name>Dlg class.
- Add the following code after the
// TODO:comment:
Copy
m_sis.LicenceKey = "enter your licence key here";
m_sis.LicenceSuffix = "enter your licence suffix here";
m_sis.Level = SIS_LEVEL_MANAGER;
m_sis.SetAxesPrj("*APrjNatGrid");
m_sis.SetViewPrj("*APrjNatGrid");
m_sis.CreateBackdropOverlay(0,"British National Grid");- Navigate to the top of the file and add the following code after the
#include "stdafx.h"statement:Copy#include "SisConst.vs" // Use the pathname of the file created above. - Select the Build/Build <your_application_name>.exe command, or press F7 to build the program.
- Select the Build/Execute <your_application_name>.exe command, (or press F5) to start the program. When the program starts the ActiveX Control should show the outline of the United Kingdom.
- The map view can be manipulated using the scrollbars, or the middle-mouse button or mousewheel where available.