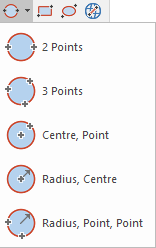
Circle: Radius, Point, Point
Click Create > Circle and choose Radius, Point, Point in the drop-down menu.
TIP: When you select any create circle commands, the cursor changes to an arrow with a spanner beside it (indicating a toolbox operation). This means the command is still active, you can continue drawing more items of the same type without re-selecting the command.
Radius, Point, Point constructs a circle of a known radius using two points on the circumference.
Use Circle: Radius, Point, Point when you know the circle’s radius and two points on its circumference. The created circle will be a Polygon item.
- Select Radius, Point, Point.
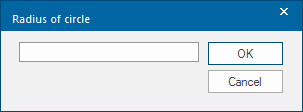
- The Radius of circle dialog will be displayed:
-
Enter the radius of the circle.
-
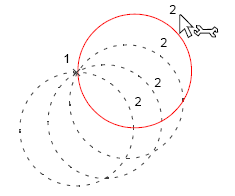
Click a point on screen through which the circumference will pass. A circle of the required size is attached to the point given. As you move the cursor, you see the potential circle rotating around the fixed point.
-
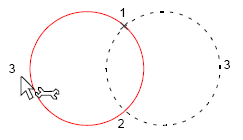
Click a second point to fix the location of the circle. The diagram shows such a circle with other circles indicated which could have been created with a different second point:
- As there are still two possible locations for the new circle, click close to where the circle’s centre will be to finally fix it (this third point could be either of the positions shown here):
To finish any of the Geometry 2D commands, press the Esc (escape) key, or select another command. The use of Esc discards any constructions still in progress.
'Transparent' zooming commands
To use the Zoom commands, i.e. In, Out or Drag etc in the middle of the Geometry 2D commands check the ‘Transparent’ zooming commands option box on the User Interface and Commands page of the Options dialog.
![]()
When the zooming commands are transparent, you can pan and zoom around the map base while running other commands, e.g. when capturing graphics.