Simple Text
You can specify the appearance of text in the properties dialog which is displayed as appropriate to the type of text you are creating. The text settings are:
- Font
- Height
- Horizontal text alignment
- Vertical text alignment
- Bold/Italic/Underline
- Opaque/Box/*Outline Text - Outline text is not used for Simple Text.
For example the Properties of BoxText dialog is as follows: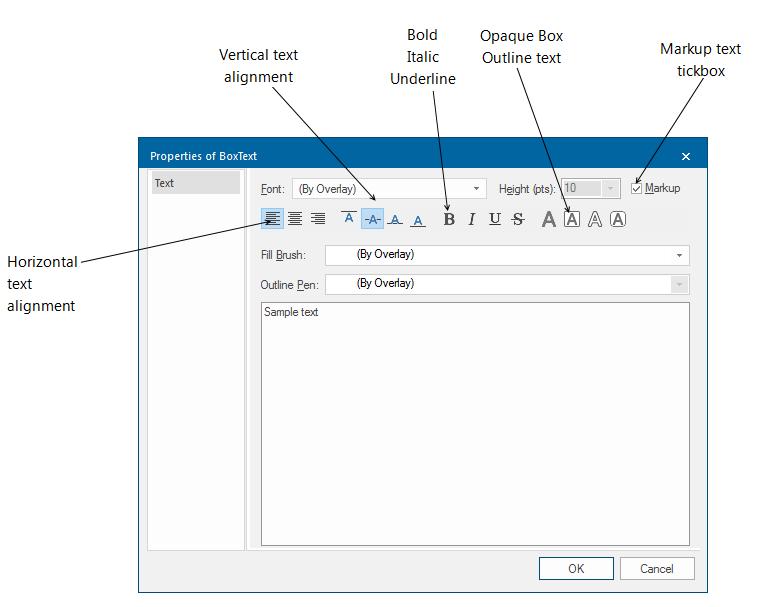
The Outline Pen field is applicable only to outline text and has no effect on simple text.
The parameters in Text - Display using: Font/style; Height and Alignment only apply to the text showing in the Preview pane and have no effect on the final graphic.
Alignment
All simple text types have vertical and horizontal alignment properties.
The choices for vertical alignment are top, middle, baseline and bottom, and for horizontal alignment they are left, centre, and right.
The alignment point of a text item is a combination of its vertical and horizontal alignment points:
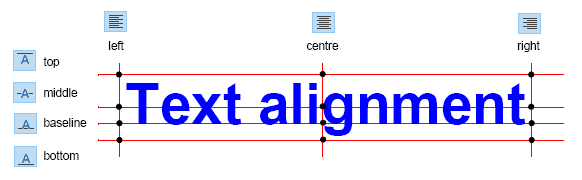
There are 12 possible alignment points:
| top left | top centre | top right |
| middle left | middle centre | middle right |
| baseline left | baseline centre | baseline right |
| bottom left | bottom centre | bottom right |
The alignment point of the text item is placed at the screen position you use to locate the text item.
Text property constants:
' Horizontal Text alignment.
PublicConst SIS_LEFT AsShort = 0
PublicConst SIS_RIGHT AsShort = 2
PublicConst SIS_CENTRE AsShort = 6
' Vertical Text alignment.
PublicConst SIS_TOP AsShort = 0
PublicConst SIS_BOTTOM AsShort = 8
PublicConst SIS_BASELINE AsShort = 24
PublicConst SIS_MIDDLE AsShort = 72
Styles
You can choose different styles of text by selecting the icons on the Properties dialog.
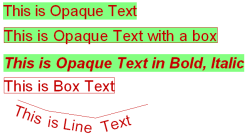
As well as Bold, Italic and Underlined, you can choose Opaque, Box, and Outline styles; these are suitable for presenting text against shaded or coloured backgrounds:
- the Opaque style draws a box behind the text, the size of the text string’s extent. The brush used to draw the box is either the overlay default, or the brush you have selected.
- the Box style creates a box around the text, the size of the text string’s extent. The pen used to draw the box is either the overlay default, or the pen you have selected. Box text is set in real world units to maintain its scale/proportion with the surrounding graphics.
- the Outline Text style allows an outline, of specified width and style, to be created around the edges of the letters. See also Outline Text.
You can choose text styles in any combination.

Secondary annotation (Point Text and Line Text)
Secondary annotation is a reference embedded in a text block which calls up and displays the current value of a property.
If a value is subject to change but you wish to include the current value in the text string, expressions can be used.
Examples
- On your map you have a piece of text against a line denoting a bus route. This note includes the length of the bus route. If you edit the bus route, you want the note to be automatically updated with the new length. If you use secondary annotation, SIS searches for the current value of the data and displays it.
- On a map of a housing estate each lamp-post has a note against it, indicating its unique ID number. You could use the same piece of text (secondary annotation) each time, but have the correct ID number displayed in each instance.
Creating secondary annotation
- Select Point (Point Text).

- Type in the required text. Both regular text and secondary annotation can be included in the same text block, as in the examples shown below.
The format required for the secondary annotation is ^(Item number.property name) where Item number applies to the item you want to annotate. You can obtain this Item ID number from the Properties of dialog or the Properties Control Bar, for example: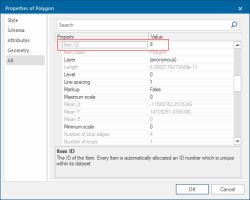

If you have made an error in the expression you will see a question mark (?) on the screen instead of the text you required.
Note: Point (Point Text) and Line (Line Text) can be used for secondary annotations. Box (Box Text) and Label (Box Label) cannot be used with secondary annotations.
Examples of secondary annotation:
What you type: Class=^(23._class$)
What it means: show the class of item 23 in this dataset.
What you see on screen: Class=Area (if it was a Polygon item)
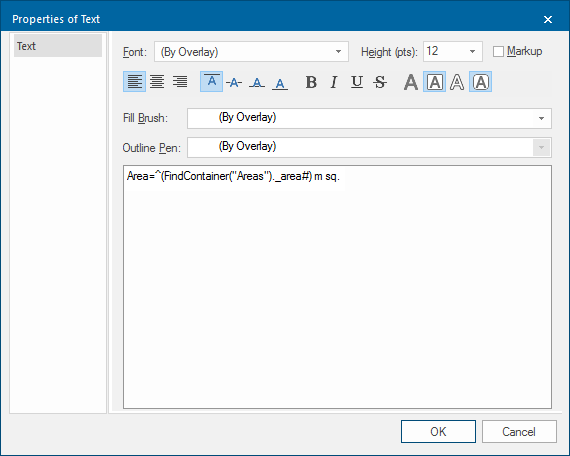
What you type: Area=^(FindContainer("Areas")._area#) m sq. (see above dialog)
What it means: look in the overlay called Areas for a polygon that contains the hook point of the current item, and print out the area value of that Polygon item. Note: the secondary annotation must be created on a separate overlay for FindContainer to function correctly.
What you see on screen: Area = XXX m sq. (if this is a line text item the text will follow the line)
What you type: Now=^(FormatDate(date(),"Time: %X, Date: %x"))
What it means: show the current time and date. If this expression is used with secondary annotation, it will update every time Redraw is used, and update every time it is printed. You can change the format of the time and date if you wish.
What you see on screen: Now=Time: 16:01:34, Date: 08/03/09
What you type: Scale=^(3.(FormatFlt(_scale#,"%10.1f")))
What it means: shows the item’s scale property, formatted as a double number with one decimal place. This provides an example of how to use more complex secondary annotation to display data.
What you see on screen: Scale = 1.0
What you type: Map Scale=1:^(59._photoscale#)
What it means: shows the map scale for use on the print template.
Note: 59 is the reserved ID no. for the map frame item.
What you see on screen: Map Scale 1:2500