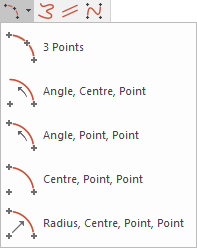
Arc: 3 Points
Tool to create an arc that goes through 3 points. Click Create > Arc and choose from these available options in the drop-down menu.
3 Points constructs an arc beginning at the first point , passing through the second, and ending on the third point. As you construct the arc, you will see it "rubber-banding" on the screen.
- Select 3 Points.
- Click the position where the arc is to start.
- Click a position anywhere on the arc.
- Click the end position for the arc.
This diagram shows arcs constructed using 3 Points. In all cases, points 1 (start of arc) and 2 (point on the arc) are the same. Point 3 (end of arc) then fixes the radius and length of the arc: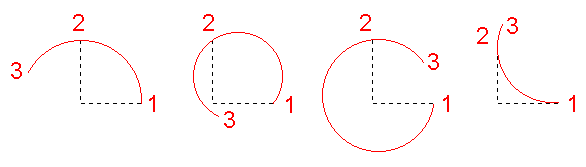
Angle, Centre, Point constructs an arc through a given angle around a known centre point.
- Select Angle, Centre, Point.
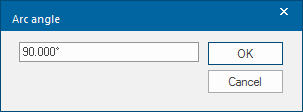
- The Arc angle dialog will be displayed. Type in the angle of the arc.
- A positive number draws an arc anticlockwise; a negative number will draw in a clockwise direction. Click OK.
- Click the position for the centre of the arc (point 1 in the diagram below). Now you will see an arc of the specified length rotating around this centre point as you move the cursor.
- Click the point at which the arc starts (point 2 in the diagram below). This fixes the location and radius of the arc.
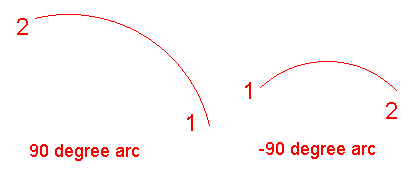
This diagram shows four arcs, each with the same angle (90 degrees) and centre: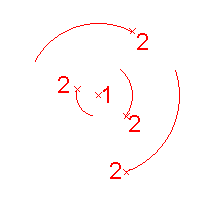
Angle, Point, Point constructs an arc through a given angle by placing its start and end points on the circumference.
- Select Angle, Point, Point.
- The Arc angle dialog will be displayed:
Type in the angle of the arc. A positive number will draw an arc anticlockwise; a negative number will draw in a clockwise direction. Click OK.
- Click the position for the start of the arc (point 1 in the diagram).
- Click the position for the end of the arc (point 2 in the diagram).
Centre, Point, Point constructs a linestring from a circular arc of maximum 180 degrees with a known centre point, start point and end point.
- Select Centre, Point, Point.
- Click a point for the centre of the arc.
- Click a point for the end of the arc (point 2 in the diagram below). The arc is drawn using the shortest route between both points and has a maximum angle of 180 degrees.
The position of the end point relative to the start therefore governs whether the arc is drawn clockwise or anti-clockwise:
Radius, Centre, Point, Point constructs a LineString item from an arc in a similar way to Centre, Point, Point, except that you are required to enter a specific radius before giving the centre, then two points on the circumference.
- Select Radius, Centre, Point, Point.
- The Radius of arc dialog will be displayed:
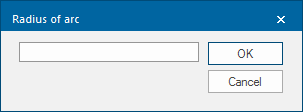
- Type in the radius of the arc and click OK.
- Click a position on screen where the arc will start.
- Click a position near the end of the arc. The end position is in fact determined by the radius you have entered; this point is used to indicate the direction in which the end point lies from the first point.