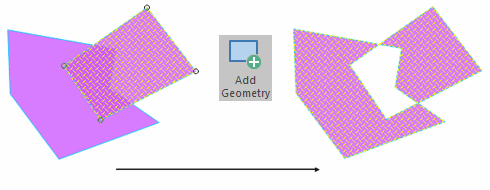
Add Geometry
All Item classes have geometry. The geometry of an item lets you snap onto it and determines where the item is in relation to other items.
An item’s geometry is also used as the starting point for determining what the item looks like (for instance is it a LineString or a Point?).
All geometry can be stored in three dimensions.
Add Geometry merges geometry from the snapped item into the selected item.
- Select the first Polygon item, select Add Geometry and click on the second Polygon item.
- To do this again, select the first Polygon item. Now select Add Geometry and click on the second Polygon item.

SIS Desktop merges the geometry of the two items by carrying out an Exclusive-Or Boolean operation (similar to Symmetric Difference). The selected item takes on the combined geometry and the overlapped area is deleted.
Creating a Multi-point item
A multi-point item is a single item with more than one point; all the constituent point items have the same symbol and style.
A multi-point item can be manipulated as a single item. The symbol used to display the points in the multi-point item is that of the original point item (the one to which other point items were added).
Create a multi-point item by first selecting a point item, then using Add Geometry as above to add further points to it.
See also MultiPolygons.