Manage Groups
Manage Groups allows for creating groups and adding users to those groups.
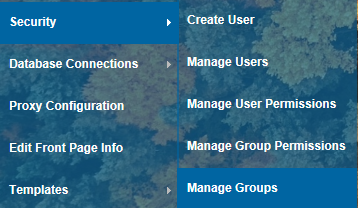
Select Security > Manage Groups from the What would you like to do? drop-down menu:
The Manage Groups dialog will be displayed as shown in the following sections.
If using Windows Authentication these groups will be generated from the Active Directory Roles and the users will be added accordingly.
If using Forms Authentication you can create your own groups by typing the group name in the box and then select Add Group:

To then add a user to a group, click on the group then start typing a user name in the allocated box, this will generate a list of matching names, press the down arrow on your keyboard until your desired user is highlighted and click the add user button:

When you then click on the group, the members of that group will then be displayed on the right hand side:

Users can be removed from groups by clicking the remove button shown next to the user name.

|
You cannot create a user if the email already exists for a different user. You cannot create more than one user with the same username. |
You will see a different screen based on the type of security. With Federated Security, for eg, roles are managed and removed by importing a CSV file of roles/groups from the Active Directory.
Send comments on this topic.