Setting the Authentication to be used
(For Web Map Layers 8.0.2549 and earlier)
Access to the Web Map Layers 8.0 site can be controlled in two ways, either by Active Directory which uses Windows Authentication or by a custom setup which uses Forms Authentication.
Windows Authentication
To use Active Directory you need to ensure that Windows Authentication is installed. This is done through the Control Panel and the Turn Windows Features on or off section, for details on how this is carried out on different operating systems see the following link:
http://www.iis.net/configreference/system.webserver/security/authentication/windowsauthentication.
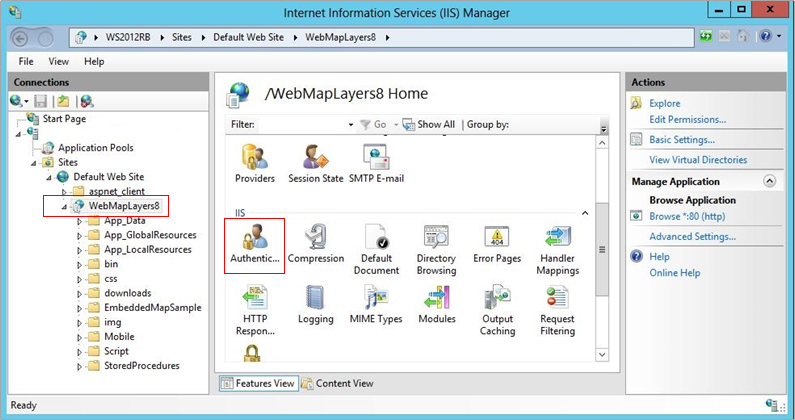
Open Internet Information Services (IIS) Manager and in the tree view on the left navigate to your Web Map Layers 8.0 site. In the Web Map Layers 8.0 Home window select Authentication from the IIS section:
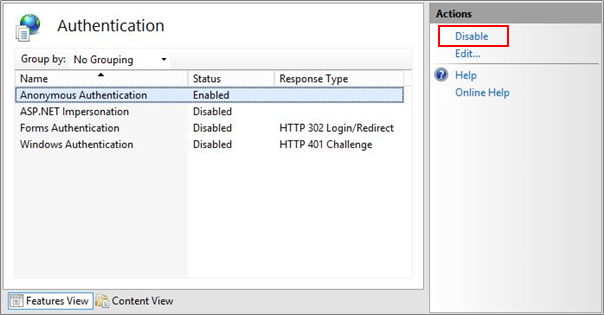
In the Authentication window you then need to Disable Anonymous Authentication that is Enabled by default:
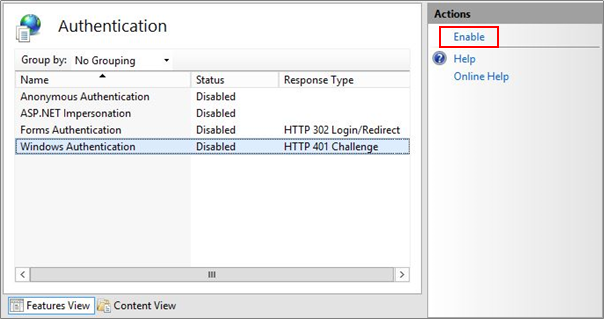
and Enable Windows Authentication:
Adding All Groups
Cadcorp.Security.LDAPConnectionString (in the AppSettings table of the webMapLayersConfig.db) generates the list of groups in Web Map Layers 8.0 from which you can then select/add users to/set permissions for. Depending on the LDAP connection string groups at different levels will be pulled in. If you only define the top level domains, DC (domain controller), then it will pull in all groups, if you define lower down in the domain then not all groups in the domain will be pulled in.
On installation the Cadcorp.Security.LDAPConnectionString is set to:
domain=MyCompany;OU=MyCompany Users,OU=Workstations,OU=Servers & Workstations & MyCompanyLocation Users,DC=MyCompany,DC=net
To pick up all groups you will need to change this string to:
DC=MyCompany,DC=net
This change will result in all the groups being pulled in.
For Windows Authentication the following changes must be made in web.config
Locate the following section:
<authentication   mode="Windows">
<forms loginUrl="Login.aspx" timeout="3000" />
</authentication>
and replace it with:
<authentication mode="Windows">
  <forms loginUrl="Login.aspx" protection="All" defaultUrl="Map.aspx" path="/" timeout="3000" />
</authentication>
  <authorization>
      <deny users="?" />
  </authorization>
This will set Windows Authentication for the whole site (both map and admin page).
Note: <deny users="?"/> will only deny non-authenticated users. You should use <deny users="*"/> to deny all users.
Note also, in order to allow Web Map Layers 8.0 to access the domain controller IIS must be able to impersonate a user with high enough authority. To allow this the following line of code should be added to the web.config in the <system.web> section. However do not add this line of code in a sub element of <system.web> as this will cause a configuration error, i.e. ("Unrecognized element 'identity'")
<identity impersonate="true" userName="domain\user" password="password"/>
The website will then be run by the impersonating user defined above. This means you would need the appropriate user permission settings on any files used.
Also make sure the Allow Anonymous Access tickbox on in the Admin Interface - General Map Settings dialog is unticked in order for this to take effect (see General Settings-FirstMap Settings).
Forms Authentication
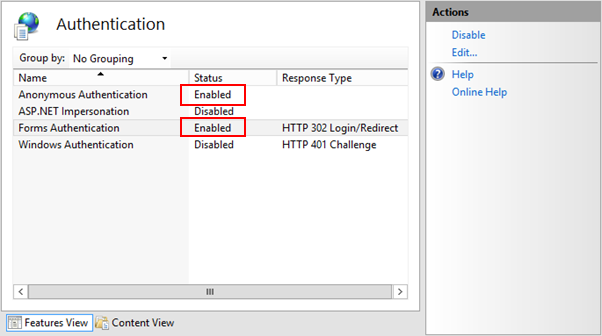
For forms authentication to work you must Enable both Anonymous Authentication and Forms Authentication:

|
Make sure that Anonymous Authentication is ENABLED on the following child folders (regardless of the authentication being used for the site); css, Image and script. |
For Forms Authentication, you also need to have Anonymous authentication ENABLED for Login.aspx, to do this you need to switch IIS to Content View:
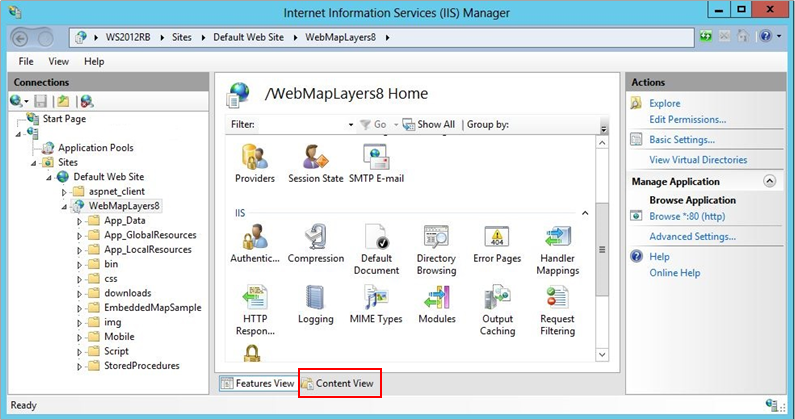
Locate Login.aspx in the list, right click and select Switch to Features View:
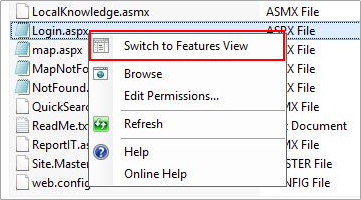
Login.aspx will then appear in the tree view on the left of your IIS window, with it selected in the tree view you then need to follow the steps outlined earlier to select authentication from the main IIS window and then ENABLE Anonymous Authentication.
For Forms Authentication the following changes must be made in web.config
Locate the following section:
<authentication   mode="Forms">
<forms loginUrl="Login.aspx" timeout="3000" />
</authentication>
and replace it with:
<authentication mode="Forms">
  <forms loginUrl="Login.aspx" protection="All" defaultUrl="Map.aspx" path="/" timeout="3000" />
</authentication>
  <authorization>
      <deny users="?" />
  </authorization>
This will set Forms Authentication for the whole site (both map and admin page)
Admin page authentication
Locate the tag <location path="admin.aspx">
In the authorisation tag, change the * in <allow users="*"/> to the name of the users you wish to be able to access the admin page, if you wish to give multiple users access separate the users with a comma.
To allow a group access to the admin page use “<allow roles=GroupNameHere />”
To disallow a group access to the admin page use “<deny groups=GroupNameHere />”
If you wish to give multiple groups access separate the groups with a comma.
Other authentication
Finally, in the section below the comment:
<!-- This section is used to streamline authentication to the folders listed here. Some browsers were slow in authenticating access to these folders. It is recommended that you do not change this section. -->
You will find a number of <location path = “***”> tags, these control permissions for the sections of the site given in quotes. Edit the authorization so that it reads:
<allow users="*" />
<allow users="?" />
Make this change to each of the following <location path = “***”> tags:
- img
- mobile/img
- login.aspx
- mobile/login.aspx
- Proxy.axd
- getmap.axd
- css
- mobile/css
- script
- mobile/script
Note:
* means All users, both authenticated and unauthenticated
? means anonymous. This allows you to allow/deny access to pages.
Secure login
The following changes will ensure that the user is always prompted to login.
- Open the web.config in a text editor.
- Locate the <forms tag inside the <authentication tag.
- Adjust the timeout to a lower value if required, the timeout is in minutes.
- Add slidingExpiration="true". This means that the session timeout is periodically reset as long as a user stays active on the site.
Note: The default timeout is 3000 i.e. 50 hours. Remaining logged in for this duration may be too long and a shorter time required. If the timeout value is set very low, i.e. 60, then the user risks being automatically logged out after 1 hour on the site. If a timeout value of 240 is entered this time will be 4 hours. However, with slidingExpiration set to true, as long as the user is active on the site the timeout will be continually reset.
Applying Security to specific Maps
Regardless of the security you have set up for your site, this security does not have to be applied to all maps. For example, you can override the security on specific maps to allow anonymous access (this is done in the General Settings section of the admin interface). This will then allow anyone to view that individual map without having to provide login details.
You could then have a second map with extra overlays and features that only specific users have access to via their Windows or Forms authenticated login (just ensure that allow anonymous access is not enabled for that map in the Admin Interface General Settings).
Send comments on this topic.