OpenIdConnect Authentication (Federated Authentication)
Cadcorp has implemented support for Federated Security in Web Map Layers 8.0.2549. In this model, a 3rd party service is used for authentication while Web Map Layers manages user and group access rights. Windows Authentication and Forms security can still be used simultaneously.
- Windows Authentication is used when the Web Map Layers server can directly access the domain controller.
- Forms security is used when custom security is required or the domain controller cannot be reached.
- Federated security is used when domain usernames and passwords are required, but Web Map Layers is hosted remotely. Communication with the domain controller is through Identity Server.
Click here for more details on implementation.
Implementing Federated Security for Web Map Layers 8.0
Identity Server must be hosted on the local network to facilitate access to the domain controller. Access through the firewall is required between the local network and the cloud hosted server.
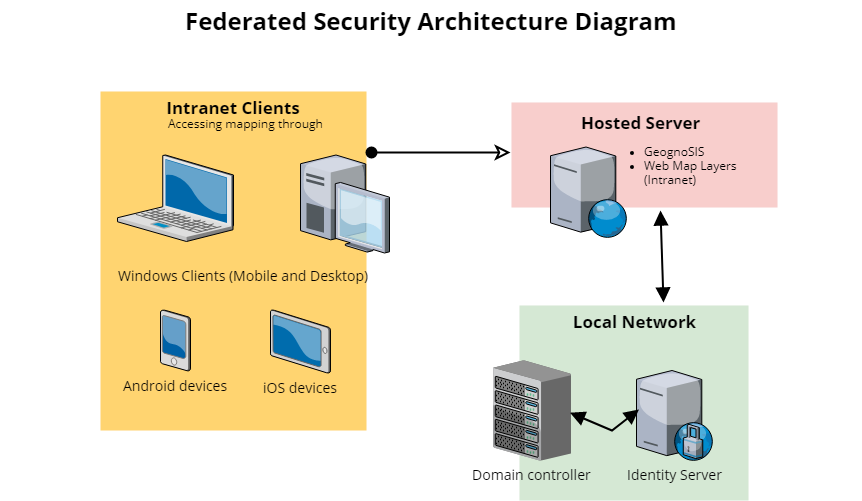
- The user is presented with an authentication request when Web Map Layers is launched.
- The user enters their domain account details and sends the request.
- The request is received by Identity Server, which obtains end-user consent/authorisation from the domain controller.
- Identity Server sends the response back to Web Map Layers as a token.
- Web Map Layers validates the token and authorises the user using its own authorisation database to determine which maps the user can access.
- A server on the customer’s domain for hosting Identity Server. Remote access is required for configuration.
- Identity Server 4.
- Web Map Layers Service Release 4.
- Harvest of Active Directory users and groups for Web Map Layers Authorisation database.
- Set up an Azure Virtual Machine running Windows Server.
- Ensure the server has a static public IP – this will be needed for the Redirect URIs later.
- Ensure ports 80 and 443 are open on the server (for communication with Identity Server and the Internet) and also port 3389 (to RDP into the VM to install the WebMap and GeognoSIS software)
- Ensure that IIS Manager is installed on the server.
- RDP into the Azure Virtual machine.
- Install GeognoSIS on the VM.
- Install Web Map Layers and note the location.
- Inside IIS, turn off all forms of authentication for the instance of Web Map Layers. Refresh IIS to check changes have been made.
- RDP into this server.
- Copy IdentityServer files for installation (Cadcorp will supply these) to the location you want your server to be hosted from.
- Open appsettings.json and locate the RedirectURI link. Change this to the location of Web Map Layers using the public IP address of the Azure instance (eg, ‘http://public IP/website name/’. Note the forward slash at the end of the RedirectUri, this must be present). If multiple sites are being served out by the same instance of Identity Server, separate them with a comma.
- Open IIS and create a new Application using the path to the folder containing the IdentityServer files.
- For the new application, turn on both Windows & Anonymous Authentication (remember to turn others off) and refresh IIS to ensure changes have been saved.
NOTE: Identity Server should be installed on a server with .NET Core Runtime 2.0.9 bundle installed on it. The bundle can be downloaded from https://dotnet.microsoft.com/download/dotnet-core/2.0
1. In the Azure server, use your preferred editor to open the web.config file (run as administrator)
2. Find and remove the <openIdConnectConfig/> tag
3. Add the following section in its place:
<openIdConnectConfig
Authority = "http://external IP address/idserver"
ClientId = "WebMap9"
RedirectUri = "http://Azure IP address/website name /"
ClientSecret = ""
Scope = "openid Roles"
ResponseType = "id_token"
RoleClaimType = "http://schemas.microsoft.com/ws/2008/06/identity/claims/role"
NameClaimType = "name" />
AuthorityThe url to the Identity Server folder ClientIdSets the client_id parameter on the authentication request RedirectUrilocation of the instance of Web Map Layers (i.e. the same as previously added to the appsettings.json file in the server) ClientSecretSets the client_secret parameter on the authentication request, probably not used in Identity Server by default so leave blank. RoleClaimTypeSets the claim type in the returned authentication token that Web Map Layers will use to determine role claims. NameClaimTypeSets the claim type in the returned authentication token that Web Map Layers will use to determine the user name.
4. Modify the <identityConfig/> section to include this code. (This obtains passwords from the Active Directory)
<identityConfig
ConnectionString="ConfigurationDatabase"
AllowOnlyAlphanumericUserNames="false"
RequireUniqueEmail="false" />

|
Ensure RequireUniqueEmail is set to “false”, In Forms authentication, this is set to True by default. This is because all users in the database need unique emails (if a password needs resetting, the email will go to the right user for example). But in Windows/OpenID, only the username and password is obtained for. This means Web Map Layers will try to populate the email column of the database with '(null)' for each user, and if RequireUniqueEmail is set to true, it will display an error. |
5. In the appSettings section of the web.config, uncomment or add the following :
<add key="owin:appStartup" value="OpenIdConnect" />Comment out all other entries that start with
<add key="owin:
6. Connect to the instance of Web Map Layers using the RedirectURI and use your ActiveDirectory credentials when prompted by IdentityServer.
Initially, an authenticated user will not have any access to maps. Their map permissions will need to be set after adding their details to the database.
To add an initial Admin user:
- Open the site’s web.config file for the site and locate the identityConfig tag.
- Change RequireUniqueEmail to false.
- Navigate to IPAddress/SiteName/admin.aspx.
- Click What would you like to do? > Security > Manage User
- In the User Name text box, enter the full username of the user to be added (i.e. DOMAIN\username if necessary)
- Click Manage User and refresh the site.
- Search for the user in Manage User Permissions and set their map permissions as normal. The user can now access all permitted maps .
Identity Server does not directly harvest user and group information from Active Directory. To populate the Web Map Layers authentication database (which determines who can access different maps) an extract of users and groups is required.
To make this easier, Cadcorp will provide a script (GetAdPrincipals.ps1), which will harvest the data into two CSV files: one for users and one for groups. No passwords will be included in the extract.
The CSV files are imported in the Web Map Layers Admin Interface, subsequently allowing the GIS administrator to assign permissions to maps on a user or group basis.
To run the script:
- Save the GetAdPrincipals.ps1 script onto a machine connected to the domain.
- Open the PowerShell command prompt.
- type cd <path to folder where script is>
- Press Enter.
- type ./GetAdPrincipals.ps1 -userCSVPath "<path to user csv>" -groupCSVPath "<path to group csv>"
- Press Enter.
- The two CSV files will be output to the files above.
- Save the two CSV files onto the Hosted Server for Cadcorp to configure with Web Map Layers.
- To maintain the concurrency of groups and users in Web Map Layers, the customer will run the GetAdPrincipals.ps1 script at a determined frequency. The GIS Administrator will upload the new CSV files into Web Map Layers to update the list of users and groups.
- Once an initial set of groups and users has been created, new CSV imports will not duplicate records from the previous import. The import will only add new records to Web Map Layers and it does not delete the currently saved security model i.e. permissions are maintained between imports.
- To clear the users and groups in the database, use Delete All to remove all users and groups registered in Web Map Layers and their associated permissions. You can now import a new set of CSV files and assign permissions.
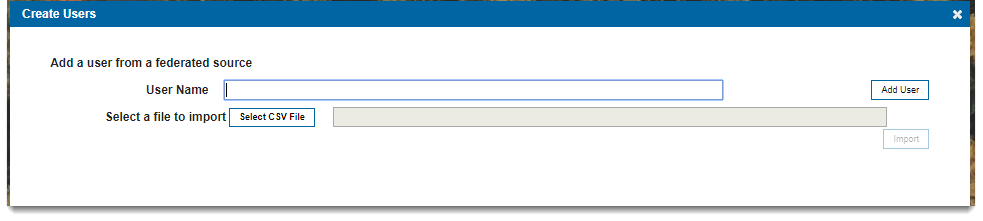
To import a harvest
- In Web Map Layers Admin, click Security > Create User.
- Select a CSV file to import. This process must be repeated twice for both CSV files. This process must be performed once with the users CSV in Create User and once with the roles CSV in Security > Add Roles.
- The users and groups are added to Web Map Layers. The GIS Administrator will assign permissions as described in the previous section.
You can enable single sign-on by altering settings in the browser. This is not required by Web Map Layers, but can provide a smoother user experience.
Chrome
NOTE: Changing in Chrome will automatically change the value in IE.
- Open Settings in Chrome menu. (click the three vertical dots top right to access the menu).
- Go to: Advanced > System > Open Proxy Settings.
- This opens the Internet Properties of IE. Click the Security tab and make sure the Internet zone is selected.
- Now click on Custom Level for security.
- Scroll down to User Authentication > Logon and select the ‘Automatic logon with current user name and password’ radio button’.
- Click OK, then OK again.
- Restart Chrome to apply the changes. (IE will also be updated automatically)
Firefox
Open Firefox’s about:config file and add the following values: (Type about:config in the Location Bar and press Enter to open the file)
- network.negotiate-auth.delegation-uris - http://External IP address
- network.automatic-ntlm-auth.trusted-uris - http://External IP address
- These should both be changed to be the location of the server where IdentityServer is being hosted. Note the lack of forward-slash at the end, this is intentional.
- network.automatic-ntlm-auth.allow-proxies – True
- network.negotiate-auth.allow-proxies – True
Restart Firefox to apply the changes.
Send comments on this topic.