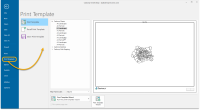
Print Template
Print Template prints a selected part of the map base onto a template.
Templates can include a border, your company logo or address, scale details, copyright notice, etc.
Cadcorp SIS Desktop is shipped with default templates which are suitable for common paper sizes and orientations. These templates can be created in advance and used as often as required.
TIP: A list of popular templates are displayed for you to choose from. If you’d rather create your own, use the Print Template Wizard on the bottom of the screen.
Click File on the Ribbon and select Print Template.
- Simply select any template from the displayed list; you will see a preview in the right pane.
- Set the map frame scale using the drop-down menu.
- Now select any one of the four options from the menu at the bottom of the screen.
Print Template

|

|
Displays the Select Print Template dialog. Note: See Print Template Wizard for more information. |

|
Creates a new SWD to be used as a template. Note: See Create SWD for more information. |
|

|
Use to publish as a PDF file. Note: See Publish PDF for more information. |
|

|
Prints to the default printer. |
|

|

|
To modify a Print Template, recall an existing one, make your changes and save it again. Note: You will be offered an option to save it as a separate SWD. Simply click Cancel if you don’t require an SWD. |

|

|
Displays the Save Print Template As dialog. Select the group where you’d like to store your template. Enter a name and click OK. The current view must contain a Map Frame item and the Map Frame item must not contain any overlays. The easiest way to create a Print Template is to recall an existing one and then modify it. If any snap grid is current then the Print Template will store it for use in the Print Wizard. |
