Spatial Filter
A Spatial Filter is a region used to include or exclude items based on their positions and geometry relative to the filter.
Spatial Filters can be created from any item on an editable or hittable overlay.
A Spatial Filter can be used once or saved as a named object in a library for future use.
TIP: Use the Libraries Control Bar to inspect and amend stored Spatial Filters.
Example
You can use Spatial Filters to display results based on diverse criteria.
For instance, if the Spatial Filter is based on a Polygon item or closed LineString item, it could exclude all items which lie outside it; if it were based on an open LineString item, it could include only those items which intersect with it; or if based on a point item, it could include only those items which contain it.
A Spatial Filter can be used for the following purposes:
- when applied to an overlay, you can use the Spatial Filter to filter out items from the display. On that particular overlay, only those items will be displayed which pass the Spatial Filter selection tests.
- when used with Find (Home > Selection) - Filter tab it can be used to limit which items in the current map window are selected.
- Select the Find items that... pass or fail as required.
- Click on ... the filter... drop-down box arrow and select the filter to apply to items in the SWD.
Filter types
- Class Filter - uses each item’s class to decide whether it is included or not. The possible classes are LineString, Point, Polygon etc.
- Compound Filter - can be used to speed up a Property Filter. You can use a different Property Filter filter for each item class.
- Feature Filter - uses each item's feature code to decide whether it is included or not.
- Property Filter - this is the most general type of filter. Using this filter type you could in theory do the job of all the other filter types. But the drawbacks of this filter type are that it is more complicated to use, and will probably operate slower than the other specialised filters.
A Spatial Filter applied to an overlay stays in force until it is explicitly cleared.
Creating a Spatial Filter
There are two distinct ways to create a spatial filter:
- Use the Spatial Filter command (Create > Miscellaneous)
- Using the Libraries Control Bar to create a Spatial Filter based on an existing one
1. Using the Spatial Filter command
- To save the Spatial Filter as a named item, ensure the library is set as the current library. See Named Object Libraries (NOLs).
- Select the item to be used for the Spatial Filter. This must be on an editable or hittable overlay.
Alternatively, construct an item to use for the Spatial Filter. If this is the sole purpose of the item, it may be better to place it on a separate overlay from other data. - Select Spatial Filter [Create-Miscellaneous].
- To apply the Spatial Filter to an overlay or overlays straight away, select the overlay(s) in the Construct Spatial Filter dialog.
- To save it for future use, check the Save Spatial Filter as tickbox and enter a name. The Spatial Filter will be stored in the current library.
- Click on the Details... button to set the selection test the Spatial Filter will use:
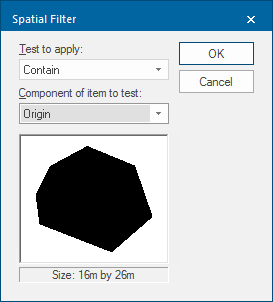
There are two variables:
- Test to apply - this is the geometric test the Spatial Filter will apply. See Spatial Filter tests below.
- Component of item to test - drop-down box to select the geometry component that the Spatial Filter will compare against - their extents, their geometry, or their origin.
Items are displayed only if they pass both components of this test. In the above example, the Spatial Filter must contain an item’s geometry for it to be displayed/selected.
The geometry of the test item is always used, the component to test (geometry, extents or origin) applies to the candidate items.
2. Using the Libraries Control Bar to create a Spatial Filter based on an existing one
Like all Named Objects a Spatial Filter can be copied into another editable library, and the new copy renamed and its properties changed.
There are of course no Spatial Filters in the (standard) library but once you have created Spatial Filters in your own libraries, you can use this method to create other new Spatial Filters.
See Named Object Libraries (NOLs).
Spatial Filter tests
The Spatial Filter has the options detailed below. There are some exceptions, marked with *
Spatial Filter options
| Test to apply | Component of item to test | Description | |
|---|---|---|---|
| *Contain | Extent |
retains items where extent is contained by the spatial filter. |
|
| *Cross | Extent |
retains items where extent is contained or crossed by the spatial filter. |
|
| *Cross by | Extent |
retains items where extent is crossed by the spatial filter. |
|
| *Disjoint | Extent |
retains items where their extents are not contained by the spatial filter. |
|
| *Equal | Extent |
the geometry of the test item cannot equal the extents of a candidate item, except in the following case: where the test item is rectangular and aligned with the axes, and the candidate extents are the same as the rectangle. |
|
| *Intersect | Extent |
retains items where their extents are intersected by the spatial filter (LineString items where not touching the spatial filter but extents are). |
|
| *Overlap | Extent |
extents are entirely overlapping spatial filter. |
|
| *Touch | Extent |
extents are touching outer rim of the spatial filter. Extents are not inside or overlapping. |
|
| *Within | Extent |
retains those items for whom the spatial filter is wholly within their extents. |
|
| *Contain | Geometry |
retains those items which are contained by the spatial filter. |
|
| *Cross | Geometry |
retains those items which are crossed by the spatial filter as well as those contained by the spatial filter. |
|
| *Cross by | Geometry |
retains those items which are crossed by the spatial filter but not those contained by the spatial filter. |
|
| *Disjoint | Geometry |
retains those items which are not crossed by the spatial filter or those contained by the spatial filter. |
|
| *Equal | Geometry |
retains only those items which are equal to the spatial filter in area and location. |
|
| *Intersect | Geometry |
retains those items which intersect the spatial filter. |
|
| *Overlap | Geometry |
retains those items which overlap the spatial filter. |
|
| *Touch | Geometry |
retains those items which touch the spatial filter but do not overlap. |
|
| *Within | Geometry |
retains those items which are wholly within the spatial filter. |
|
| *Contain | Origin |
retains Point/LineString/Polygon items which are contained by the spatial filter. |
|
| *Cross | Origin |
retains Point/LineString/Polygon items for which their origins are contained by the spatial filter. |
|
| *Cross by | Origin |
The candidate item (a point) does not go outside the test item (the polygon), except where the test item is rectangular and aligned. |
|
| *Disjoint | Origin |
retains items where their origins are not contained by the spatial filter. |
|
| *Equal | Origin | the geometry of the test item cannot equal the origin of a candidate item, except in the following case: where the test item is rectangular and aligned with the axes, and the candidate extents are the same as the rectangle. | |
| *Intersect | Origin |
retains origins within or intersecting. |
|
| *Overlap | Origin | the test item (the polygon) contains the candidate item (a point). | |
| *Touch | Origin |
retains items where origin touches the spatial filter but does not overlap. |
|
| *Within | Origin | the test item (the polygon) is not inside the candidate item (a point). | |
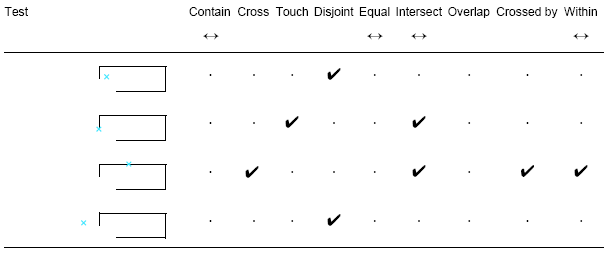
Spatial tests
The following tables describe the spatial tests used in SIS Desktop.
For example in the first row, you have selected the rectangular Polygon item and you want to find the square Polygon item which lies inside it.
You can use the Contain, Cross and Intersect tests. In these tables, the double arrow at the top of a column indicates that the test item is also returned in the results. So, if you use Contain or Intersect, the test item (a rectangle in this example) is returned.
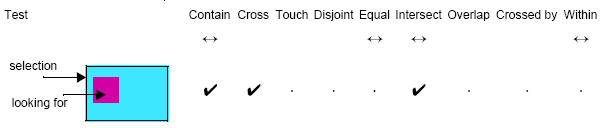
Selected item: Polygon - candidates to find: Polygon items
In this table, the selected item is a Polygon item, and the tests are looking for Polygon items.

Selected item: Polygon – candidates to find: LineString items
In this table, the selected item is a Polygon item, and the tests are looking for LineString items.
Selected item: Polygon – candidates to find: Point items
In this table, the selected item is a Polygon item, and the tests are looking for Point items.
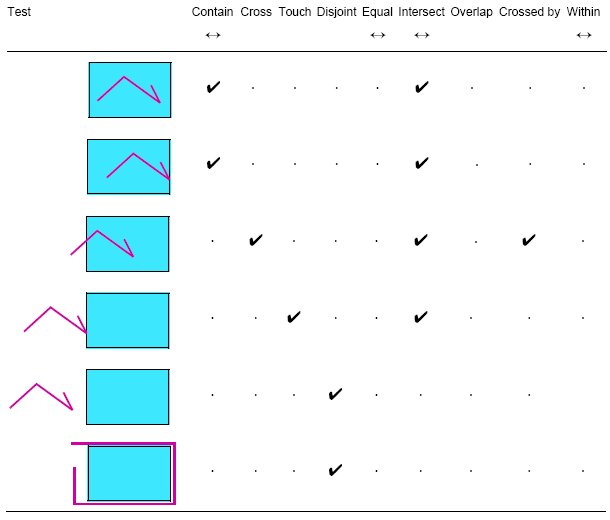
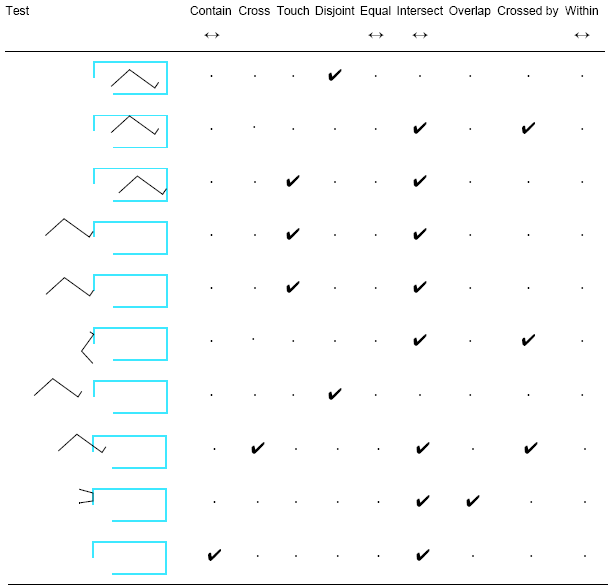
Selected item: LineString – candidates to find: LineString items
In this table, the selected item is a LineString item, and the tests are looking for LineString items.
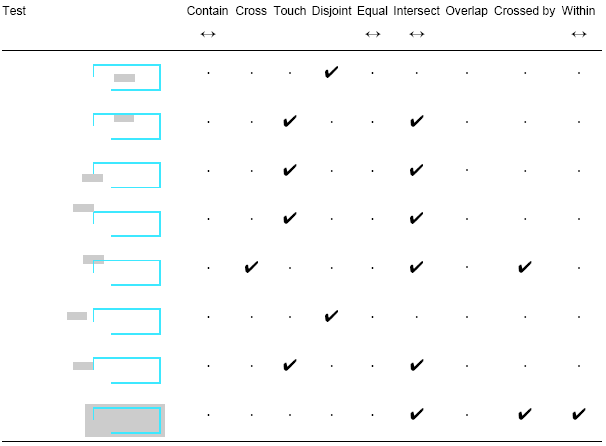
Selected item: LineString – candidates to find: Polygon items
In this table, the selected item is a LineString item, and the tests are looking for Polygon items.
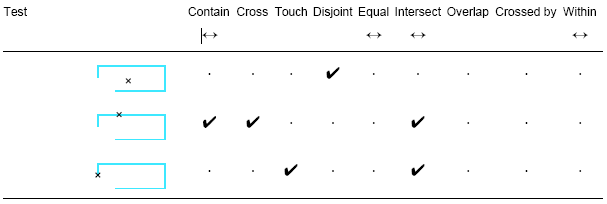
Selected item: LineString – candidates to find: Point items
In this table, the selected item is a LineString item, and the tests are looking for Point items.
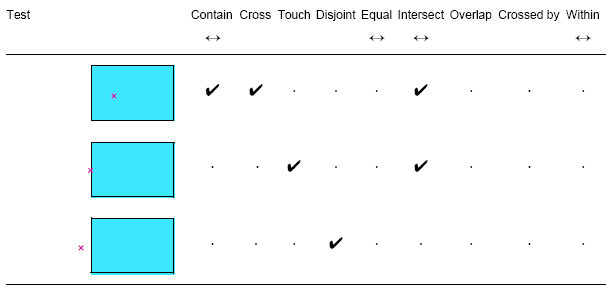
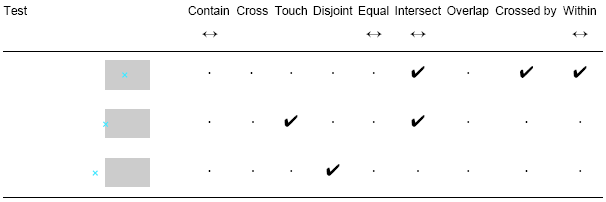
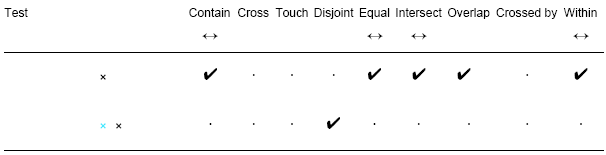
Selected item: Point – candidates to find: Polygon items
In this table, the selected item is a Point item, and the tests are looking for Polygon items.
Selected item: Point – candidates to find: LineString items
In this table, the selected item is a Point item, and the tests are looking for LineString items.
Selected item: Point – candidates to find: points
In this table, the selected item is a Point item, and the tests are looking for Point items.
Using an overlay Spatial Filter
As you progress through creating a Spatial Filter (Create > Miscellaneous) it prompts you for the overlays to apply the Spatial Filter to.
To use an existing Spatial Filter on different overlays, follow these steps.
- In the Overlays dialog, select the General tab.
- Select the overlay to apply the Spatial Filter to.
- From the Spatial Filter drop-down list, select the Spatial Filter to apply.

the Spatial Test may be viewed from the Spatial Filter drop-down box:
.gif)
On the selected overlay, only those items which pass the chosen Spatial Filter are displayed.
Clearing an overlay Spatial Filter
Once applied to an overlay, a Spatial Filter stays in force until you clear it.
There are two ways to do this:
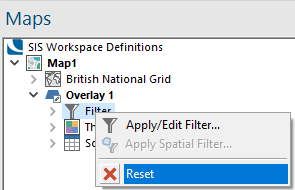
- In the Maps Control Bar, select the overlay to which the Spatial Filter is applied. Then use the Spatial Filter/Reset command from its local menu.
- on the Overlays dialog General tab, click on the cross icon adjacent to the Spatial Filter drop-down box. This clears the Spatial Filter ensuring that all data on the overlay is available for a new query.
Using a Spatial Filter when selecting items
Find (Home > Selection) allows you to use an existing Spatial Filter, either on its own or in combination with a filter and/or expression to select certain items in the map window and not others.
- Select Home > Selection > Find and select the Spatial Filter tab in the Find dialog.
- Choose the required Spatial Filter from the ... the spatial filter... drop-down box. Click on the right arrow next to its name to create a new Spatial Filter based on this one. You can also save the Spatial Filter with a new name.
- If you use the pass option, the test is applied and the results accepted. If you use the fail option, the meaning of the test is reversed - i.e. the test is applied and items which fail the test are selected.
All items found are highlighted in the map window and the number found (total number and number of editable items) is shown on the status bar.
If you cannot see the selected items, pan and/or zoom until you can or use Selection (Home > Zoom).
TIP: The Flicker selection option may be useful here as can highlight selected items by making them appear to flicker.
If you set an expression and/or a filter as well as the Spatial Filter, items are selected only if they pass the Spatial Filter test plus the expression and/or Filter. ![]() Related Topics
Related Topics
Inspecting and editing a Spatial Filter
In the Libraries Control Bar you can inspect all libraries currently in use, and their properties.
Using the Spatial Filter local menu, you can rename the Spatial Filter:

or use the Properties... command to see and change details of the test it applies.