Adding and removing commands
ACom Commands
Whenever a command is invoked, it will be shown in the Developer Control Bar.
Commands can be invoked from the Ribbon, within the Map Window or the Maps or Libraries Control Bars.
The command is shown as a system command in the form "ACom... ",
For example, if the Polygon command is selected the ACom command will be "AComAreaEx" (followed by "::Snap" or "::DblClick", depending on the mouse action).
The ACom form enables developers to find the system name and use it when customising SIS Desktop.
All system command names begin with the letters "ACom". For example: AComRedraw will redraw the Graphical View and CallCommand "AComRedraw" will redraw the view by command.
Note: ACom is case sensitive. If any other combination of upper and lower case letters are used (eg "acom") Cadcorp SIS Desktop will not recognise the command.
Click here to see a full list of ACom commands available in SIS Desktop.
Adding Custom Commands
GisLink customisations can add custom commands to both the ribbon Applications tab (using the RibbonButton method) and the local right-mouse menu (using the MenuItem method).
The following code example creates a button on the Applications tab and defines the properties for the SisRibbonButton:
        This is the application group in Cadcorp SIS desktop Applications Tab
        Dim group As SisRibbonGroup = APP.RibbonGroup
        group.Text = "Batch Translator"

        ' Define a large command button
        Dim BigButton As SisRibbonButton = New SisRibbonButton("Translate", New SisClickHandler(AddressOf Translate))
        BigButton.LargeImage = True
        BigButton.Icon = My.Resources.ButtonImage
        BigButton.Help = "Translates multiple files between supported formats"
        BigButton.Description = "Batch Translator"

        ' Add the button to the main add-in group
        group.Controls.Add(BigButton)
The following code example creates a local menu and defines the properties for the SisMenuItem:
     Dim mMainMenu As SisMenuItem = New SisMenuItem("Batch Translator", New SisClickHandler(AddressOf Translate))

        mMainMenu.Text = "Batch Translator"
        mMainMenu.Help = "Translates multiple files between supported formats"
        mMainMenu.Class = ""
        mMainMenu.Filter = ""
        mMainMenu.Image = My.Resources.MenuImage
        mMainMenu.Locus = ""
        mMainMenu.MinSelection = 0
        mMainMenu.MaxSelection = -1
        mMainMenu.MinStatus = 2
        mMainMenu.Enabled = True


     APP.ContextMenu.MenuItems.Add(mMainMenu)
TIP: See Command Methods (GisLink) for a list of methods which allow a GisLink customisation to action commands.
Custom Command Buttons
Command buttons can have any name but their captions must exactly match the menu$ argument which appears in the RibbonButton statement.
When the user selects a custom command from the Cadcorp SIS Desktop Applications tab, the corresponding command button is pressed automatically.
Removing System Commands
A customisation may choose to remove built-in system commands in order to simplify the Cadcorp SIS Desktop application user interface presented to the user. System commands are removed (and re-added if necessary), typically the “Public Sub New()” of the Loader.vb of the project using the AllowCommands method:
'Remove all system commands.
SIS.AllowCommands(SIS_COM_NONE, "")

'Put the zoom in and zoom out commands back.
SIS.AllowCommands(SIS_COM_ADD, "AComZoomIn2 AComZoomOut")
or:
' Allow all system commands.
SIS.AllowCommands(SIS_COM_ALL, "")

' Remove the zoom in and zoom out commands.
SIS.AllowCommands(SIS_COM_REMOVE, "AComZoomIn2 AComZoomOut")
Running System Commands
Although the GisLink API contains many functions to perform operations in SIS Desktop, it is sometimes easier to invoke one of the system commands than to write Visual Basic code to produce the same result.
Any of the commands available to the user may also be invoked through Visual Basic.
System commands fall into two categories:
- One-shot commands (those which perform an action without user mouse or positional input, e.g. Redraw. They are run using the CallCommand method.
- Callback commands (those which require user mouse or positional input, e.g. LineString) are started using the SwitchCommand method:
'Redraw the view by command.
SIS.CallCommand("AComRedraw")

'Start drawing a line.
    SIS.SwitchCommand("AComLine")

'Release control back to the user
    SIS.Dispose()
Here is an example:
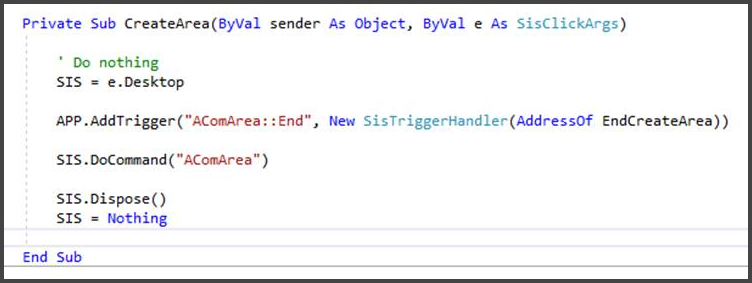
Here SIS = e.Desktop has effectively taken control over SIS Desktop and users are locked out until SIS.Dispose() is called.
Note: Be aware after a GISLink program has taken control over SIS Desktop, SIS Desktop won’t respond to user input or mouse clicks until the GISLink program’s Desktop object has been disposed of.
The one-shot redraw command will be started and completed in the duration of the CallCommand method.
Remember however the callback command exists beyond the duration of the SwitchCommand method. (In this case until the user presses Enter or CTRL + Enter to complete the line or Escape to quit the command).
The progress of callback commands is monitored using Triggers.
Note: The DoCommand method can be called with either a one-shot or a callback command and will choose the appropriate action.