Bitmap Images and Transparency
Bitmap images can be turned transparent using the palette-based transparency method.
- If you use a GIF or 8-bit PNG file which has been set to become transparent, vector overlays under the bitmap become visible through the bitmap.
- If you use the transparency command on other bitmap file types, the intensity of the image displayed on the screen is controlled by the alpha blend factor which is set by a slider on the Styles tab of the Overlays dialog.
Setting transparency
- Load a bitmap image. For example, use the File option on the Overlays dialog to select and load an image in one of the many raster formats supported by Cadcorp SIS Desktop.
- Once the bitmap image is displayed in the Map Window, display the Overlays dialog.
- Ensure the bitmap overlay is selected.
- In the lower right of the Styles tab, there are four Transparency Overrides sliders. The Map Window Bitmaps slider bar controls the transparency of the selected bitmap. As you move the slider from left to right, the transparency increases, and the bitmap starts to fade.
No transparency:
_thumb_150_0.png)
50% transparency:_thumb_150_0.png)
When the slider is fully to the right (255), the bitmap is invisible.
Note: The effects are not visible until Apply is clicked.
Notes on the transparency of imported bitmaps
You can import bitmap files into Cadcorp SIS Desktop using the Overlay Types dialog Imported File option.
Once the image is displayed, use the Set Transparency... (local menu command) to set the degree of transparency.
TIP: See also Set Transparency
Making a specific colour within the bitmap transparent
A specific colour in a bitmap can be made transparent.
Consider the image below consisting of red and green Polygon Items on a white background.
![]()
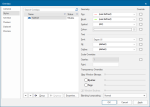
To make the white background transparent display the Overlays dialog, select the overlay containing the image and click on Properties to display the Overlay dialog:
![]()
Select the Raster Transparent Colour (_rasterTransparentColour$) property.
The entry made in the Value field for this property is the RGB value of the image colour you wish to become transparent and could be the RGB value of any colour in the image. In this example the RGB value for white is entered, i.e. 255 255 255.
Click OK and the image white background will become transparent.
If the image shown above is overlaid on a background similar to:
![]()
All white areas of the image will be made transparent and the resulting display in this case would be:
![]()
Transparency of images with an Alpha channel
Some file types (notably TIFFs and PNGs) allow you to create and save an extra channel (Alpha channel), making it a 32-bit image.
This extra channel is not visible but acts as a mask to make certain areas of the image transparent in SIS.
Because this alpha channel is 8-bit, 256 levels, it can have 256 levels of transparency from black/100% transparent to white/100% opaque.
TIP: See Image Stretching - example for further explanation of the alpha channel.
Consider the image below.
![]()
To make an image with an alpha channel transparent display the Overlays dialog, select the overlay containing the image and click on Properties to display the Overlay dialog:
![]()
Select the Raster Transparency (_rasterAlphaTransparency&) property.
Enter a value for this property between 0 (fully opaque) and 255 (fully transparent).
Click OK and the image will become transparent to the degree specified.
The value entered here will be shown on the Map Window Bitmaps slider in the Styles tab of the Overlays dialog.
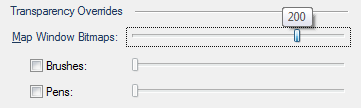
The following screenshot shows how the above image may appear with a Raster Transparency value of 200.
![]()