Datum
Datum constructs a series of single dimensions, each one being measured from a common datum point.
You can dimension any graphics which have the status of hittable or editable.
Select CAD > Datum.
You will see options for the Datum Dimension.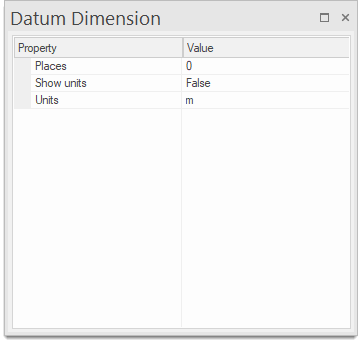
| Option | Description | |
| Places | Specify the precision in places. | |
| Show Units | Select True or False to turn on/off displaying the units | |
| Units | Select the required units from the drop-down menu | |
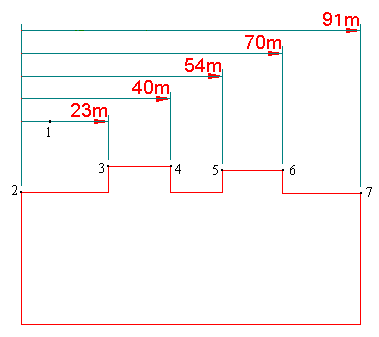
- Click a position on screen through which the first dimension line (or an imaginary extension of the dimension line) will run (point 1 on the diagram above).
- Further dimension lines will be automatically spaced relative to the first one.
- Click a point on the graphics to start dimensioning from (point 2 on the diagram above). Use snapcodes to to ensure accuracy. This is the datum point from which all dimensions are measured.
- Click a point on the graphics to dimension to (point 3 on the diagram above).
- Keep clicking on further points to dimension to (points 4 to 7 in the diagram above).
- Each new point is measured relative to the first point. If you make a mistake inputting a point, press the Backspace key to remove it.
-
Press Enter when you have finished selecting points.
Note: A dimension set will be treated as an item. To pick up the dimension set, click anywhere on the leader lines or click on the dimension line anywhere (except on its grab handle).
The dimension graphics consist of lines (the dimension and leader lines), text (the dimension text), and points (the dimension arrow). Their properties (eg such as font or Pen) may be changed as normal.
The dimension arrow is the Symbol item called DimArrow, located in the "(standard)" Named Object Library.
Use the item’s grab handle to move the line closer or further from the items you have dimensioned. (The leader lines are stretched or shortened accordingly.)
TIP: Dimensions are dynamic - if you move a leader line (by its vertex) the dimension value will be updated accordingly.