Creating Filters
In addition to standard filters you can create your own editable filters. Use either of these two methods.
Note: See here for Filter examples.
1. Use Copy and Paste
Use the Libraries Control Bar to copy a filter from the standard library and paste it into an editable library.
We recommend copying a filter as similar as possible to the one you want. This will require the least editing.
Once you have an editable copy, use Properties to rename and edit the filter.
2. Use Find (Home > Selection)
- In the Libraries Control Bar select the library where you want the new filter to be stored as the current library.
- Select Find
 (Home > Selection) and the Filter tab.
 - Select a filter on which your new filter will be based.
- In the Save filter as: box, name the new filter and click Save Now.
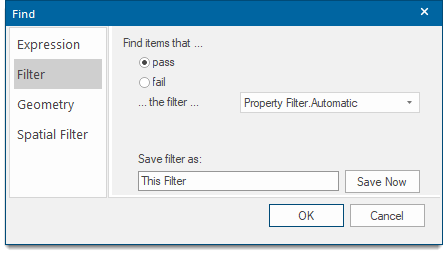
- The new filter is now in the current library. You can use its local command Properties… to edit it.
- Click on the horizontal arrow next to each filter for a drop-down list of related structure.
- To include an item click the circular button to select it. Now click Include. To exclude an item click the circle again and click Exclude.
Click the Clipboard button and select Copy as SIS Expression to copy the Filter selections as a Cadcorp SIS Desktop expression.
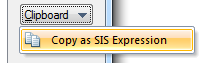
The copied Cadcorp SIS Desktop expression would be:
(_FC& between 17004 and 17007 or _FC& between 17201 and 17224 or _FC& in (0,17,17001,17002,17100))
Apply this new filter by selecting it in the Overlays dialog General tab. ![]() Related Topics
Related Topics
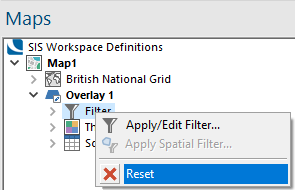
Clear a filter
An overlay filter remains active until you clear it. To remove the filter, use the Reset command on the overlay’s local menu.
When a filter is reset all items on the overlay will become visible and the filter tree will also be re-set.
TIP: Alternatively on the Overlays dialog General tab click on the cross adjacent to the filter to be cleared.