Add Lat/Lon Graticule - Print Templates
This option enables you to display a lat/lon graticule and define how it appears on the template.
TIP: See here for information on Graticules.
Each graticule can have up to 8 levels, each level being a sub-division of the previous level.
For instance, level 0 (the first level) defines the appearance of the lines of latitude and longitude and that of their labels. Level 1 defines the spacing of the dicing, how it is labelled and so on.
Graticule styles are named objects, stored in libraries.
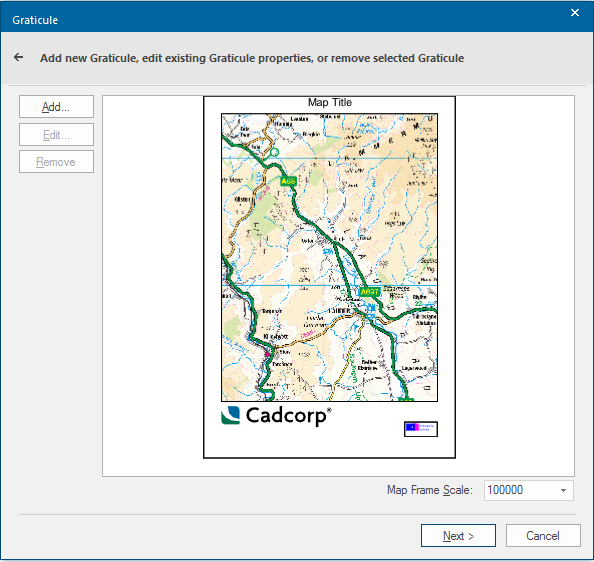
1. On the Graticule dialog, select the map frame which will contain graticules (a template can contain more than one map frame).
Note: If you have already created any graticules and saved them as named objects, the Edit and Remove buttons are enabled. Otherwise click on Add.
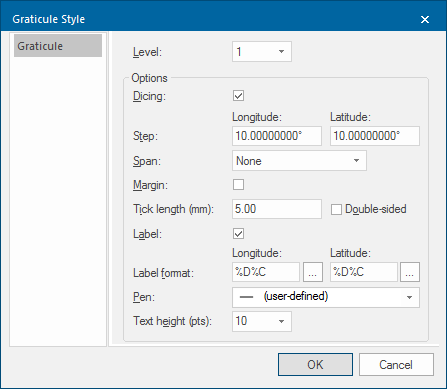
2. On the Graticule Style dialog define each level in turn (defaults are set automatically).
3.
When you have finished defining these parameters, click OK.
4. Back on the Graticule dialog you now see the template with the graticule. Click on Next if OK, or Back to go back and re-define it.
To add a graticule to a previously created template, use the local command Create Graticule.
Saving a Graticule as a Named Object
Once you have created a graticule on a print template, you can save it for future use using its item command Store style. You can select a graticule using the S snap. Graticules are named objects, and are stored in the current library.
Graticule parameters
1. Dicing
Here you choose whether or not to display dicing. This parameter can only be set in level 1.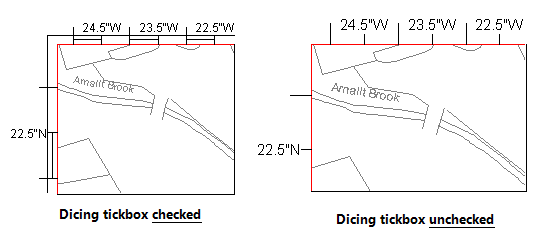
2. Step
These are the intervals at which the graticule lines will be drawn, in the current angular units
3. Span
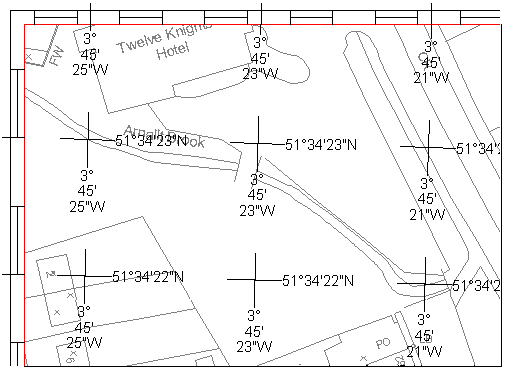
The span determines how the graticule lines are drawn at this level. There are four options:
- None - no lines appear across the map frame, but labels or ticks can still be drawn if required (see the Label and Tick length options below)
- Grid - grid lines are ruled right across the map frame
- Crosshair Grid - a crosshair is drawn at the intersection of lines
- Crosshair Grid with Text - the position (in latitude and longitude) of each crosshair is shown (the level text style and label format are used):

4. Margin
Use this option to determine whether or not a margin is drawn at this level.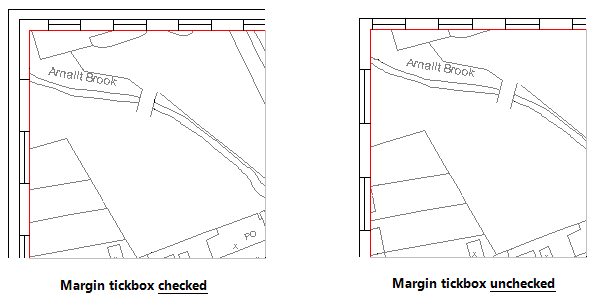
5. Tick length
This is the distance that the ticks which appear on the graticule border (at the step intervals) extend beyond the graticule border.
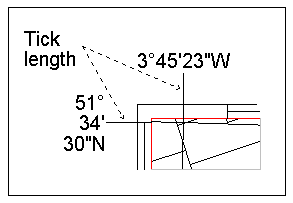
Ticks are always drawn perpendicular to the graticule border (whereas span lines are drawn along lines of equal latitude or longitude).
By selecting the Double-sided checkbox, the tick lines are drawn on both sides of the graticule border.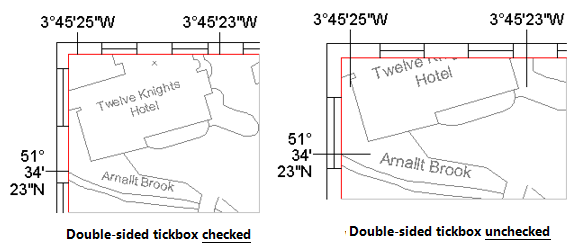
6. Label
Use this checkbox to control whether or not to have the graticule ticks labelled: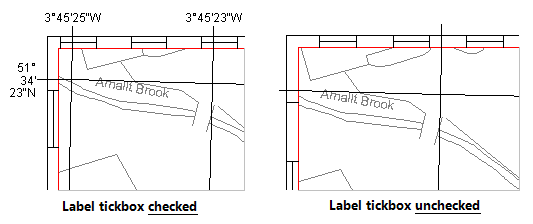
7. Label format
At each level you can choose whether to show degrees, minutes, seconds and the compass point. The options are:
%d or %D print the degrees (%D appends a degrees symbol)
%m or %M print the minutes (%M appends a ')
%s or %S print the seconds (%S appends a ")
%c or %C print the direction (N, S, E, or W)
%d, %D, %m, %M, %s and %S can be modified to print fixed width and precision. For example, %4.2s will print at least 4 characters, with 2 decimal places.
8. Pen
The pen used for the graticule lines and the labels. Use the More button to edit the current pen using the Edit Pen dialog.
9. Text height
This is the point height of the label text and/or the graticule span text.