Creating an overlay from a Spatial Database (RDBMS Cursor Dataset)
For the purposes of this section any reference to RDBMS Cursor Datasets refers to data from these databases. The data here has been stored in the native spatial data type:
- Oracle (Locator/Spatial)
- Microsoft SQL Server
- PostgreSQL using PostGIS
Note: See also Spatial Databases for use and functions of an RDBMS Cursor Dataset.
Preliminary Tasks
Before creating an overlay in Cadcorp SIS Desktop from spatial data, complete these preliminary tasks.
1. Backdrop
Ensure the appropriate backdrop has been opened for your geographical areas. UK users should be using the British National Grid backdrop.
2. Set Map Extents/viewing scale
- Set the Map Window view extents in Cadcorp SIS Desktop to a scale of approximately 1:2500 (or less) and
- Set the focus on an area which is coincidental with the spatial data read from the RDBMS cursor dataset. You can do this by displaying boundary data or aerial photography for your area and then using the Zoom command.
If view extents are not coincidental with the data, no data will display in the RDBMS cursor dataset overlay. Users may have to pan or zoom to an appropriate location to see data.
If view extents are set too large (above 1:5000) large volumes of data may have to be read from the database to Cadcorp SIS Desktop. This may affect the spatial database server, client and network resources.
3. Hot snapping
'Hot' snapping enables you to select features and snap to vertices easily on an RDBMS cursor dataset overlay by clicking on them with the left mouse button (whilst the cursor is in its default select mode i.e. arrow as the mouse cursor). There is a performance overhead for this option so switch it off in the Options (File) dialog:
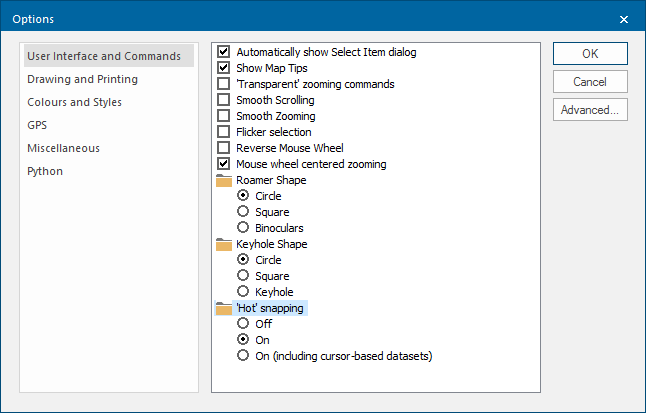
If the 'Hot' snapping radio button is set to off map tips will not display.
With 'Hot' snapping switched off use the following ‘hot’ keys to select features while the mouse cursor is hovering over the feature:
| A | = | to select Polygon items |
| L | = | to select LineString items |
| P | = | to select Point items |
| C | = | to select the Centre of an item |
| V | = | to select a Vertex |
| M | = | to select the Middle of a LineString |
| X | = | to select the cross of two LineStrings |
TIP: See Snapcodes for further details of ‘hot’ keys and snapcodes.
4. Expression Caching
Expresssion result cache is a preference that can be switched on for RDBMS Cursor-based Datasets created in dynamic mode.
In situations where the result of an expression is static, Cadcorp SIS Desktop will remember the value rather than calculate it every time the user pans the map window or takes any action that causes Cadcorp SIS Desktop to redraw the overlay. If Expression result cache is switched off Cadcorp SIS Desktop will recalculate the values every time the map has to redraw.
Expression result cache can be switched on and off from the Options dialog:
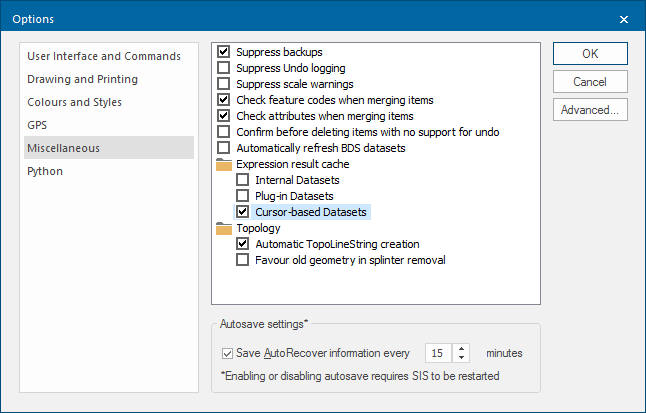
- Choose Miscellaneous on the left hand side of the dialog.
- Check the Cursor-based Datasets tickbox under the Expression result cache folder.
4. Scaling Symbol Sizes
If you require symbols to be scalar (i.e. adjusting in size according to view scale) select the overlay and check the Scale:Override tickbox on the Styles tab of the overlays dialog box.
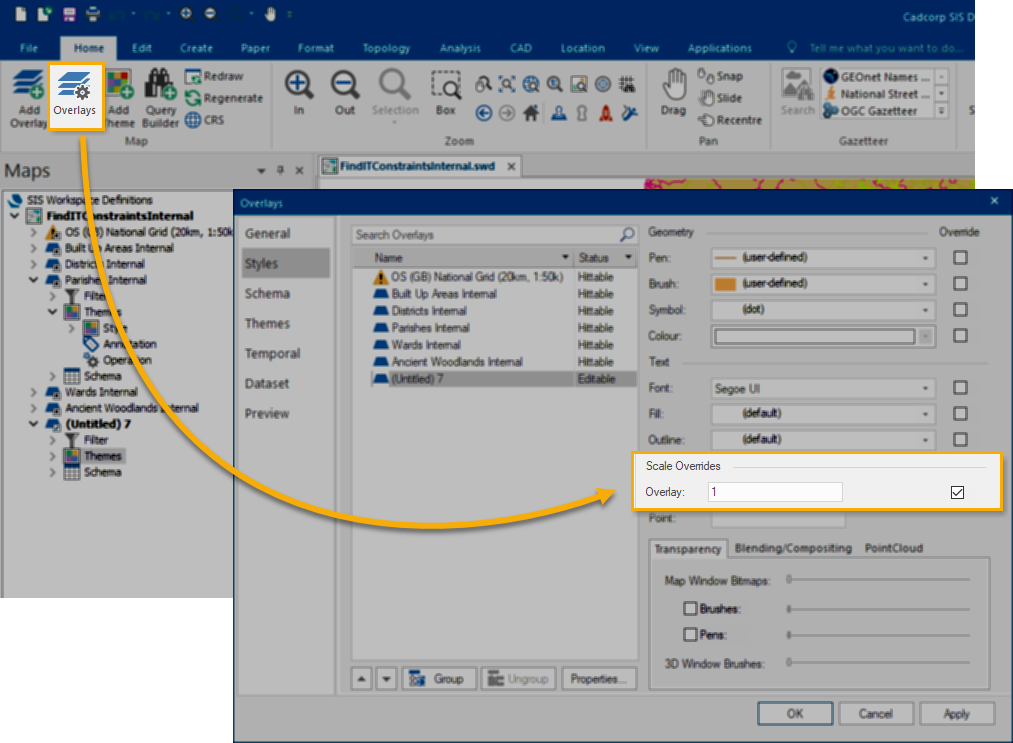
Symbols will appear on the screen at the size that they were created as it is the dataset scale that matches the view scale. If the dataset scale is doubled then the symbols will double in size for a given view scale.
5. Fixing a Symbol size
A symbol can be set to display at a fixed size, i.e. the size it was drawn or a multiple of that size. ![]() Related Topics
Related Topics