A Colourset is a series of values with associated colours, and is used by Grid items to indicate heights, densities or other values by graduated colour shades. The Relief theme also uses a Colourset.
SIS lets you create Colourset objects and save them in Named Object Libraries using names. You can also use user-defined coloursets. A user-defined colourset does not exist as a named object, but is displayed according to its name that must be in a particular form. The name of a user-defined colourset can be defined in JSON.
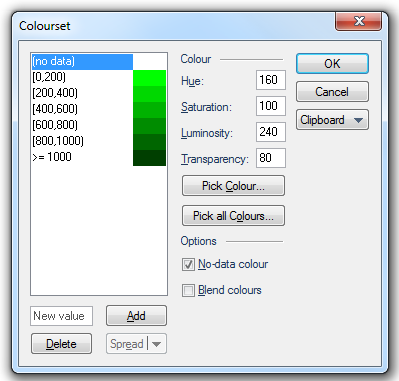
The following example shows a Colourset with 6 colour-value pairs in steps of 200 displayed in shades of green.
The Colourset dialog allows you to define the colour-value pairs to be included in the Colourset.
Click on a colour-value pair, the range colour can then be edited for Hue, Saturation, Luminosity and Transparency.
Colour
Hue
The wavelength of the colour. This corresponds to a position in a rainbow of colours.
Saturation
The purity of the colour. For example, pink is an unsaturated form of red. Primary colours are saturated, pastel colours are unsaturated.
Luminosity
The brightness of the colour. Very dim colours become black.
Hue, Saturation and Luminosity values are all in the range 0-240
Transparency
The transparency of the colour. Fully opaque to fully transparent is a range between 0 (for fully opaque) and 255 (for fully transparent).
Note: The Transparency value in JSON is the inverse of the range 0 to 255 as entered in the Colourset dialog.
For example:
Entering 10 in the dialog will result in "A":245 in the code:
{"Value":0,"Colour":{"HSL":[80,240,120],"A":245}}
Entering 245 in the dialog will result in "A":10 in the code:
{"Value":0,"Colour":{"HSL":[80,240,120],"A":10}}
Pick Colour
Select a colour-value pair and click the Pick Colour button to display the colour palette to edit the selected colour-value pair and define custom colours if required.
Pick all Colours
Click the Pick all Colours button to display the Pick Colours dialog to allow a ColorBrewer colour scheme to be selected.
Options
No-data colour
Coloursets store a 'nodata' colour. This allows reordering of the HLS (Hue, Lightness, Saturation and Transparency) controls into the more commonly used HSL (Hue, Saturation and Luminosity) order, and enables the New value - Add button when viewing a read-only Colour-set.
No-data colour
If you wish to blend and smooth the transition of the colour ranges check the Blend colours tickbox.
Clipboard
The Clipboard drop down box allows you to copy the complete Colourset parameters in JSON.
Click Copy as JSON to copy the entire JSON which can then be pasted into a JSON editor and the values edited as required.
On completion the code can be copied from the editor and, using the Paste option, pasted into the existing or a new Colourset.
The following JSON defines the colourset as shown in the above dialog:
JSON as copied and pasted into Notepad:
{"Colourset":{"ValueColourPairs":[{"Value":0,"Colour":{"HSL":[80,240,120]}},{"Value":200,"Colour":{"HSL":[80,240,102]}},{"Value":400,"Colour":{"HSL":[80,240,84]}},{"Value":600,"Colour":{"HSL":[80,240,66]}},{"Value":800,"Colour":{"HSL":[80,240,48]}},{"Value":1000,"Colour":{"HSL":[80,240,30]}}]}}
The formatted JSON:
{
"Colourset": {
"ValueColourPairs": [
{
"Value": 0,- lower value of the first colour-value pair
"Colour": {
"HSL": [
80, - Hue value in range 0-240
240, - Saturation value in range 0-240
120 - Luminosity value in range 0-240
]
}
},
{
"Value": 200, - lower value of the second colour-value pair
"Colour": {
"HSL": [
80, - Hue value in range 0-240
240, - Saturation value in range 0-240
102 - Luminosity value in range 0-240, etc.
]
}
},
{
"Value": 400,
"Colour": {
"HSL": [
80,
240,
84
]
}
},
{
"Value": 600,
"Colour": {
"HSL": [
80,
240,
66
]
}
},
{
"Value": 800,
"Colour": {
"HSL": [
80,
240,
48
]
}
},
{
"Value": 1000,
"Colour": {
"HSL": [
80,
240,
30
]
}
}
]
}
}
Options
With the No-data colour tickbox checked in the Colourset dialog:

With the Colour values for (no data) set as follows:
Hue set to 160,
Saturation set to 100,
Luminosity set to 240,
Transparency set to 80.
The JSON copied from the Colourset dialog.
The code in red shows the No-data colour parameters added to the JSON:
{"Colourset":{"ValueColourPairs":[{"Value":"NoData","Colour":{"HSL":[160,100,240],"A":175}},{"Value":0,"Colour":{"HSL":[80,240,120]}},{"Value":200,"Colour":{"HSL":[80,240,102]}},{"Value":400,"Colour":{"HSL":[80,240,84]}},{"Value":600,"Colour":{"HSL":[80,240,66]}},{"Value":800,"Colour":{"HSL":[80,240,48]}},{"Value":1000,"Colour":{"HSL":[80,240,30]}}]}}
Note: The Transparency value of 80 is shown as 175 in the code.
The formatted added code:
{
  "Colourset": {
      "ValueColourPairs": [
          {
             "Value": "NoData", ---------- additional lines of code
             "Colour": {
                 "HSL": [
                     160,    ----------
                     100,    ---------- HSL values of selected colour
                     240     ----------
                ],
              "A": 175 ---------- Transparency value of selected colour
            }
       },
If the Blend colours tickbox is checked in the Colourset dialog:

The following JSON will be copied from the Colourset dialog:
The code in red shows the Blend colours parameter added to the code:
{"Colourset":{"Blend":true,"ValueColourPairs":[{"Value":0,"Colour":{"HSL":[80,240,120]}},{"Value":200,"Colour":{"HSL":[80,240,102]}},{"Value":400,"Colour":{"HSL":[80,240,84]}},{"Value":600,"Colour":{"HSL":[80,240,66]}},{"Value":800,"Colour":{"HSL":[80,240,48]}},{"Value":1000,"Colour":{"HSL":[80,240,30]}}]}}
The formatted added code:
{
"Colourset": {
"Blend":true,---------- additional code
"ValueColourPairs": [
{
"Value": 0,
.... continued as above

New value/Add
To add a new value to the list of colour-value pairs enter a range value in the New value box, and click the Add button. SIS adds the new value and converts the existing colour-value pairs to suit.
Delete
Select a colour-value pair from the colourset and click the Delete button to remove it from the colourset. The lower range value will automatically change to include the deleted range.
Spread
Spread/Spread colours/Spread transparency
Where you have three or more colour-value pairs, you may choose to let SIS use graduated colours through the range. This is achieved by selecting a colour for the first colour-value pair, selecting a colour for the last colour-value pair, highlighting all the values for which you want the colour and/ot transparency graduated, and then clicking the corresponding Spread button.
The Spread option spreads the colours AND the transparency values between the first and last selected colour-value pairs.
The Spread colours option spreads only the colour values between the first and last selected colour-value pairs.
The Spread transparency option spreads only the transparency values between the first and last selected colour-value pairs.
Click to return to www.cadcorp.com
© Copyright 2000-2017 Computer Aided Development Corporation Limited (Cadcorp).