Configuring Edit Add-In
Introduction
The Edit Add-In is a licenced extension to Web Map Layers 8.0.
The Edit Add-In allows the creation and editing of data in a supported spatial database (SQL Server, Oracle or PostGIS). Users can create and edit points, lines and area geometry features, as well as adding or editing attribute values.
Installation
The Edit Add-In installation comprises the following files located in specific folders:
| Folder | Files |
| App_GlobalResources | Cadcorp.WML.EditingExtender.Resources.resx |
| bin | Cadcorp.WML.EditingExtender.dll |
| css | Cadcorp.WML.EditingExtender.css |
| img | Delete_40x40_02.png |
| DrawingSelect_40x40_02.png |
Copy and paste each of the above files to the folder of the same name in the WebMapLayers8 installation folder, i.e. C:\inetpub\wwwroot\WebMapLayers8.0.nnnn.0.
Licencing
Check that the feature "GeognoSIS|Webmap|Lyr|EDT" is included in the Web Map Layers 8.0 licence file.
The Web Map Layers 8.0 licence file is named cadcorp.lservc and is located in C:\inetpub\wwwroot\WebMapLayers8\bin.
Open cadcorp.lservc in Notepad, or similar ASCII editor, and search for the feature "GeognoSIS|Webmap|Lyr|EDT". If this feature is not included in the file add the line in the licence file supplied for the Edit Add-In to the end of cadcorp.lservc and save the file.
Authentication (IIS)
The Edit Add-In requires security to be enabled on Web Map Layers 8.0. This is to ensure that unauthorised users cannot edit the data. It is also important to define the correct security users for each map, as users are editing the database directly.
Edits to the database are applied using the database user which is defined in the SWD. This allows different security users to have their own SWDs and therefore edit the database using a linked database user.
You can define Windows Authentication or Windows Forms security on Web Map Layers and the Edit Add-In. Steps to apply these security models are described in the Setting the Authentication to be used topic.
Cadcorp SIS settings
To allow users to make edits to a database layer the administrator must:
- Add the spatial database layer using the Add Overlay wizard to the SWD. The database user must have edit rights on the table.
- Make sure that the database layer in the SWD has the property WML::AllowEdit& and the property is set to 1. See Creating an Overlay Property. A number of editable tables can be defined in an SWD.
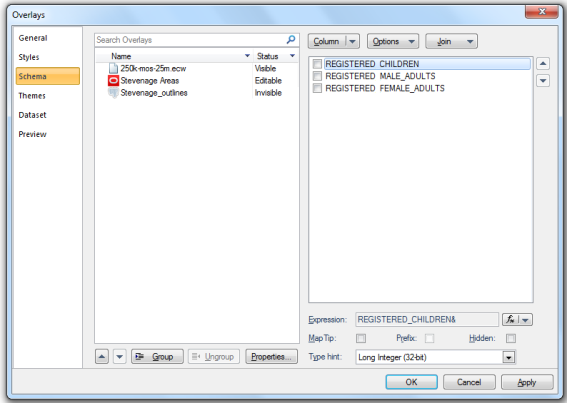
- Modify the schema to define which columns are presented to the user for editing or population. All columns displayed in the Schema tab of the Overlays dialog will be available for editing using the name defined in this view of the data

System expressions, such as _area#, are calculated by GeognoSIS and cannot be edited so will not be displayed in the Edit Attribute dialog. All system expressions start with an underscore e.g. _area# - Define any styling on the data. Themes can be used to define feature types. These will be automatically maintained as the user creates or edits data and can be used for visual recognition and confirmation of edits.
- A single snapping layer can be defined. Edits can be snapped to an underlying data layer. These are defined by adding the WML::AllowSnapping& property to the layer in the SWD and ensuring that the value is set to 1:

Snapping requires features to be pushed to the client from GeognoSIS. Most datasets can be used for snapping but the following recommendations should be taken into consideration:A spatial database or BDS file should be used
When snapping to OS MasterMap data, a lightweight snapping layer should be created by copying line work from the OS MasterMap table to a separate table. Do not use a filtered or phased overlay.
- Only one overlay should be defined as the snapping overlay.
Note: 'name' and 'description' are reserved names and should not be used for schema column names.
Web Map Layers settings
Add Map
The map is defined using the Admin Interface provided with Web Map Layers 8.0. It is a collection of layers, usually some base mapping and then data layers. Security is defined on each map which will allow the administrator to provide access to a range of editable layers for different users. If you need to create a new map for editing, please see the Add Map topic.
Add Layers
Once a map is created, then layers can be added. For editing, the map will require some base mapping and a GeognoSIS SWD containing any editable database layers, a snapping layer and other required data layers. To manage these layers in your map, please see the Add Layers topic.
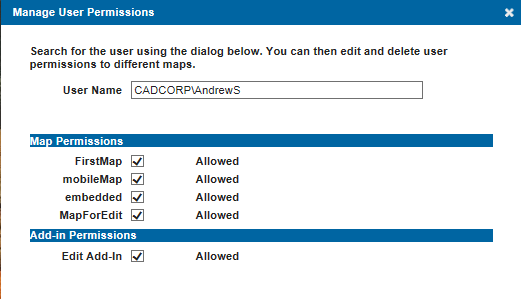
Manage User Permissions
Set the Map Permissions and Add-in Permissions.
Security > Manage User Permissions

Permissions will need to be set for each user.
In General Settings > mapname Settings dialog:
 Settings.png)
Uncheck the Allow Anonymous Access tickbox.
Check the Edit Add-In tickbox.
Click Update.
Defining attributes in the Edit Add-In
As an Administrator, you can decide how attributes need to be defined when they are captured.
- Data type - defined by the type hint used on the Schema in SIS - only data entered using this type will be accepted.
- A choice of whether the field is mandatory or not.
- Options for defining attributes which must be used, selected from a drop down by the user
Select Configure Edit Add-In from the drop-down menu.

You will see the active SWD with editable layers listed in a drop down menu:

Choose any layer and click OPEN to view its attributes. Use the options to determine how users handle each attribute on Web Map layers- for eg, making it mandatory or changing the data field type.
Attributes are inherited from the Schema entries in SIS. To add new attributes, click here.

- Enable Mandatory Attribute to force user to fill this field.
- Enable Free Data Entry to allow any information (alphanumeric or special characters) to be entered in the field.
- If you want to restrict the type of information entered, untick the check box to view other options.
- In the Label field, enter the label to be displayed on the web page. In the Value field, enter the value tag to be used in the database.
- Click Add to create new values or Update to finalise the changes.

Send comments on this topic.