Run new Process
Applies one or more geoprocessing operations to Items and creates new Items from the results.
Click Run new Process to display the Processing Input dialog.
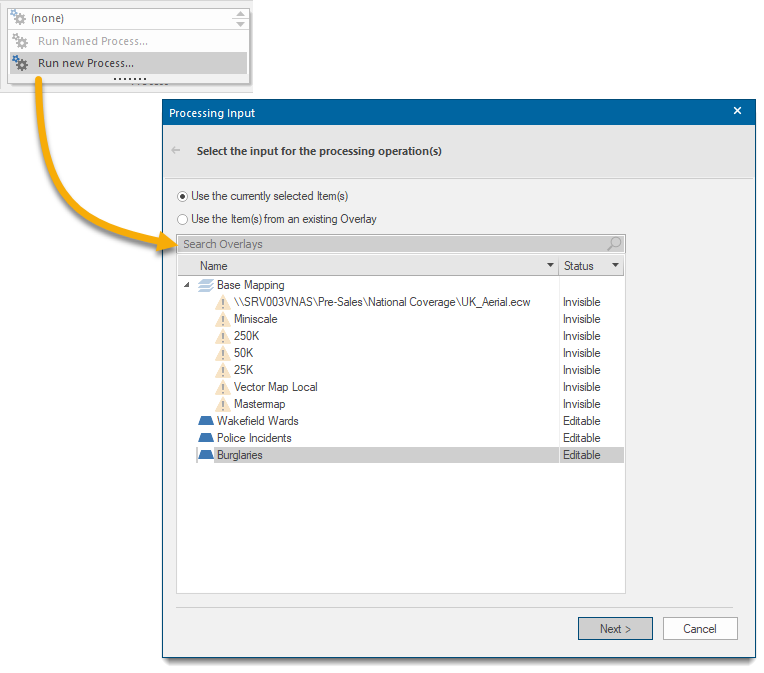
Choose from either of these options:
- Use the currently selected Item(s): If you have Item(s) selected in the Map Window this option will be selected by default but can be changed to the next option.
- Use the Item(s) from an existing Overlay: If no Item(s) are selected this option will be selected and cannot be changed. In this case choose the required overlay.
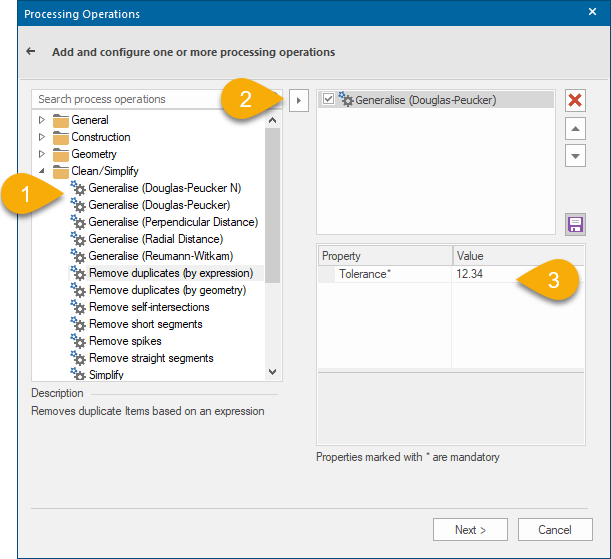
Click Next to open the Processing Operations dialog.
(1) Select the required process, click the arrow (2) to add it to the configuration pane and define its properties (3).
Click the Save button 
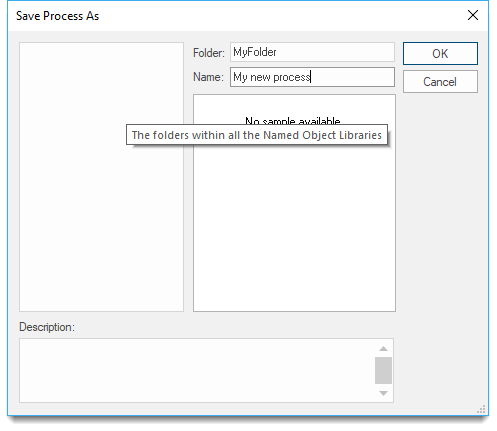
Enter a Folder name and Name for the Process and click OK. The new Process will now be added to the current NOL:
Click Next to specify the output type.
1. Create a new Overlay for the processed Item(s)
Click the Create Overlay button and select one of the available types.
- Create new file to save the file in any of the accepted formats: Cadcorp Base Dataset (*.bds), Cadcorp Feature Database (*.fdb), Cadcorp Item Database (*.idb)
- Microsoft SQL Server Spatial Dataset: This is an editable dataset that stores items in a Microsoft SQL Server Spatial database using the planar geometry type. See also Microsoft SQL Server Spatial Dataset.
- PostGIS: This is an editable dataset that stores items in a PostGIS-enabled PostgreSQL database using the PostGIS spatial schema. See PostGIS for more information.
- Oracle Spatial: This is an editable dataset that stores items in an Oracle 9i (or later) Spatial database, using the Oracle Object-Relational schema. See Oracle Spatial for more information.
- Cadcorp Internal Dataset: This is an internal dataset. Contents of the internal dataset are stored within the SWD file and cannot be shared with other SWDs. The Internal Dataset dialog will be displayed to allow the name for the new overlay to be entered.
2. Replace the input Item(s) with the processed Item(s)
The input Item(s) will be replaced with the processed Item(s). Only use this option if you do not need to keep the input Item(s).
3. Add the processed Item(s) to an existing Overlay
The processed Item(s) will be added to an existing overlay, keeping the input Item(s).
Click Finish.
TIP: For a complete list of processing operations, click here. Properties marked with an * in the process descriptions are mandatory.