.gif) Insert Block
Insert Block.gif) Insert Block
Insert Block
.gif) Insert Block places an instance of a Block on the current editable overlay, creating an Insert item.
Insert Block places an instance of a Block on the current editable overlay, creating an Insert item.
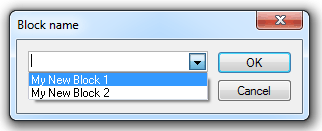
On selecting Insert Block, the Block name dialog will prompt you to select a Block name from a drop-down list of available Blocks:

After selecting a Block, an Insert item containing the Block items will be placed on the cursor.
Positioning the Insert Block:
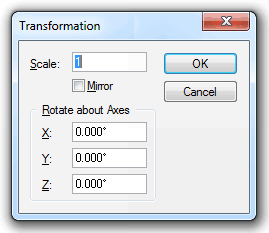
If you do wish to make any scale, mirror or rotation changes to the Insert Block press the Enter key to display a Transformation dialog:

Scale
Enlarges or reduces the items on the cursor by the specified value. This value is relative to its current size, and ignores any previous enlargement or reduction.
Mirror
Creates a mirror image of the graphics on the cursor, using the specified angle as the mirror plane. 0 degrees is horizontal, 45 degrees is bottom-left to top-right, and 90 degrees is vertical.
Rotate about Axes:
X - Defines three-dimensional rotation around the X-axis. This option is only useful in 3D modelling.
Y - Defines three-dimensional rotation around the Y-axis. This option is only useful in 3D modelling.
Z - Rotates the items on the cursor through the specified angle. Positive angles are anti-clockwise, negative angles are clockwise.
See Blocks for further details.
Top of page
Click to return to www.cadcorp.com
© Copyright 2000-2017 Computer Aided Development Corporation Limited (Cadcorp).