.gif) Publish
Publish.gif) Publish
Publish
.gif) Publish publishes the current window to a selected type of file, e.g. to Adobe Portable Document Format (PDF). This option should be used when you want to create a document that cannot be edited by anyone viewing that file. This is especially useful when creating official or formal documents.
Publish publishes the current window to a selected type of file, e.g. to Adobe Portable Document Format (PDF). This option should be used when you want to create a document that cannot be edited by anyone viewing that file. This is especially useful when creating official or formal documents.
The Publish As dialog is displayed to allow you to select the file name and the output type:

The Publish button allows you to save in the following file formats (expand the links for more information):
Encapsulated PostScript documents, also known as EPS, are capable of storing any combination of text, graphics and images.
In order to open EPS files you must have some Illustration software, such as Adobe Illustrator. However EPS images can be imported into many applications as an image, such as Microsoft Word. In Word simply go to Insert > Picture and navigate to the EPS file.
Before creating the document you are able to alter the parameters within the Encapsulated PostScript dialog. The dialog offers a number of options, organised into tabs as follows:
General, Description, Output and Options.
The General tab provides general page size, rotation of the map view and page orientation options.
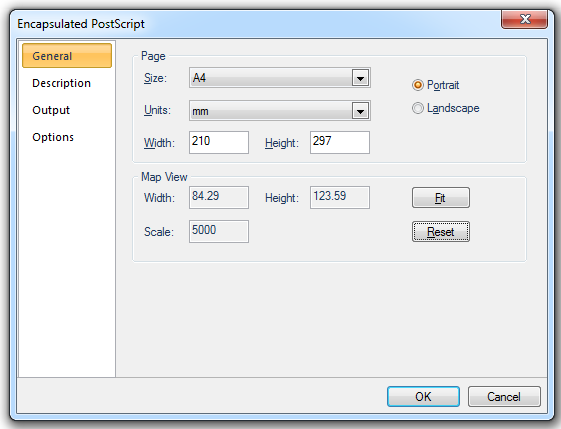
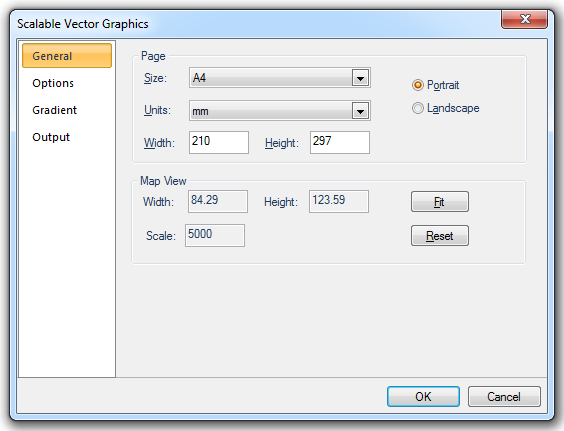
Page
Size
Select from standard page sizes
Units
Allows the page size units to be selected. The drop-down box allows selection from points, mm, cm and inch.
Width/Height
Shows the width and height of the page. For a custom page size manually enter the width and height.
Portrait/Landscape
Select the page orientation to match the template.
Map View
Width/Height
Shows the width and height of the view.
Scale
The scale of the exported map.
Fit
Squeeze or stretch the view to fit onto the page. This is useful for exporting the current view quickly, but the map will not be exported to a known scale. The Map View values will change as a result of using Fit.
Reset
Resets the view to the original settings (before pressing Fit).
The Description tab allows you to supply additional information to be stored in the .pdf file
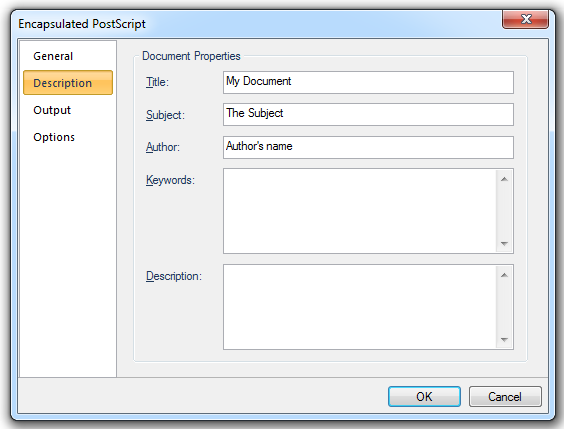
Document Properties
Title
Specifies the title of the Encapsulated PostScript document.
Subject
Specifies the subject of the Encapsulated PostScript document.
Author
Specifies the author of the Encapsulated PostScript document (this will default to the current logged on user).
Keywords
Specifies any keywords in the Encapsulated PostScript document.
Description
Specifies a description of the information in the Encapsulated PostScript document.
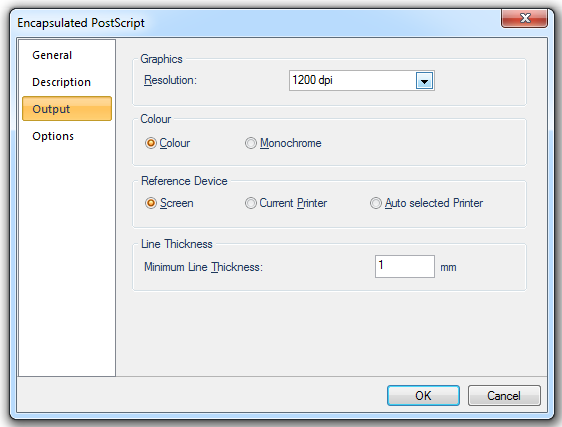
The Output tab lets you:
The Options tab provides a selection of the Adobe Postscript Language Level, colour mode and image encoding.
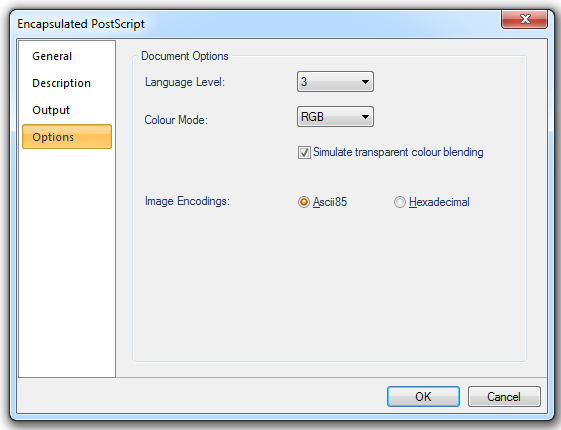
Document Options
Language level
Select from Adobe PostScript level 1, 2 or 3.
Colour Mode
Select between RGB and CMYK.
Simulate transparent colour blending
Check to simulate transparent colour blending.
Image Encodings
Select the required image encoding method: Ascii85 or Hexadecimal.
XPS (XML Paper Specification) documents are designed to look the same on screen as they do in print, and, as the name suggests, are XML based files. Once created the files can be viewed through XPS Viewer, which is installed by default on Windows Vista, Windows 7 and Windows 8.
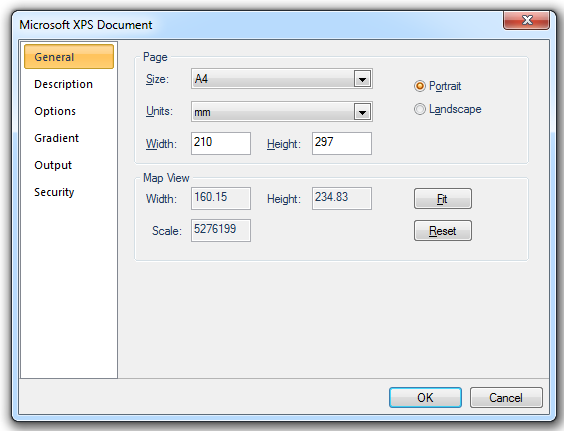
Before creating the document you are able to alter the parameters within the Microsoft XPS Document dialog. The dialog offers a number of options, organised into tabs as follows:
General, Description, Options, Gradient, Output and Security.
The General tab provides general page size, rotation of the map view and page orientation options.
The Description tab allows you to supply additional information to be stored in the .XPS file.
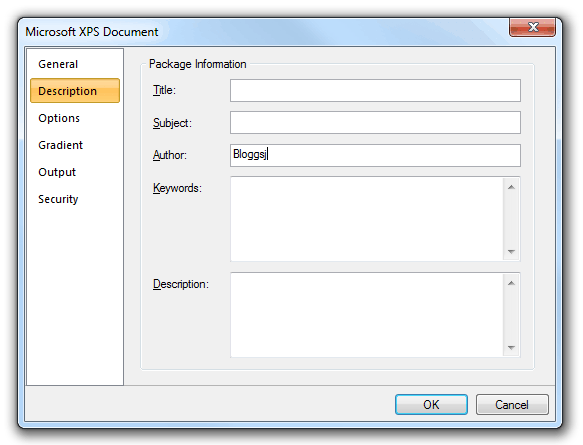
Package Information:
Title
Specifies the title of the XPS document.
Subject
Specifies the subject of the XPS document.
Author
Specifies the author of the XPS document (this will default to the current logged on user).
Keywords
Specifies any keywords in the XPS document.
Description
Specifies a description of the information in the XPS document.
Note: The above information is held within the Details tab of the XPS Viewer Properties dialog.
The Options tab lets you export hyperlinks, layers and text.
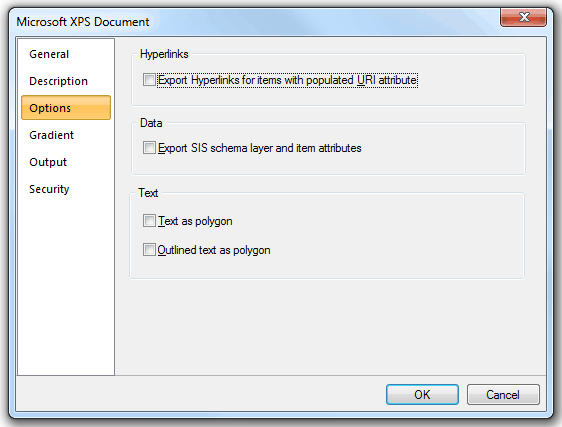
Hyperlinks
Export Hyperlinks for items with populated URI attributes
Check this option if any hyperlinks applied in Cadcorp SIS (_URI$ attribute) are to be exported and will work within XPS Viewer.
Data
Export SIS schema layer and item attributes
Attribute data contained within the schema layer will be exported as an XML Object in the XPS package.
Text
Text as polygon
Text items in SIS will be converted into polygons and therefore cannot be highlighted when viewed within XPS Viewer.
Outlined text as polygon
Text items in SIS with an outline applied (_text_outline& = true) will be converted into polygons and therefore cannot be highlighted when viewed within XPS Viewer.
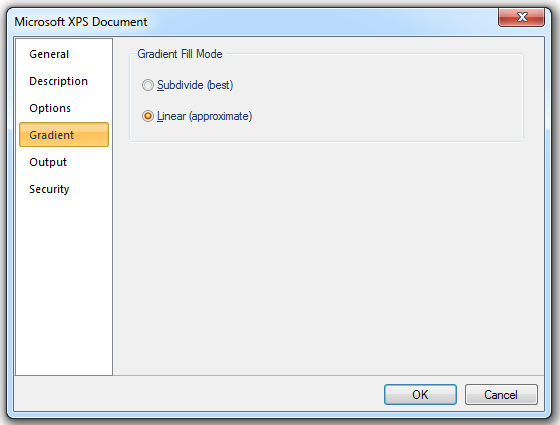
Gradient Fill Mode
Subdivide (best)
Recursively sub-divided triangles, until the colour in all three points of a triangle equal or reach the minimum colour tolerance and visually appear to be the same.
Linear (approximate)
Apply linear gradient from the colour of one point to the colour of the opposite side in a triangle.
The Output tab lets you:
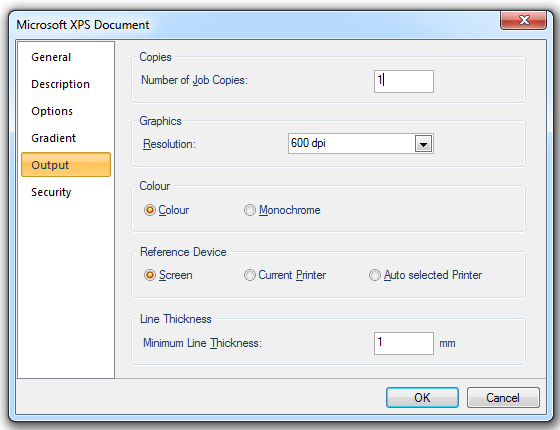
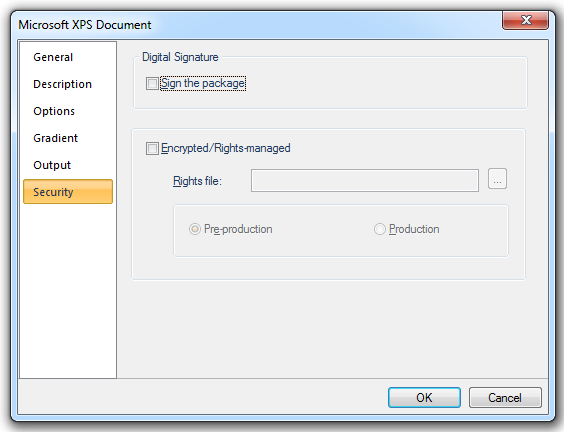
Digital Signature
Sign the package
Digital signatures are used to verify the publisher of a document or file is legitimate. Signing the package is the process of applying a digital signature (or electronic security mark) to the XPS file. Checking the Sign the package tickbox will load a Windows Security dialog after setting all the XPS properties and clicking OK. Within this dialog you view/change the digital signature details or install an existing certificate or you can accept the default settings.
Encrypted/Rights-managed
Check this tickbox to enable encrypted rights.
Rights file
Click the ... button to navigate to an XrML Rights markup file.
Pre-production
Creates a pre-production public/private key pair.
Production
Creates a public/private key once published.
PDF files are widely used for distributing documents, because they retain their original appearance regardless of the hardware, software, and fonts available on different computers. A PDF file can contain both vector and raster data.
SIS enables you to export to a PDF file, or use the Print Template Wizard to save directly to a PDF file.
The Portable Document Format dialog offers a number of options, organised into tabs as follows:
General, Description, Options, Schema, Output, Fonts and Security.
Click on each tab in the following PDF dialogs to navigate between tabs.
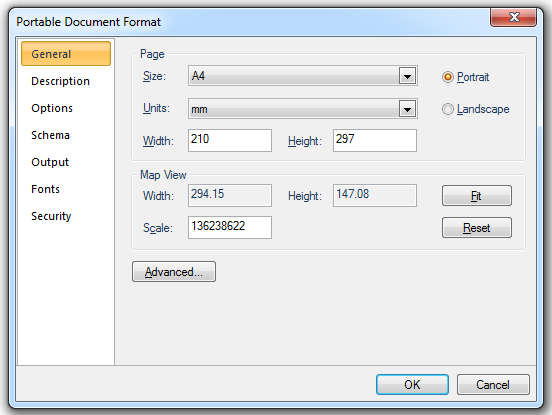
The General tab provides general page size, rotation of the map view and page orientation options.
Page
Size
Select from the range of standard paper sizes.
Units
Allows the page size units to be selected. The drop-down box allows selection from points, mm, cm and inch.
Width/Height
Shows the width and height of the page. For a custom page size enter the width and height.
Portrait/Landscape
Select the page orientation to match the template.
Map View
Width/Height
Shows the Width and Height of the view.
Scale
The scale of the exported map.
Fit
Squeeze or stretch the view to fit onto the page. This is useful for exporting the current view quickly, but the map will not be exported to a known scale. The Map View values will change as a result of using Fit.
Reset
Resets the view to the original settings (before pressing Fit).
Advanced
Displays the Advanced PDF Settings dialog. This dialog allows the specification of additional parameters, e.g. page margins, image rotation, etc.
The Margins settings specify the page's margins.
The Rotate settings specify if the map view is to be rotated before placing it on a page and if so by 90° clockwise or 90° anticlockwise.
The Description tab allows you to supply additional information to be stored in the PDF file.
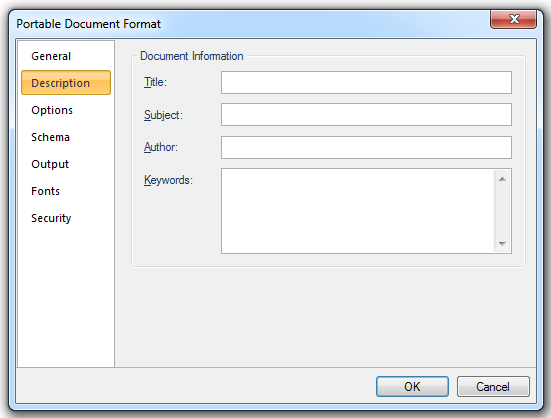
Other applications can make use of this information later. For example, Adobe® Reader® can search your computer for PDF files that have matching information in the following fields
Document Information
Title
Specifies the title of the PDF document.
Subject
Specifies the subject of the PDF document.
Author
Specifies the author of the PDF document.
Keywords
Specifies any keywords in the PDF document.
The Options tab lets you:
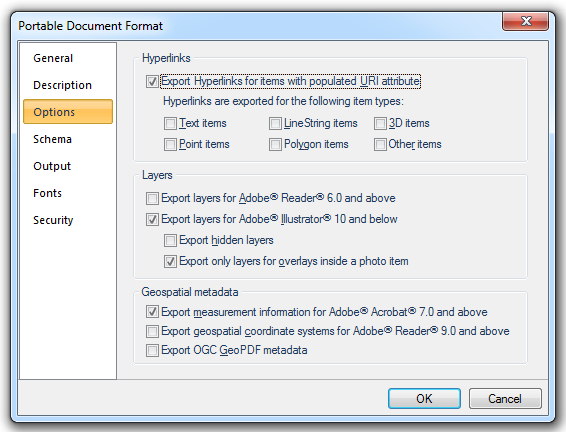
SIS supports the Adobe® Acrobat® viewport and measurement tag functionality when exporting to an Adobe® Acrobat® PDF document. Note that some of these features are only available with the Adobe® Acrobat® Standard or Professional version 7.0.8 or above, they are not provided with Adobe® Acrobat® Reader®.
Layer awareness may be maintained when exporting to a PDF by ticking the appropriate Layers option in the Options tab.
The Options tab entries are as follows:
Hyperlinks
Export Hyperlinks for items with populated URI attribute
Exports hyperlinks to external resources for items whose _URI$ attribute is not empty.
Hyperlinks are exported for the following item types
Select as required from six item types:
Text items
LineString items
3D items
Point items
Polygon items
Other items
In an exported PDF you may find the exported hyperlinks are only selectable, i.e. the pointer cursor changes to a hand cursor, at a very close range from the linked item. To increase the selection range see Hyperlinks to external objects - Hyperlinks in PDF output.
Layers
Exportlayers for Adobe® Reader® 6.0 and above
Exports layer information so that Adobe® Reader® 6.0 and later can display each overlay as a separate layer.
Exportlayers for Adobe® Illustrator® 10 and below
Exports layer information so that Adobe® Illustrator® 10 and previous versions of Adobe® Illustrator® can display each overlay as a separate layer.
Export hidden layers
Exports hidden overlays as hidden layers instead of ignoring them.
Export only layers for overlays inside a map frame item
Suppresses the layer information for top-level overlays and Map Frame items contained within them.
If this tickbox is unchecked the layer structure of the exported pdf will include the Frame and Map Frame, for example:
This option gives control over visibility of the entire Map Frame.
If this tickbox is checked the pdf will be exported with control of only the layers inside the Map Frame, for example:
This means there is no control over the frame which will be permanently visible.
Geospatial metadata
Export measurement information forAdobe® Acrobat® 7.0 and above
Specifies whether or not measurement information will be inserted into the PDF document. Adobe® Acrobat® 7.0 is capable of measuring lengths and areas in coordinate reference system units if such measurement information is present in a PDF document.
Export geospatial coordinate systems forAdobe® Reader® 9.0 and above
Specifies whether or not geospatial coordinate systems will be inserted into the PDF document.
Export OGC GeoPDF® metadata
Specifies whether or not GeoPDF® metadata will be inserted into the PDF document. GeoPDF® metadata enables the functionality of the OGC GeoPDF® plugin for Adobe® Acrobat®.
The viewport and measurement tag functionality allows users of Adobe® Acrobat® Standard or Professional version 7.0.8 or above to perform real world measurements on mapping data contained within an Adobe® PDF document. Measurements allowed by Adobe® Acrobat® Standard or Professional include the measurements of the Distance, Perimeter and Area. This functionality is available within Adobe® Acrobat® Standard and Professional from the Tools/Measuring command.
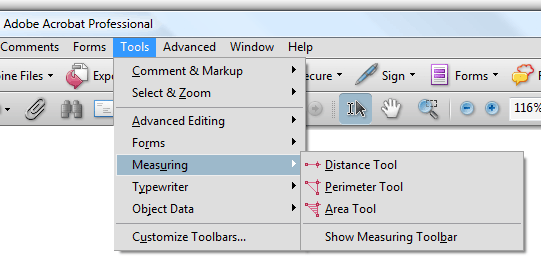
To activate viewports and the ability to utilise the measurement tools, it is necessary to tick the Export measurement information forAdobe® Acrobat® 7.0 and above box in the Options tab when exporting to an Adobe® PDF document.
Currently only viewports (coordinate systems) measured in metres/feet/miles etc. in x and y coordinates are supported.
Note: Adobe® PDF documents created with the activated viewports are not created with unlimited accuracy, instead every vertex created during the measurements are snapped on to a grid created according to the resolution chosen, i.e. 300dpi, 600dpi, 1200dpi. Therefore a greater resolution should improve the accuracy of the results returned. It should also be noted that even though the vertex coordinates within the Adobe® PDF document may be exactly the same as those within SIS it is highly unlikely that the measurement values provided by the system will exactly match. This is due to the fact that Adobe® Acrobat® could be using a different algorithm to perform its measurements and that there is no such thing as true, real, exact, correct values. Each value is an approximation.
The Schema tab enables you to transfer attribute information associated with graphical items so that they are available and visible to Adobe® PDF document users.
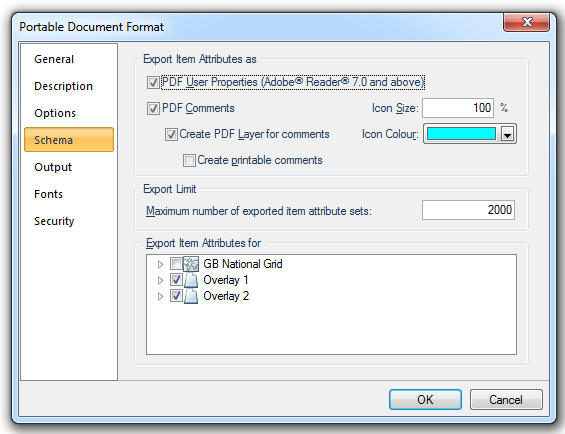
Export Item Attributes as
PDF User Properties (Adobe® Reader® 7.0 and above)
Specifies whether User Properties shall be exported as PDF User Properties. Only Adobe® Reader® 7.0 and above is capable of displaying PDF User Properties. See Adobe Acrobat; File>Properties>Description.
PDF Comments
Check this tickbox to export item attributes as PDF comments.
Create PDF Layer for comments
Specifies whether a separate layer should be created in the PDF document, which contains only the PDF comment icon.
Create printable comments
Specifies whether the PDF comments should be included in the output, when the PDF document is printed.
Icon Size:
Specifies the width and height of PDF comment icons.
Icon Colour:
Specifies the colour to be used for PDF comment icons and PDF comment dialog borders.
Export Limit:
Maximum number of exported item attribute sets
The maximum number of items for which item attributes shall be exported. Exporting item attributes for too many items may cause Adobe® Reader® to respond very slowly.
Export Item Attributes for:
Specifies the overlays for which item attributes shall be exported.
Currently there are two different methods in which attribute information stored within the Overlay schema columns can be transferred to be used within an Adobe® PDF document:
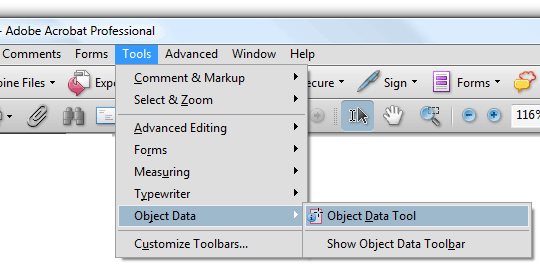
Method 1 - Through the Tools>Object Data>Object Data Tool within Adobe® Acrobat® by ticking the PDF User Properties (Adobe® Reader® 7.0 and above) box in the Schema tab.
Method 2 - Through the use of the Adobe® PDF comments section by checking the PDF Comments tickbox.
On selection of either of the above options the Export Item Attributes for overlay list box will become available, tick the overlays in which the attribute information is required.
Note: checking the tickbox next to the overlay name will result in all of the columns that are shown with the schema column being exported. Therefore it is recommended that only the required attribute columns for each overlay are present within the schema column.
If the PDF Comments option has been chosen, the additional options of Create PDF Layer for comments, Icon size, Icon Colour, and Create printable comments will be made available. Comments can be displayed within Adobe® Acrobat® from the Comments menu in the toolbar.
The Create PDF Layer for comments option configures the export to place all comments on to a separate PDF layer, which then allows for its visibility status to be configured. Please note that this option only really works if the appropriate Export Layers option has been selected in the Options tab.
Configuration of Icon Size and Icon Colour allows the configuration of the icon size and colour of the centre select icon within Adobe® Acrobat®.
The Create printable comments option allows the comments to
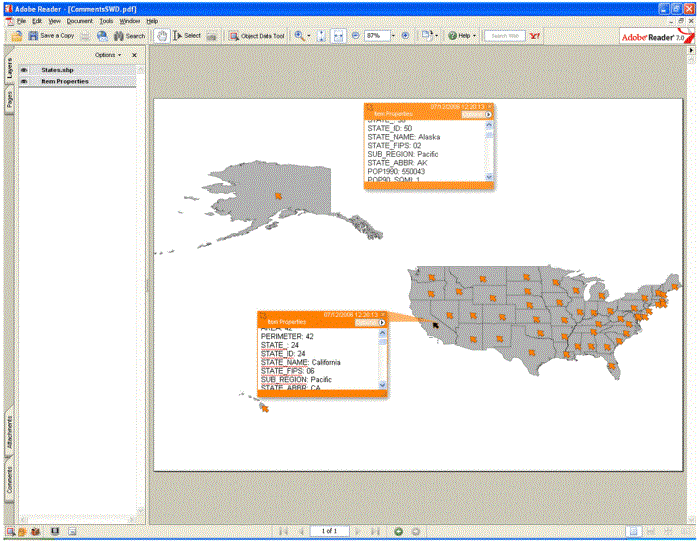
Adobe® Reader® 7.0.8 showing comments
The Maximum number of exported item attribute sets option allows the configuration of the number of item attributes that are to be exported. For example if the value has been set to ‘1’ only the first items attribute will be exported. Note: it is not possible to configure the order of the items in which they are to be exported.
When using a Print Template, by default the map frames provide the hierarchy in which the overlay names are listed. These can be amended to provide more meaningful descriptions especially where more than one map frame item exists. The Frame acts like an overlay and therefore can be renamed in the SWD prior to exporting. Each map frame can be named by adding the Property GPhotoName$ to the map frame’s attributes. The Value can be filled with the required text.
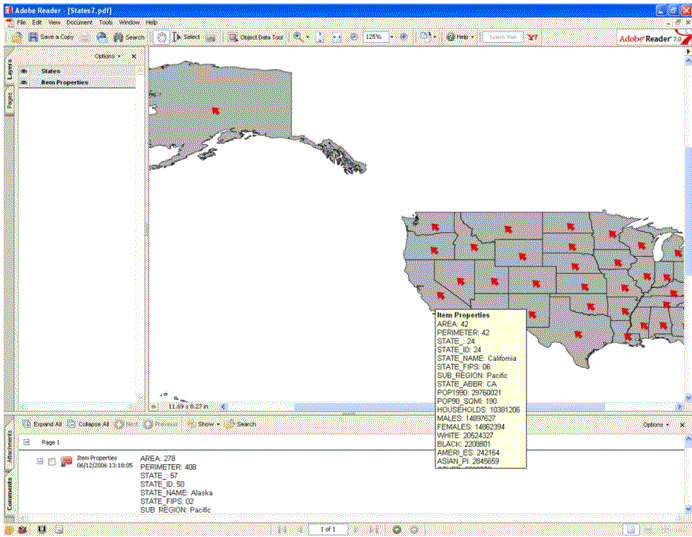
Adobe® Reader® version 7.0.8 reading in a PDF document exported from SIS with PDF Comments selected and Icon Colour set to Red. Attributes can be displayed by pointing the mouse cursor over the red pointer arrows.
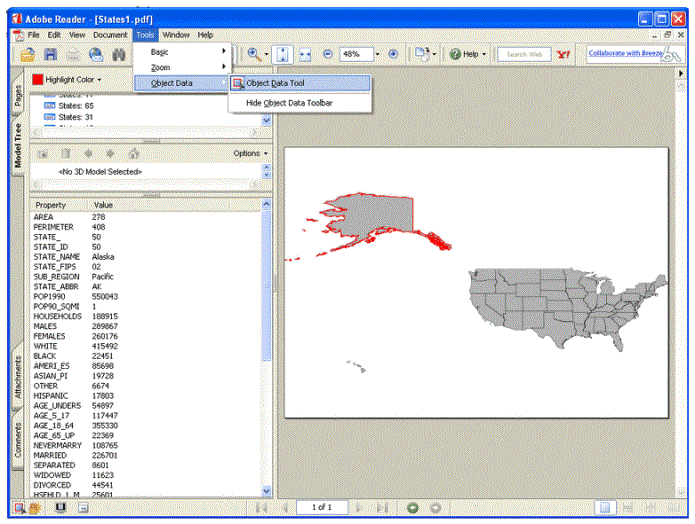
Adobe® Reader® version 7.0.8 reading in a PDF document exported from SIS with PDF User Properties (Adobe® Reader® 7.0 and above) selected. Attribute information is displayed within the Model Tree tab when the Object Data Tool has been selected. Attributes of the geometry items can then be viewed by selecting the required geometry.
The Output tab lets you:
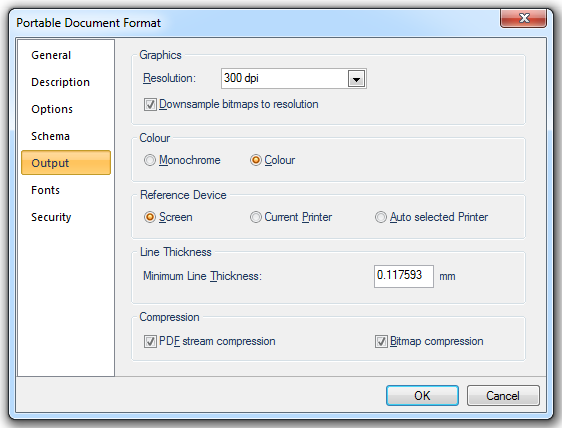
Graphics
Resolution
This emulates the resolution of a printer. For most SWDs a higher resolution setting results in larger but higher quality PDF files, while a lower setting results in smaller but lower quality PDF files. The drop-down box allows the following resolutions:
300 dpi
600 dpi
1200 dpi
Downsample bitmaps to resolution
Downsample bitmaps to the chosen resolution. This can reduce the size of the PDF document.
Colour:
Monochrome
Creates a monochrome PDF document.
Colour
Creates a true colour PDF document.
Reference Device:
Screen
Creates a PDF document using the screen as the reference device for drawing commands. This option is the preferred choice unless the SWD contains Windows metafiles.
Current Printer
Creates the PDF document using the printer currently selected by the user as the reference device for drawing commands. This option may yield better results than the Screen option if the SWD contains Windows metafiles.
Auto selected Printer
Creates the PDF document using the automatically selected printer as the reference device for drawing commands. This option may yield better results than the Screen option if the SWD contains Windows metafiles.
Line Thickness:
Minimum Line Thickness
Specifies the minimum width of all LineString items in the PDF document. Whichever of the four available units is specified in the Page Units field; points, mm, cm or inch, the default value for Minimum Line Thickness is the equivalent of 1/3 point. Smaller LineString item widths normally give better results when zooming into a PDF document. Thicker LineString items normally give better results on printouts.
The PDF exporter uses the dpi value from the resolution exporter to calculate the thickness of a LineString item in SIS. It does this as the dpi is “dots per inch”, where a dot is 1 pixel wide. A LineString item in SIS has a certain thickness in pixels, this is passed to the PDF exporter which calculates the thickness in the units specified in the PDF exporter using the dpi. If the thickness is less than the minimum thickness, then it is increased to meet the minimum required thickness.
Compression
PDF stream compression
This always reduced the size of the PDF document. Compressing the PDF document will, however, reduce its quality.
Bitmap compression
When you want to publish maps you might want to compress the map in order to significantly reduce the file size. Compressing the PDF document will, however, reduce its quality.
The Fonts tab allows you to select the fonts to be embedded, if required.
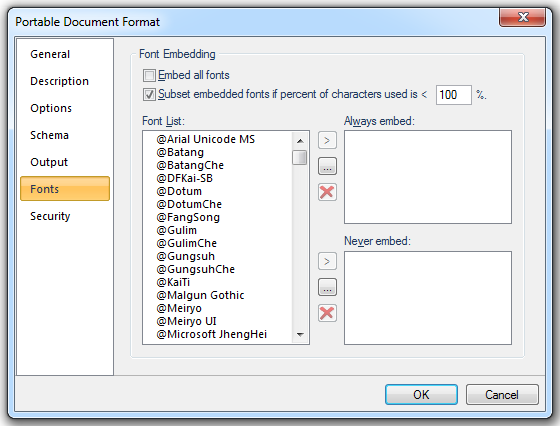
Font Embedding
Embed all fonts
Embedding ensures that all PDF readers will see the text in its original font and be able to print the file using the original fonts, hence the quality will be maintained.
If you embed the whole font in the PDF changes can be made to the PDF even if the original font is not available. Embedding the entire font will increase the file size.
Subset embedded fonts if percent of characters used is <xxx%
Specifies whether fonts which are embedded shall be subset if less than a certain percentage of characters in the font are used in the document.
The xxx% figure specifies the percentage of characters of the font used in the document below which the font will be subset before it is embedded. The lower the percentage entered the smaller the final file size will be.
A value of 100% is equivalent to subsetting all fonts.
Note: Changes to the PDF can only be made if the full version of Adobe Acrobat® or another program with the capability of modifying PDFs is installed on your computer.
Font List
The list of fonts available on your system.
Always embed
The list of fonts that are always embedded, regardless of the setting of the Embed all fonts check box.

- Adds the font selected in the Font List to the Always embed list. 
- Displays a Font name dialog to allow you to enter a specific font's name, which will then be added to the Always embed list. -Directories buttons-Delete.gif)
- Removes the font selected in the Always embed list from that list.
Never embed
The list of fonts that are never embedded, regardless of the setting of the Embed all fonts check box.

- Adds the font selected in the Font List to the Never embed list. 
- Displays a Font name dialog to allow you to enter a specific font's name, which will then be added to the Never embed list. -Directories buttons-Delete.gif)
- Removes the font selected in the Never embed list from that list.
The Security tab provides various settings for controlling how the PDF file can be used or modified by other people. For example, you can prevent others from editing, printing, copying, or even opening the PDF file unless they know the relevant passwords.
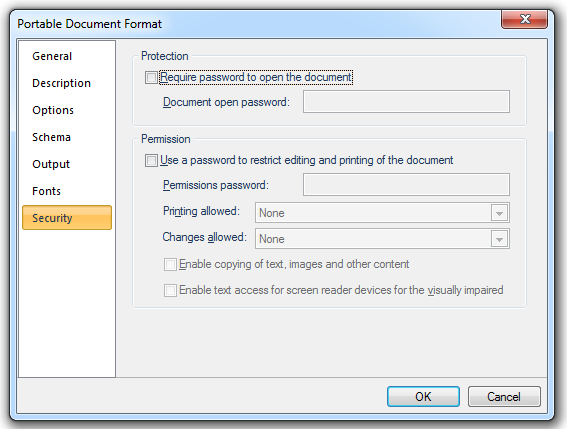
Protection:
Require password to open the document
Check this box to password protect the opening of the PDF document. If this box is checked the Document open password field becomes active.
Document open password
The password users have to type if they want to open the PDF document.
Permission:
Use a password to restrict editing and printing of the document
Restricts the printing and editing of the PDF document. Users cannot change the security settings unless they type the password you specify.
Permissions password
The password users have to type if they want to change the PDF document's security settings. This password must be different from the Document open password.
Printing allowed
Specifies the quality of printing for the PDF document. The drop-down box allows the choice of:
None
Low Resolution (150dpi)
High Resolution.
Changes allowed
Specifies which editing actions are to be allowed in the PDF document. The drop-down box allows the choice of:
None
Insertion, deletion and rotation of pages
Filling in of form fields and signing
Commenting, filling in of form fields and signing
Any except extraction of pages
Enable copying of text, images and other content
Allows users to select and copy the contents of the PDF document. Also grants access to those contents to utilities such as Adobe® Catalog®.
Enable text access for screen reader devices for the visually impaired
Allows visually impaired users to read the document with screen readers. This option does not allow users to copy or extract the document's contents.
SIS offers four slightly different formats in which you can publish Scalable Vector Graphics: SVG, SVG gzipped, SVG tiny and SVG tiny gzipped. All four SVG file formats use the same Scalable Vector Graphics dialog to alter parameters.
SVG files are XML based which describe two dimensional vector graphics. The SVG specification is an open standard. Once the SVG files have been created you can view them through most web browsers. Depending on the settings applied the saving of the files may take a while to complete.
This is a compressed version of the SVG file and can be viewed in some web browsers. The compression is roughly one third of the standard SVG files.
This is a simplified version of the SVG file, designed for devices with lower display and computational capabilities, such as mobile or portable devices. As a result these are created more quickly than standard SVG files.
This is a compressed version of the SVG tiny file format.
Before creating the document you are able to alter the parameters within the Scalable Vector Graphics dialog. The dialog offers a number of options, organised into tabs as follows:
General, Options, Gradient and Output.
The General tab provides general page size, rotation of the map view and page orientation options.
The Options tab lets you export hyperlinks, layers and text.
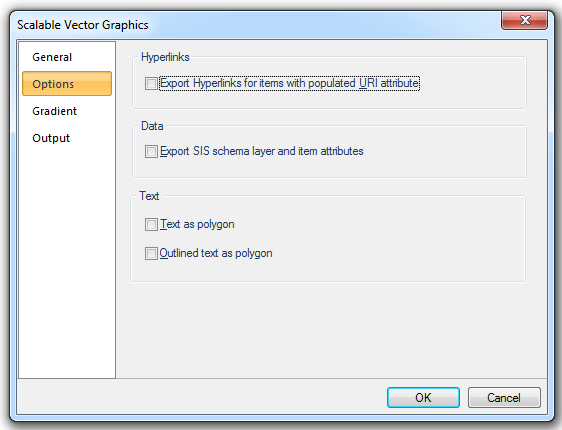
Hyperlinks
Export Hyperlinks for items with populated URI attribute
Any hyperlinks applied in SIS (_URI$ attribute) will be exported and will work within XPS Viewer.
Data
Export SIS schema layer and item attributes
Attribute data contained within the schema layer will be exported as metadata.
Text
Text as polygon
Text items in SIS will be converted into polygons and therefore cannot be highlighted when viewed within XPS Viewer.
Outlined text as polygon
Text items in SIS with an outline applied (_text_outline& = true) will be converted into polygons and therefore cannot be highlighted when viewed within XPS Viewer.
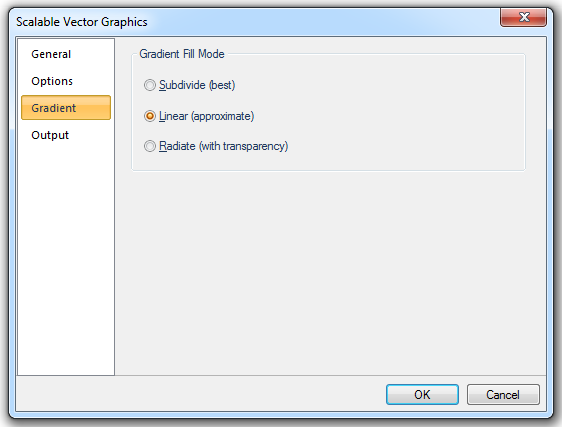
Gradient Fill Mode
Subdivide (best)
Recursively sub-divided triangles, until the colour in all three points of a triangle equal or reach the minimum colour tolerance and visually appear to be the same.
Linear (approximate)
Apply linear gradient from the color of one point to the color of the opposite side in a triangle.
Radiate (with transparency)
Apply linear gradient using opaque transparent colour from one point to average colour on the average point the opposite side. Repeatedly apply the same method to all the other points in a triangle.
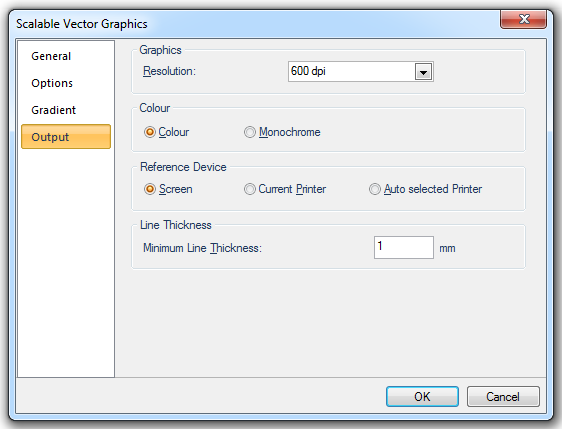
The Output tab lets you:
Top of page
Click to return to www.cadcorp.com
© Copyright 2000-2017 Computer Aided Development Corporation Limited (Cadcorp).