
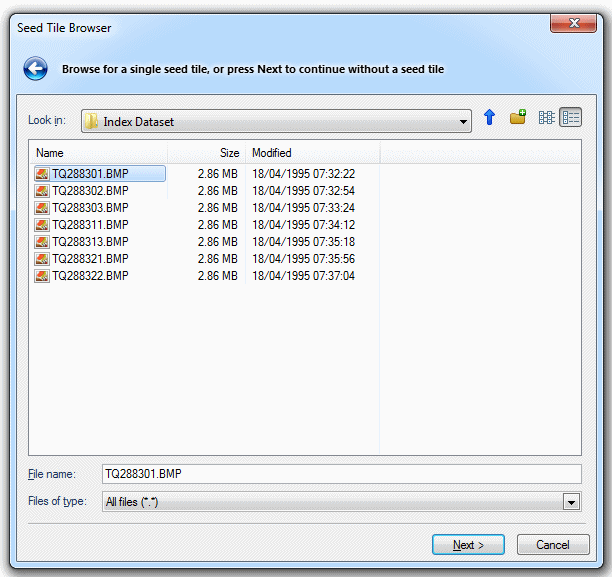
Select the seed tile, if required, and click Next.

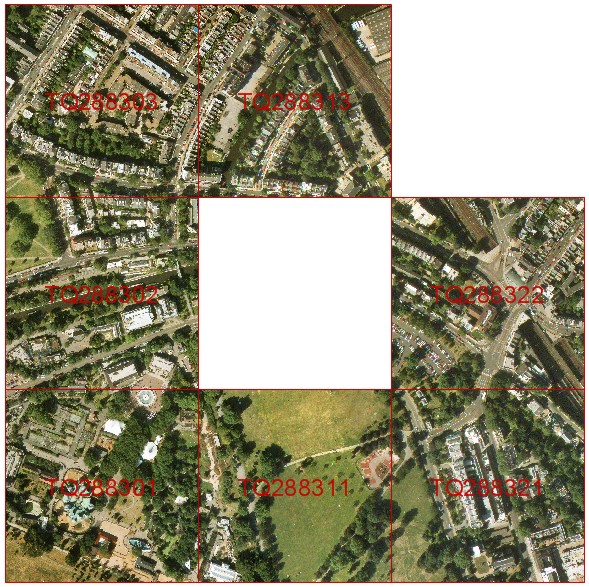
An index dataset does not contain any data. Instead it is a pointer to all files of selected type(s) which reside in a selected folder or folders. It tiles together these dataset files in a rectangular grid, making a continuous map base.
For instance, if you had 20 OS(GB) Meridian tiles in a folder called C:\DATA\OS(GB) Meridian_SS\SS68.ntf, and another 12 in a folder called C:\DATA\OS(GB) Meridian_TL\TL02.ntf, you can create an index dataset pointing to these tiles in these folders. Then, whenever you load the index dataset in the Overlays dialog, all the OS(GB) Meridian tiles in both folders are automatically loaded together on screen.
Once you have created an index, if you later copy more new files to the indexed directories, the new files are automatically loaded when the Index is used, without any further action being required.
Where you are using a large number of tiles at once, the large volume of map data this represents can easily be greater than can fit into your computer's memory. In this case, some of the tiles cannot be opened and will not be displayed on your screen. When you use an Index, the computer opens map tiles as you pan to them and closes them as you pan away.
This gives you seamless mapping as you pan around on screen.
An Index allows you to place a limit on the number of files which can be open on screen at the same time. If your computer does not have large amounts of RAM and you find that performance slows when a lot of tiles are open at once, you can use this feature to counteract the problem. By setting the limit on open tiles option to a lower number (the default is 64), you can guard against this loss of performance.
You may use multiple paths and/or file types. In this way you can access files which are in several different locations (e.g. some on your computer’s hard drive and some on the network server), or which are of different types (e.g. some raster files in BMP format, and the rest in TIFF).
To create an Index Dataset:
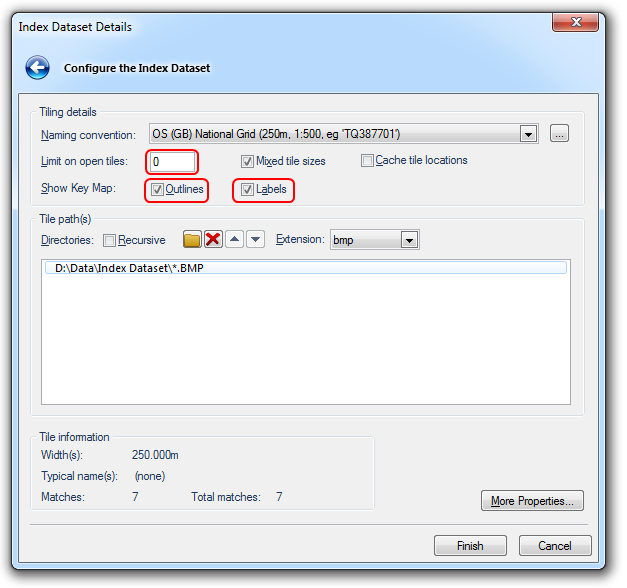
Tiling details
Naming convention
This box displays the naming convention for the selected tiled dataset. The drop-down allows you to select a different naming convention.
There are several standard naming conventions for tiled datasets. In each convention the filename indicates a position in the world. This means that SIS can automatically open just the datasets that overlap the current window.
The
button displays a dialog to allow further configuration. The dialog displayed depends on the naming convention selected. For example OS (GB) National Grid conventions will display a dialog to allow the selection between British and Irish to be made.
Limit on open tiles
This is the maximum number of dataset tiles that SIS will hold open simultaneously.
The default value is 64 but by setting the value to a lower number you can guard against any loss of performance caused by SIS opening a large number of tiles when you zoom out.
Mixed tile sizes
With some naming conventions, different sized tiles are mixed together in a single coverage. For example, in OS Land-Line, the tiles in urban areas are 500m wide, but the tiles in rural areas are 1000m wide (or even larger).
Check this tickbox to make sure that all larger and smaller files of the same file type are automatically included.
Cache tile locations
Should the Index Dataset cache the filenames of all the tiles found, for faster re-opening?
Show Key Map
Outlines
If you check this tickbox only the tile outlines will be displayed enabling you to quickly see the tiles that are available without waiting for SIS to load them.
Tip: Specify 0 for Limit on open tiles but keep Outlines checked, this will let you quickly see what tiles are available without having to wait for SIS to load them.
Labels
Check this tickbox to create label items so you can see what the available tiles are called.
Tile path(s)
Directories
Recursive
Check this tickbox to recursively search sub-directories of all of the chosen directories.
Adds further folders to the index. Click and select a folder followed by a file (the file naming convention must be the same as previously). Click Open.
Folders can be removed from the Index Dataset by selecting them and clicking on this button.
Moves the selected directory/extension search up/down. Tiles matching higher searches will be loaded in preference to lower searches.
Extension
This drop-down box allows you to select a different type of file to index in the selected folder.
Display pane
Shows the folders to look in for the files. To add a new folder press the folder icon
to browse for a new file.
Tile Information
Width(s)
Shows the approximate width of the tiles.
Typical names(s)
Display a selection of typical tile names.
Matches
When you have multiple folders indexed, this shows the number of files of that type found in the currently selected folder.
Total matches
Shows the total found in all the folders. This is the number of tiles which will be loaded and displayed in the map base when you use this Index (unless the limit on the number of open tiles is lower than the number of matches found).
Press this button to modify the dataset's Coordinate system, scale, etc.
Click
to display a dialog to enable dataset details to be changed, for example:

Indexes are stored as part of the SWD when you use Save [File].
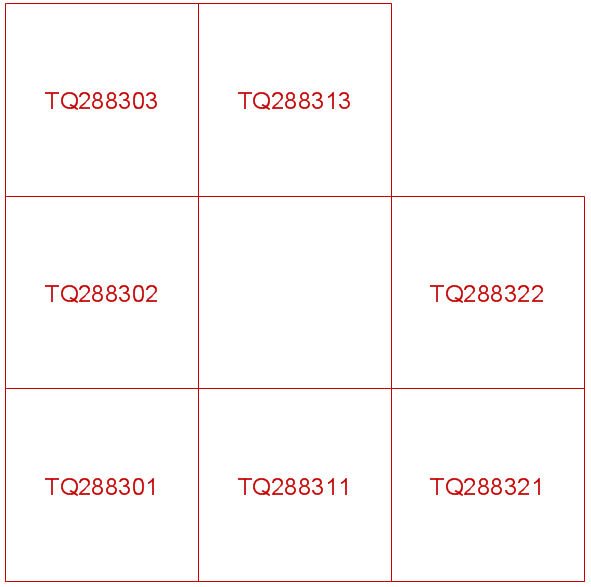
You may automatically generate a KeyMap for all the tiles in the index by selecting the Tile outlines option, in the Index Dataset Details dialog. Selecting Labels will label each tile with its name.
The KeyMap allows you to see the extent of the datasets referenced by the Index dataset, and the names of the dataset files.
Keymaps are created as a non-editable area item with a label using non-editable box text. The text is placed on level 255 to ensure that labels are always drawn after the tile items. For details on the levels on which graphics are drawn, see Creating Text.
To make changes access the Index Dataset Details dialog from the Maps Control Bar - Dataset > Properties... local menu:

Setting the value of Limit on open tiles to 0, no tiles are opened, but a KeyMap is still displayed if the Outlines tickbox is checked, and labelled if the Labels tickbox is checked:
Whether you place a KeyMap using the Print Template [File-Print Template] or Quick Print Template [File-Print Template] or afterwards on a composed Print Template, the process is the same: select the KeyMap from the displayed list, then 'click-drag-click' a rectangular area on the template preview or composed template where you wish the KeyMap to appear.
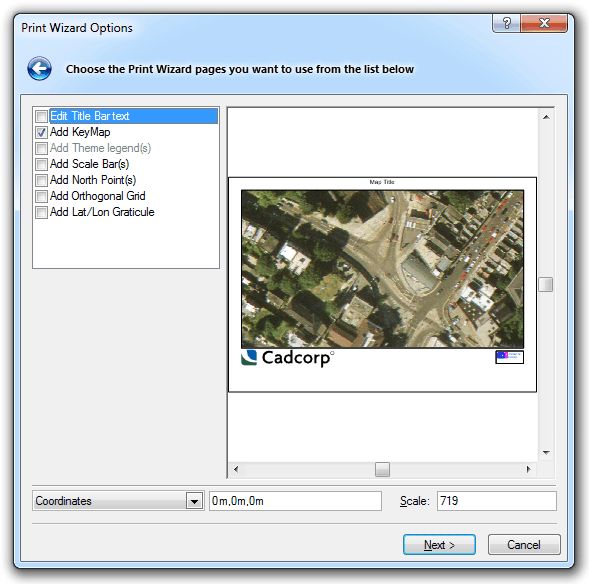
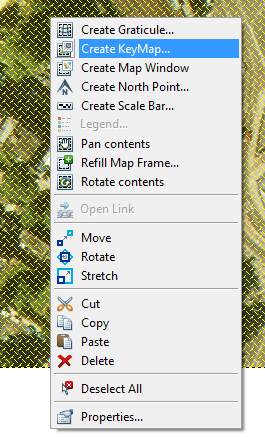
Keymaps are for use on Print Templates, and can be added in three ways:
Send comments on this topic.
Click to return to www.cadcorp.com
© Copyright 2000-2017 Computer Aided Development Corporation Limited (Cadcorp).

