Quick Print Template [File-Print Template] takes a Map Window or a 3D Window and places the picture inside a Print Template.
Quick Print Template allows you to choose which Print Template to use, and when used with a Map Window, at which scale. When used with a Map Window the Quick Print Template always creates a new SIS Workspace Definition (SWD) for further editing. When used with a 3D Window the Quick Print Template can just print the results, or create a new SWD for further editing.
If you require further options, (in addition to angle and scale) such as placing a graticule, scale bar, north point, etc., use Print Template [File-Print Template] instead. Quick Print Template is a simplified version of Print Template.
Make sure the current window contains the view to be printed.
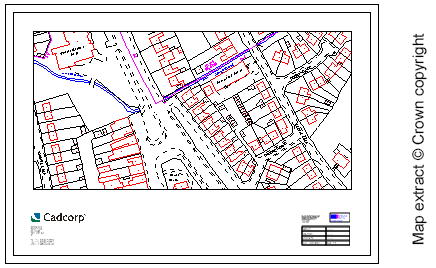
The inner rectangle on the print template is called the "Map Frame", this is the area where your map will be placed.
- Change the Scale if required.
- Change the Angle of rotation if required. You may want to do this, for example, to align a major road or building horizontally on the paper. You have two options:
- Fixed - Type in the angle required. North is 0°, East is 90° etc. The print template is rotated anti-clockwise. For example, if you type an angle of 90°, East will be pointing up. Note that when you come to place the print template on the map base, it will appear to be rotated in the opposite direction. This is because the map graphics are to appear rotated once the print template is aligned back with the sheet of paper.
- Snaps - When you later place the template, this option will require you to give an extra snap to indicate interactively the angle of rotation.
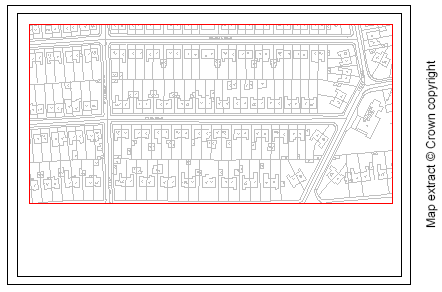
View of map in the current window, showing the print template rectangle at a scale of 1:1250, rotated at an angle of 72°:
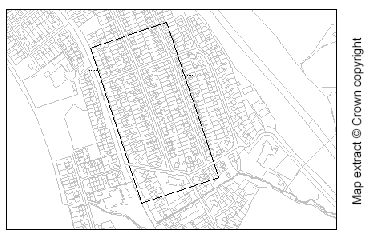
The resulting print template:
If you see the Place Print Template dialog, proceed to step 5.
If you see the Print Size dialog, the print template you have chosen does not fit onto the current printer paper at the scale you have chosen. You can:
- go back a step to choose a different scale or another print template
- choose Print Setup [File-Print] to access the Print Setup dialog to change the paper used
- click on Fit in the Print Size dialog to fit the template to the paper
- press Next to continue.
If you cannot see the rectangle, it is either bigger than the view or very small. Zoom out or in until you can see it using the “+” or “*” keys on the numeric keypad, the mouse wheel, the Up, Down, Left or Right arrows, or return to the first page to choose a different scale or print size.
The Map Frame is filled with the selected area of the map base. This view is dynamic, always reflecting the current appearance of the overlays it contains.
.gif) . This zooms the print template SWD to its extents and ensures the whole of the map is printed.
. This zooms the print template SWD to its extents and ensures the whole of the map is printed.
In future, when you recall this file, the map view in the template (the Map Frame) reflects the current appearance of the original data (except in the case of an internal dataset).
Send comments on this topic.
Click to return to www.cadcorp.com
© Copyright 2000-2017 Computer Aided Development Corporation Limited (Cadcorp).