Prepare the SWD for publishing
To set up publishing options, begin by adding new layers to the SWD using Cadcorp SIS Desktop 
To ensure you see background mapping, you can do one of the following:
-
Add the Overlays from the base mapping SWD(s)
-
Add the base mapping as a WMTS from GeognoSIS
Method 1 - Add the Overlays from the base mapping SWD(s)
Open the SWD (ideally containing both base layers and data layers).
Expand to see the Overlays.
Click & drag each Overlay from the Baselayer SWD into the Datalayers SWD.
Each of the copied overlays must be renamed to match the name used in the WebMap. In this example, it is called OS basemap.
Select Home > Overlays and rename the layer accordingly. 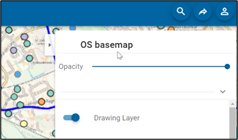
You can now copy & paste the General settings (e.g, the Overlay name) to the remaining Overlays.
- Click Copy at the bottom/middle of the Overlays dialog box.
- Select the next Overlay you wish to rename.
- Click Paste at the bottom/middle of the Overlays dialog box
- Repeat for the rest of the basemap Overlays.
- Set the Status for each to Invisible.
The last step is to add an Overlay Property of WML::Ignore& to each Overlay to ensure they do not show in the WebMap menus.
- Click Properties at the bottom/middle of the Overlays dialog box
- In the Overlay dialog box, click Add… button
- Type WML::Ignore& in the Name edit text box.
- Type a 1 in the Value edit text box.
- Click OK.
- Scroll down to the bottom of the Properties list. You can right click the WML::Ignore& property and copy it.
-
Note: Repeat the above for the other Overlays using paste – you still need to input the value of 1.
- Click OK to close the Overlays dialog box and save the SWD.
Method 2 - Add the base mapping as an OGC WMTS from GeognoSIS
Begin by getting the path to the Capabilities document from GeognoSIS
Next add an Overlay in Cadcorp SIS Desktop and paste the URL to connect to the WMTS SWD. Save the connection for future use.
Set the Tile Image Format to image/png and the Tile Matrix/Layout to OSOpenSpaceCompatiblePlus.
Click Finish.
Select Home > Overlays and rename the new overlay to match the name on WebMap (OS basemap as seen in the above example).
Set the Status to Invisible.
The last step is to add an Overlay Property of WML::Ignore& to each Overlay to ensure these Overlays do not show in the WebMap menus. To do this, follow the steps in Method 1.