If the last Item you have selected is editable, then you can edit it using grab handles. An editable item will have visible grab handles at its vertices. Different grab handle operations can be done with different Item classes.
In general, you can select a grab handle by snapping on it, or use Tab and Shift+Tab to cycle through all of them forwards and backwards respectively.
By using a click-slide-release snap with the mouse, you can drag any handle to a new position.
With most items you can hold the Shift key down to select several grab handles at once.
Note: The default grab handles colour is black. If required the colour can be changed using a similar method for changing the drag pen colour but using *Handle instead of *Drag. See Selecting graphics - Drag pen colour.
When an editable item is selected it has visible grab handles at its vertices:
To select a handle, click on it. It becomes filled to show it is selected.
Once a handle is selected, press the tab key to select the next handle, and press Shift + tab to select the previous one.
To move a handle of a circular arc to reposition one end, keeping the subtended angle the same.
To move the handles of Bezier curves to reposition the ends or the control points.
If you select several grab handles, then you can move them all at once by using Shift-Click-Slide-Release on the last selected handle. (This is actually quite tricky, and you may prefer to use Move Path [CAD-Alter] .GIF) instead.)
instead.)
The vertex will be removed, and the graphic will change as though it is made of elastic stretched between pins. Deleting a vertex is like removing one of the pins. It is not possible to delete one of the two vertices of a single LineString item segment.
You can insert a vertex anywhere along the outline of a selected item by holding the Ctrl key down and clicking the cursor on the item outline. A handle appears at this point, which you can then move to the required position:

Adding a vertex to a circle will break the circle into a series of connected arcs. Moving these vertices moves the ends of the arcs:
The proportions of the arc are maintained, so that, if the arc is a semicircle, it will remain as a semicircle as the vertex is moved.
Adding a vertex to a Bezier curve splits it into two Beziers, each with its own four handles (two ends and two control points).
Many LineString item editing operations in SIS do not require menu commands, because they can be carried out by selecting the LineString item and using grab handle operations.
In the case of a LineString item which contains a large number of vertices (e.g. a freehand LineString item created using Freehand [Create-Advanced] .GIF) ), as you progressively zoom out, fewer and fewer vertices are displayed. However, pressing the Tab key still steps to the next existing vertex, Shift+Tab to the previous vertex, even if the vertex is not visible on screen.
), as you progressively zoom out, fewer and fewer vertices are displayed. However, pressing the Tab key still steps to the next existing vertex, Shift+Tab to the previous vertex, even if the vertex is not visible on screen.
The first LineString item shows five vertices.
The second LineString item shows a new vertice created by holding the Ctrl key down and clicking the cursor on the LineString item at the required position.
The third LineString item has the new vertice deleted by clicking on the vertice to be deleted and pressing the Backspace key.
Polygon items are edited in a similar way to LineString items. Each loop of the Polygon item is treated as if it were a LineString item, so you get grab handles at each vertex. You can move individual vertices, and insert and delete vertices using the Control and Backspace keys respectively.
The first Polygon shows five vertices.
The second Polygon shows a new vertice created by holding the Ctrl key down and clicking the cursor on the Polygon item outline at the required position.
The third Polygon shows the new vertice deleted, achieved by clicking on the vertice to be deleted and pressing the Backspace key.
SIS shows nine grab handles arranged in a grid over the Bitmap item. You can stretch the Bitmap item by dragging these handles.
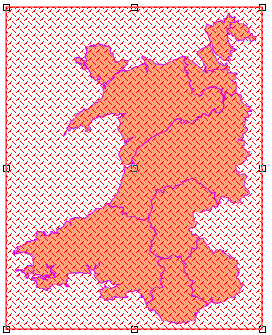
Alternatively, you can crop the Bitmap item by dragging the handles with the Ctrl key pressed.
These methods are also available with Grid items.
Note: The status of the bitmap image must be set to Editable to display the grab handles.
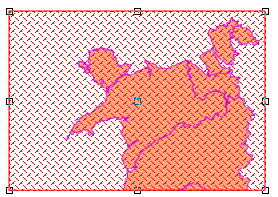
When you select an editable BoxText item you get nine grab handles.
A butterfly shaped handle shows the current alignment point. You can change the alignment by selecting another handle, and pressing Enter. (Please note that you cannot set "Baseline" alignment by this method, as that would require an unwieldy configuration of twelve alignment points.)
You can also change the size of the BoxText items by dragging an alignment point.
Whenever you change the size of a BoxText item it will keep its aspect ratio, so making it taller will automatically make it wider. The dragging operation will either work primarily on the width or the height, depending on the relationship between the dragged alignment point and the butterfly alignment point.
If you drag the alignment point then you will move the whole BoxText item instead of resizing it.
Click to return to www.cadcorp.com
© Copyright 2000-2017 Computer Aided Development Corporation Limited (Cadcorp).