Note: Ensure you are familiar with the meanings of the image status options of editable, hittable, visible and invisible before proceeding with this topic, see The Overlays dialog.
You must select graphic items before you can carry out any edit functions.
See Select [Home-Selection] / Select All [Home-Selection].
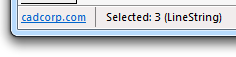
The status bar at the bottom of the screen reports the total number of items selected. If there is more than one class of item in the selection the total number of selected items will be displayed in the form; Selected: n (Polygon). The item name in brackets will change according to the item(s) selected, i.e. LineString, Point, Text, etc. If a mixture of items are selected only the total number of items will be shown in the form; Selected: n.
Typical display examples:
Selected: 1 (Polygon)
Selected: 1 (TIN)
Selected: 5
To select multiple items, hold down the Shift key as you keep clicking on additional items (clicking on an already selected item will de-select it). Alternatively, enclose the required items in a selection box - press the left-hand mouse button at an empty part of the screen and, holding it down, drag your cursor to a diagonally opposite position in order to form a box enclosing all the items you wish to select. If you want to de-select some of these items, hold the Shift key down and click on them.
See the explanation of drag selecting items while holding the Ctrl key in the following Selecting groups of items with a selection box section.
To select a group of items which are close together, you can enclose them in a selection box. To do this click and hold, and drag select the Items, you will see a rectangle rubber-banding on the cursor. Release the mouse button when the required area is encompassed, and all items enclosed or touched by the selection box will be selected.
In the case of point and point text items, the selection area is just the point itself (the extents of the point’s shape or the text’s letters are ignored).
When you have selected a range of items by creating a selection box around them, you can de-select individual items within the box by clicking on them while holding down the Shift key.
Clicking an item without holding the Shift key will leave the item clicked selected but all other items will be de-selected.
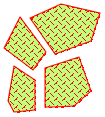
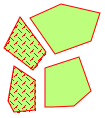
When drag selecting Items the default behaviour is that any Items within, or touched by, the selection box will be selected. If you wish to select only those Items completely contained within the selection box hold down the Ctrl key while drag selecting the Items, see the following diagrams:
Drag select the items:
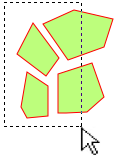
Default behaviour, all the Items will be selected:
Resulting behaviour with the Ctrl key held down during drag select:
The default drag pen colour is black. If required this can be changed to another colour as follows.
Note: The Style and Width of the drag pen cannot be altered .
Note: The colour of the Grab Handles can also be changed in a similar manner using *Handle instead of *Drag.
A more flexible method of selecting a group of items is to use a fence. A fence is a temporary LineString or circle, within which (if it is closed) or within a certain distance of which, all items are selected.
There are four buffer commands to provide four methods of creating a fence:
When you have a number of items selected, the local menu shows you which item classes are included in the selection, and how many items of each class there are. (It also gives you their item menus).
If you want only one of these item classes to be selected, use the appropriate item command (accessed via the local menu). For instance, if you want to have only LineString items selected, choose Select LineString items. The other item classes will then become de-selected.
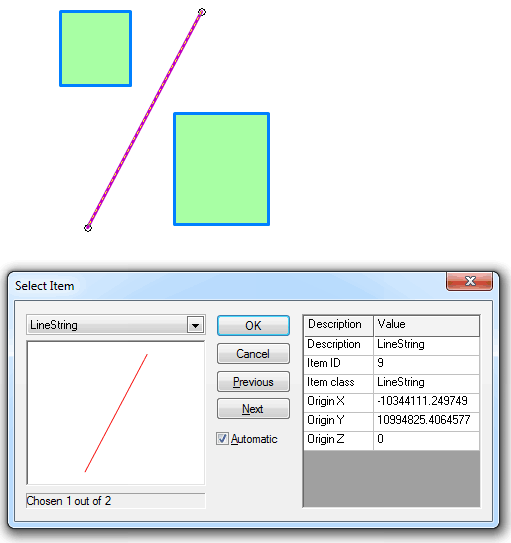
If there is more than one item of the selected class in close proximity clicking on the item will display the Select Item dialog:
Note: This is only applicable to Map Modeller and Map Editor.
You may use the individual selection method, a selection box and a selection fence in conjunction with each other by holding the Shift key down each time you add to or subtract from the selection list.
Use the Select All [Home-Selection] (F7) or Deselect All [Home-Selection] (F8) commands to select/de-select all items in the SWD, as long as they are on editable or hittable overlays.
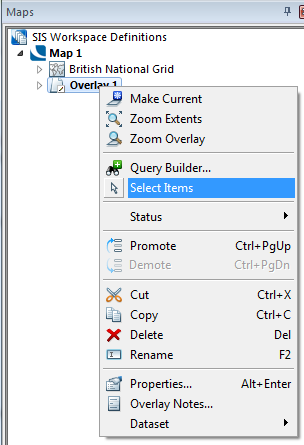
You can select all items on any particular overlay by selecting the overlay on the Maps Control Bar, then using the overlay’s local command Select Items.
Items that are scale thresholded and not currently displayed, for example incidents that are thresholded to display above 10,000 and your current scale is 100,000, may be selected by holding down the Alt key at the same time as holding down the left mouse button and carrying out a drag select.
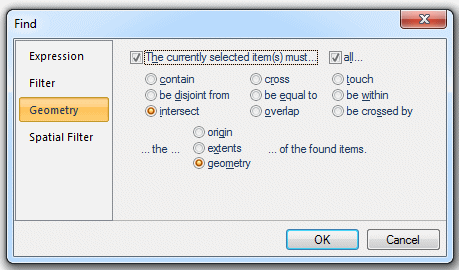
Find [Home-Selection] allows you to find items in a number of different ways. You can define:
Items that meet your specifications are selected.
You can combine geometry tests, filters, spatial filters, and expressions in any combination.
The Geometry tab of the Find [Home-Selection] dialog allows you to use existing items to select other items, applying any of a number of tests. This command allows all OGC geometry relationships to be tested.
The tests, which conform to standard OGC specifications, are as follows.
Geometry tests for finding items
The currently selected item(s) must...
Check this tickbox if the only items that pass a geometrical test are to be selected.
The tests use the OGC "relate" function. This measures the dimensions of the nine intersections formed between the interior boundary and exterior of the two items being compared. The different tests have different rules for which dimension matrices are valid.
all...
Check this tickbox if all the selected items have to pass the test, or uncheck if any one will be enough.
The tests are as follows:
contain
Their interior is completely inside the selected item.
be disjoint from
They are completely separate from the selected item, and their boundaries do not touch.
intersect
If they have a point in common with the selected item (they must not be disjoint).
cross
LineString items will be found if they intersect the selected item without being tangential.
Other items will be found if their interior intersects with the interior of the selected item, and the selected item goes outside the found item.
be equal to
If their geometry is the same as that of the selected item.
overlap
If the selected item is a LineString item, another LineString item will be found only if the two LineString items are tangential, and if neither contains the other.
With other item classes, an item will be found only if its interior intersects with that of the selected item, and neither contains the other.
touch
If its interior is disjoint from that of the selected item, and if their boundaries intersect.
be within
If the interior of the selected item falls completely within it.
be crossed by
LineString items will be found if they intersect the selected item without being tangential.
Other items will be found if their interior intersects with the interior of the selected item, and the found item goes outside the selected item.
...the... of the found items
origin
Tests the origin of each SWD item against the current item(s). This lets you speed up the test.
extents
Tests the origin of each SWD item against the current item(s). This lets you speed up the test for complex items. An item’s extents are considered to be a notional rectangle drawn to encompass the item. This rectangle is as small as possible, but still contains the entire item.
geometry
Does a full geometry test. This is the slowest, but most accurate mode.
A Spatial Filter allows you to limit which items are selected based on their position relative to the spatial filter.
An expression can simply be a property (for instance, you could just select items with a certain feature code using the Feature Code property (_FC&)), or it can use a property or combination of properties in a mathematical or logical operation.
The following are some examples of expressions you might use to select graphics:
|
To select |
use the expression |
|
only Building Outlines (Feature Code 1) |
_FC&=1 |
|
all items except Road Centrelines (Feature Code 98) |
_FC&<>98 |
|
only Building Outlines (_FC&=1), House Numbers & Building Names (_FC&=1006) and Road Centrelines (_FC&=98) |
(_FC&=1) or (FC&=1006) or (_FC&=98) |
|
all items except Building Outlines (_FC&=1), House Numbers & Building Names (_FC&=1006) and Road Centrelines (_FC&=98) |
(_FC&<>1) and (_FC&<>1006) and (_FC&<>98)
|
| only those Building Outlines which are closed, plus all other items except Road Centrelines. |
(_FC&<>1) and (_FC&<>98) everything which is not Feature Code 1 or 98 |
|
only Point items which fall within those container items called Polygons. |
(FindContainer("Polygons")._id&<>0) and (_class$="Point") |
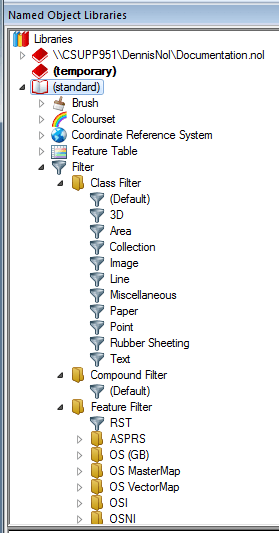
A filter allows you to base the selection process on the class of item, on features, on the properties of items, or on a combination of these. When an edit filter is applied (on the Filter tab of the Find dialog), the items filtered out are still displayed, but cannot be selected (they act as if they had been demoted to visible status).
Filters are named objects, stored in libraries, and so can be accessed on the Libraries Control Bar. You can also create your own filters. These same filters can also be applied to selecting which items are displayed on screen.
There are several different types of filter, and they are used as follows:
To include or exclude entire classes of items If you want to exclude an entire item class from being selected, or conversely limit the selection process to just one item class (such as all Text items, or all Polygon items), use the Class based Filter.
To include or exclude certain feature types To exclude an entire feature type from being selected, or limit the selection process to include one feature type only, use the feature filter. This filter can be based on the feature types of many different datasets (e.g. TIGER/Line95, Meridian, etc.). It can also be used to include or exclude items with no feature code.
To include or exclude items based on their properties If you want to include or exclude items on the basis of a property value, use the property filter. For instance, you could limit the selection process so that only those items whose pen is Green are selected. Properties can also be combined in expressions.
To include or exclude items by combining filters Use the compound filter option to combine other filters.
SIS comes supplied with many filters already created. These are stored in the (standard) library and are read-only.
The standard filters are listed in the Libraries Control Bar.
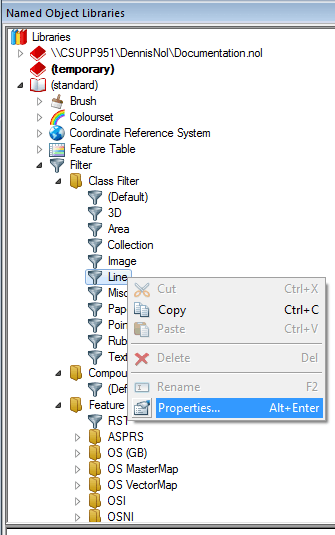
Selecting the filter and using the local command Properties... allows you to see exactly what each filter includes or excludes.
The following Class Filter dialog shows the details of the filter called Line. Only LineString items, Link items, Line Text items and some Paper and Rubber Sheeting items are included. All other items are excluded:
You can apply any of the filters supplied in the (standard) library or any you have created yourself and stored in an editable library. Or you can copy an existing filter and paste it into an editable overlay to alter it.
See Creating Filters
Send comments on this topic.
Click to return to www.cadcorp.com
© Copyright 2000-2017 Computer Aided Development Corporation Limited (Cadcorp).