Overview of Properties
Every Item in SIS Desktop has its own properties (you can view these in the Properties Control Bar  when you select an Item).
Properties hold key information about the item (for instance the default Pen to draw the item with, the Length of a LineString item or even the and the Point height of Text items).
Every property has a name, a description and a value.
Creating and editing properties
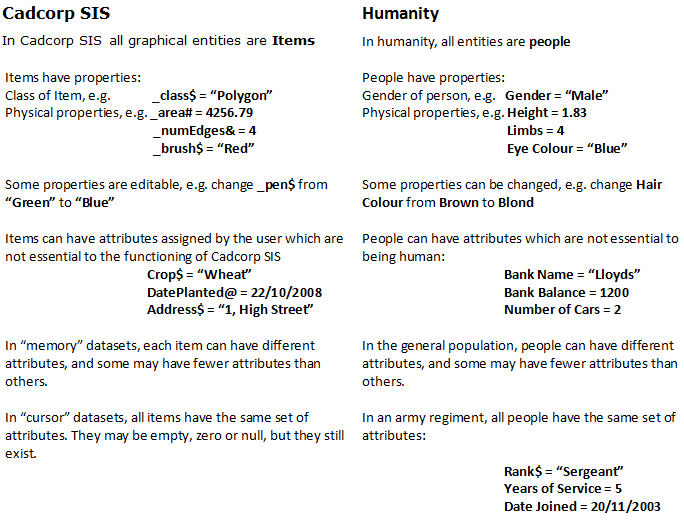
The system automatically supplies many properties for every item. These properties are called system properties; their names always start with an underscore character.
TIP: For clarity, avoid using underscore characters as your property name’s first character.
Some system properties can be edited, e.g. an item’s pen.
- If the property is editable it will appear with a white background on the Property dialog (if using standard Windows colour schemes).
- If not editable it will appear on a grey background.
Properties (Home > Selection) displays a tabbed dialog with advanced controls for editing Item properties.You can also add your own properties to any editable item as Attribute data.
How properties are displayed
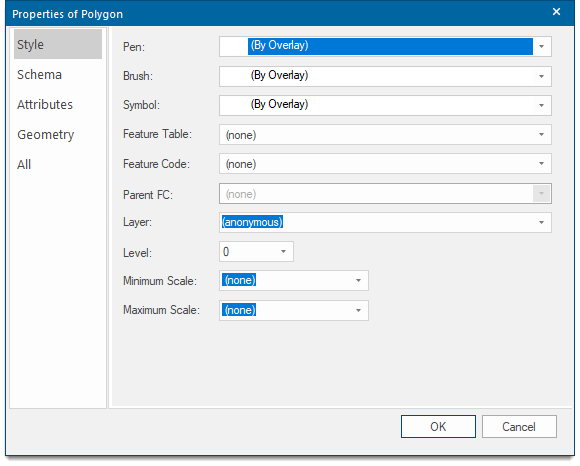
To display the Properties dialog, select the item(s) and do one of the following:
- choose Properties from the local menu.
- choose Properties (Home > Selection)
The Properties dialog usually shows five tabs (except for some objects such as map frame items and text): Style, Schema, Attributes, Geometry and All.
1. The Style tab lets you edit the following:
| Option | Description | |
|
Pen |
The pen to draw linear geometry with. |
|
|
Brush |
The brush to fill interior geometry with. |
|
|
Symbol |
The symbol to apply to geometrical points. |
|
|
Feature Table |
The Feature Table in which to look up the feature code. |
|
|
Feature Code |
The feature code can be used to describe what the item represents in the real world. Feature codes can also be used to set default styles (e.g. pen, brush and symbol). |
|
|
Paent FC |
The parent feature code lets you arrange feature codes in a tree. If this entry is empty, then the chosen feature code is put at the top of the tree. |
|
|
Layer |
You can use any layer names you wish. Layers can be used in the Maps Control Bar to show/hide items within an overlay. |
|
|
Level |
Affects the drawing order of items. Within an overlay, items in lower levels are drawn before items in higher levels. Range 0 to 255. |
|
|
Minimum Scale |
The minimum scale to draw items. If you set the minimum scale to 956 and zoom in to 1:1000, then the item will disappear. |
|
|
Maximum Scale |
The maximum scale to draw items. If you set the maximum scale to 956, and then zoom out to 1:500, then the item will disappear. |
|
2. The Attributes tab provides additional data to the system properties.
- Attribute data is non-graphical information assigned to editable items, SWDs, Overlays and Datasets.
- Attribute data can be added only to unlinked datasets or copies of linked datasets. Original data cannot be altered. A table is included below to illustrate the concept of Properties and Attributes and how the concept can be related to the human world.
3. The Geometry tab provides information on the selected item’s geometry. The list will vary for different types of geometry.
4. The All tab lists all the information available on the selected item(s). This includes information given in the Style, Schema, Attributes and Geometry tabs.
If more than one item is selected, only the common properties are shown.
Properties and Attributes
Here is an example to better understand this topic:

