The Quick Access Toolbar, part of the Ribbon, is a small, customizable toolbar that provides access to frequently used commands independent of which ribbon tab is selected. By default, the Quick Access Toolbar is located in the SIS title bar, but it can be set to display below the ribbon.
A default set of commands will appear in the Quick Access Toolbar, you can also select commands from the ribbon to appear in the Quick Access Toolbar.
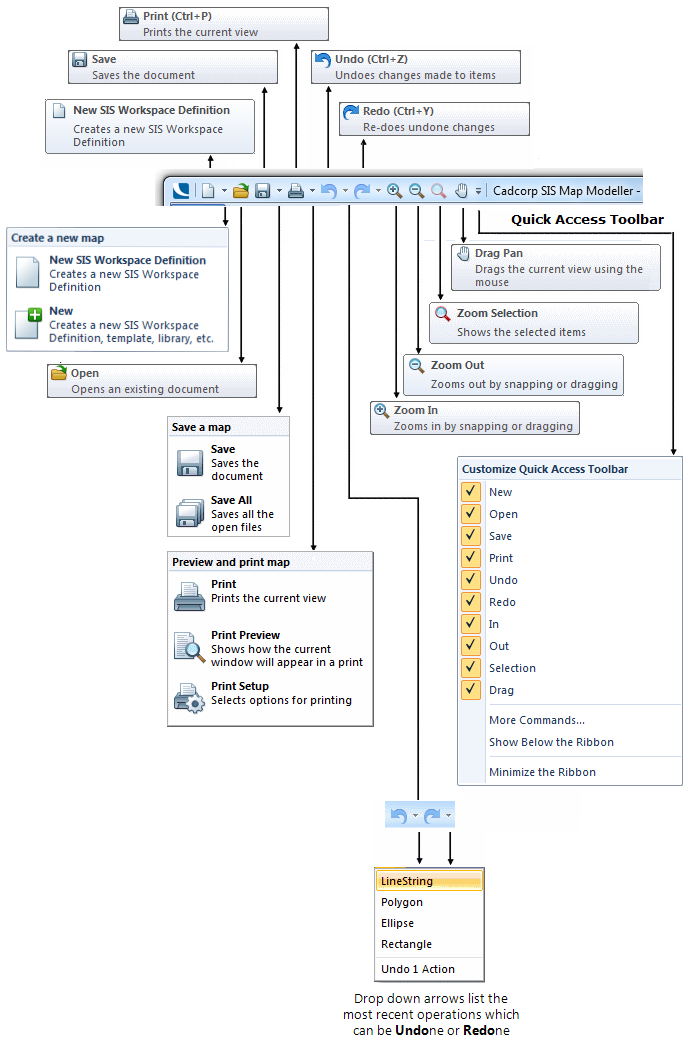
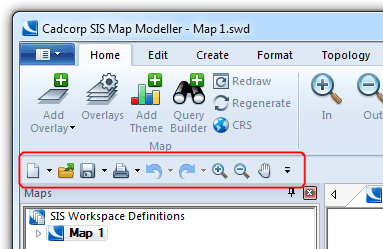
The following diagram shows the default setting of the Quick Access Toolbar.
Commands can be added to, or removed from the Quick Access Toolbar as required.
One method of adding a command to the Quick Access Toolbar is to right-click on the command to be added and select the Add to Quick Access Toolbar option:

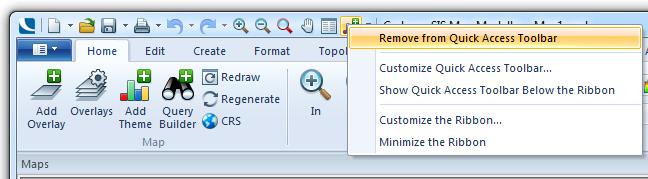
To remove a command from the Quick Access Toolbar right-click on the command to be removed and select the Remove from Quick Access Toolbar option:
Another method of adding and removing commands to and from the Quick Access Toolbar is to select the down arrow at the right-hand end of the Quick Access Toolbar:
Check and uncheck the corresponding tickboxes in the above Customize Quick Access Toolbar dialog to determine the default commands (New, Open, Save, Print, Undo, Redo, In, Out, Selection and Drag) that are to be shown in the Quick Access Toolbar.
More Commands...
Selecting

will display the following Map Modeller dialog.
Note: This dialog has three tabs; Quick Access Toolbar, Customize Ribbon and Tools.
Ensure the Quick Access Toolbar tab is selected: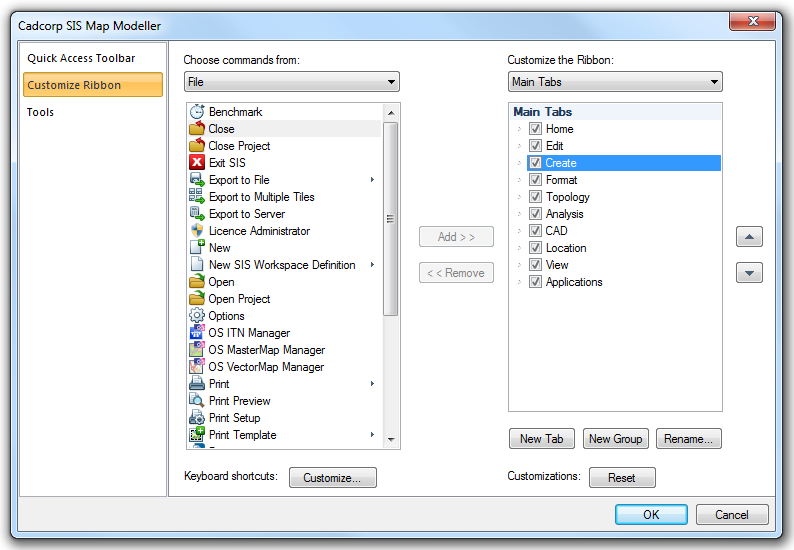
Note: The Keyboard shortcuts Customize button is described in the Keyboard commands topic.
This provides another method of adding commands to the Quick Access Toolbar, select the command name in the left-hand pane and click the Add>> button, the command will now be displayed in the right-hand pane.
Note: Some of the commands in the left-hand pane are duplicated, this is because some commands may be added to the Quick Access Toolbar singly or as part of a group of related commands, as described above in the first method of adding commands to the Quick Access Toolbar.
To remove commands from the Quick Access Toolbar select the command name in the right-hand panel and click the Remove button, the command will be removed from the right-hand panel.
A <Separator> is included to enable the commands to be separated on the Quick Access Toolbar as required.
To return the Quick Access Toolbar to the default condition click the Reset button.
On completion click OK.
The above screen shows the commands available in the File group. The procedure is the same for adding/removing commands in all groups.
Each group can be selected from the Choose commands from: drop-down box:
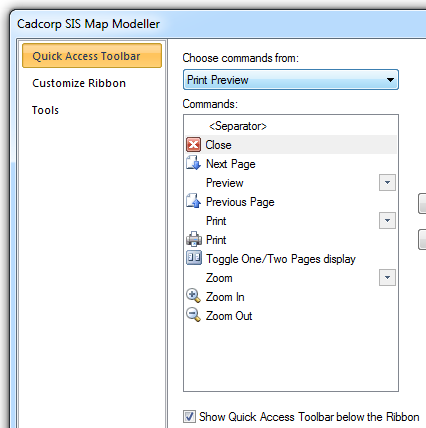
To display the Quick Access Toolbar below the Ribbon check the Show Quick Access Toolbar below the Ribbon tickbox, on the Map Modeller dialog:
To display the Quick Access Toolbar above the Ribbon uncheck the Show Quick Access Toolbar below the Ribbon tickbox:

Show Above/Below the Ribbon
As an alternative method of placing the Quick Access Toolbar above or below the Ribbon, select either:

or

from the Customize Quick Access Toolbar drop-down as appropriate.
Minimize the Ribbon
To minimize the Ribbon select

on the Customize Quick Access Toolbar.
For full details of working with the minimized ribbon see The Ribbon.
Note: Any changes made to the Quick Access Toolbar commands, its position or its minimized state, are stored in the Options database. Each time SIS is started settings are read from the database and the Quick Access Toolbar configuration from the previous session will be displayed.
See also:
Send comments on this topic.
Click to return to www.cadcorp.com
© Copyright 2000-2017 Computer Aided Development Corporation Limited (Cadcorp).
