.GIF) Point (Create point item) Point (Create point item)
Point (Create point item) Point (Create point item)
Point creates Point items.
Each time you enter a position, SIS will create a new Point item. You can enter positions by typing coordinates, or clicking in the Map Window.
If you want to enter positions in 3D, you can either snap onto existing 3D items, or you can enter a Z height value in the dialog provided.
You can also choose the Symbol you wish the new Point items to have. If you do not enter a Symbol name, then the Point items will be drawn as a single pixel dot.
Note: When constructing point items, if the dataset scale is inappropriate, SIS normally shows the Confirm Dataset Scale warning and gives you the opportunity to change it.
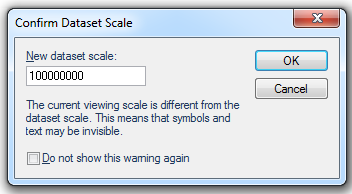
This is most likely to happen when you are constructing points on an internal dataset, because these take an initial dataset scale of 1 when they are created, see the explanation of Dataset Scale in the Scale topic.
The Confirm Dataset Scale warning dialog tells you that the current viewing scale is different from the dataset scale, meaning that symbols and text may be invisible. The New dataset scale shown is the scale that SIS will change the dataset scale to if you click OK to accept.
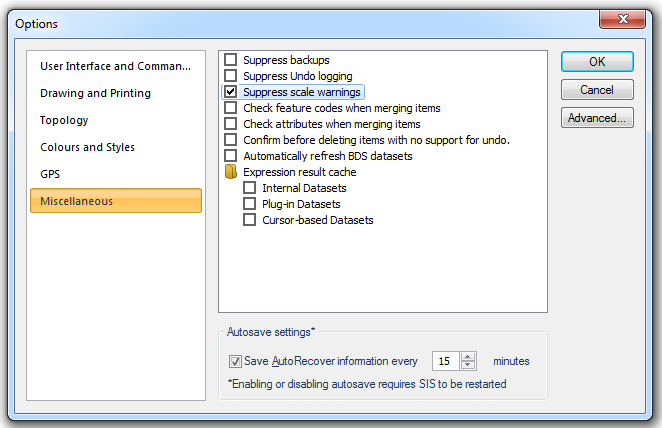
Check the Do not show this warning again tickbox if you do not wish to see this warning for the rest of the current session. If you do not want to see the scale warning in future sessions, select the Suppress scale warnings option on the Miscellaneous tab of the Options dialog, see Options.
.gif)
.gif)
 drop-down).gif)
- Click Overlays [Home-Map] and select the required overlay in the dialog.
- Click on the required overlay in the Maps Control Bar and select Properties... from the local menu
- Press F2
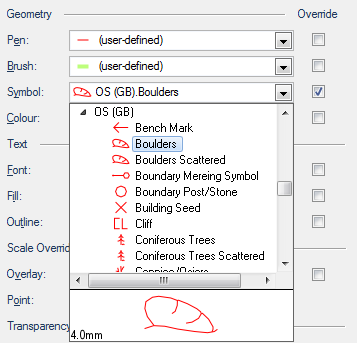
In the Geometry area of the Overlays dialog Styles tab select the required symbol from the Symbol drop-down list. Check the Override tickbox. If the Override tickbox is not checked the symbol will be defined by the overlay setting.
To change the symbol assigned to an overlay display the Overlays dialog and select the required overlay.
Go to the Styles tab and select the Symbol drop-down list.
Select the required symbol. The new symbol will now be assigned to the overlay.
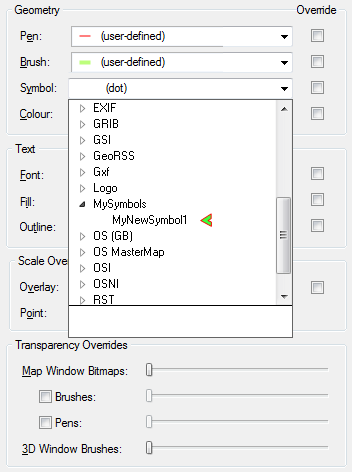
The list of available symbols is displayed, including any that may have been created using Symbol [Create-Miscellaneous].
Select the required symbol and click OK.
All points on that overlay which use the (By Overlay) symbol will now use the symbol you have just chosen. Any future points you construct on this overlay will also adopt this symbol. Whenever you change the symbol, all (By Overlay) symbols adopt the new symbol.
This means that if the original items have the "(By Overlay)"Pen, then they will be drawn in the Pen of the Point item. But if the original items have their own Pen objects, then the Pen of the Point item will be ignored. If the Pen objects of the items are mixed between "(By Overlay)" and other Pen objects, then the effect of changing the Point item’s Pen will be to partially change the Pen objects used to draw the Symbol.
When you place a copy of a Symbol using a Point item there is an interaction between the properties of the Point item and the properties of the item(s) which define the Symbol. In general the properties of the item take priority, unless they are undefined. Properties that act in this way include Pen, Brush, Minimum scale, and Maximum scale.
Top of page
Click to return to www.cadcorp.com
© Copyright 2000-2017 Computer Aided Development Corporation Limited (Cadcorp).