-Styles tab.png)
The Styles tab allows the following options to be selected:
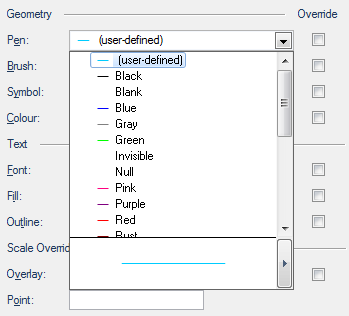
Pen
The Pen drop-down box allows you to change the pen used by the overlay. To view or edit the pen, drop down the combo-box list, and click the right arrow at the bottom to display the Edit Pen dialog.
Pens are fully described in the section commencing with What is a Pen?
Pen-Override (tickbox)
Check this tickbox to force all item Pens to the specified settings, not just items whose Pen is "By Overlay".
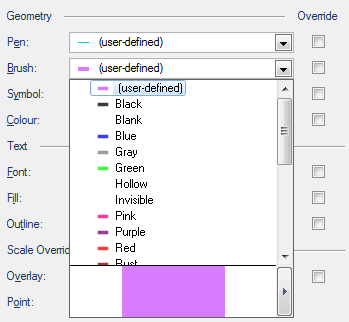
Brush
The Brush drop-down box allows you to change the brush used by the overlay. To view or edit the brush, drop down the list, and click the right arrow at the bottom to display the Edit Brush dialog.
Brushes are fully described in the section commencing with What is a Brush?
Brush-Override (tickbox)
Check this tickbox to force all item Brushes to the specified settings, not just items whose Brush is "By Overlay".
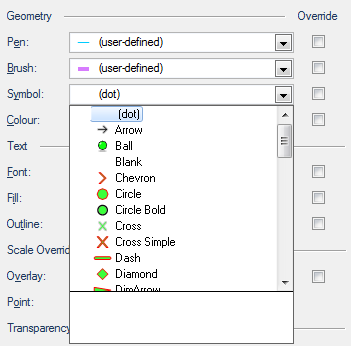
Symbol
This drop-down box allows you to change the symbols used by Point items in the overlay.
Symbols are fully described in the section commencing with Creating Points and placing Symbols.
Symbol-Override (tickbox)
Check this tickbox to force all item Symbols to the specified settings, not just items whose Symbol is "By Overlay".
Colour
The Colour box is only active if the Colour Override tickbox is checked, in this case the Colour drop-down box can be used to set a colour to which all Pens in the overlay will be forced. This can also affect the colours used to draw monochrome bitmap images.
Font
This drop-down box allows you to change the font used in the overlay.
Font-Override (tickbox)
Check this tickbox to force all item Fonts to the specified settings, not just items whose Font is (By Overlay).
Fill
This drop-down box allows you to change the text fill colour used by the overlay. To view or edit the brush, drop down the combo-box list, and click the right arrow at the bottom.
Fill-Override (tickbox)
Check this tickbox to force all item text fills to the specified settings, not just items whose Fill is (By Overlay).
Outline
This field is applicable only to outline text and has no effect on simple text. See Simple Text and Outline Text topics for a full description.
Outline-Override (tickbox)
Check this tickbox to force all item text outlines to the specified settings, not just items whose Outline is (By Overlay).
Overlay
Overrides the scale of the overlay's dataset.
Overlay-Override (tickbox)
Check this tickbox to make the specified scale used for all the graphics in the overlay. This will affect the appearance of symbols, fonts and thick pens. Normally, you should let the dataset scale control the appearance of graphics, but in some cases the scale of a read-only dataset is incorrect.
Point
As stated in What is Scale?, symbols are not real world objects. They are typically created at about 10 or 12mm (1/2 inch) high. The size they appear on the map will depend on the dataset scale.
The Point text box enables you to change the display size of symbols, without affecting other cartographic sizes such as line thickness or text height.
Entering 2 in the Point text box will double the display size of the symbols, entering 3 will treble their display size, etc. Entering values less than 1 in decimal format, i.e. 0.5, will halve the display size of the symbols. Any positive, or no value, will cause the display size of the symbols to change as the zoom level changes.
Setting a negative value in the Point text box will also affect the symbols display size as described above, however, they will always remain at that size on your display, independent of the level of zoom.
Note: The Point setting is cancelled if the Scale Overrides-Overlay-Override tickbox is checked.
Map Window Bitmaps
This slider controls the transparency, or blending, that will be applied to Bitmaps in a Map Window. From fully opaque to fully transparent is a range between 0 (for fully opaque) and 255 (for fully transparent). Move the slider from the left (0) to the right to increase the transparency of a raster image in a map window, click Apply if you wish to see the transparency before you click OK to accept the setting.
opaque 0 . . . . . . . . . . . > . . . . . . . . 255 transparent
Brushes/Pens/3D Window Brushes
These are the fully opaque to fully transparency sliders for each item.
The range for Brushes and Pens are both 0 to 255, identical to the Map Window Bitmaps adjustment. Check the Brushes / Pen tickboxes to make their sliders active.
The range for 3D Window Brushes is 0 (for fully opaque) to 100 (for fully transparent).
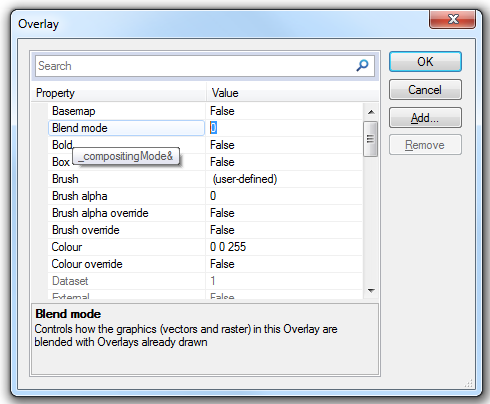
Blending/compositing
Controls how the graphics (vectors and rasters) in this Overlay are blended with Overlays already drawn.
The Blend mode property values (_compostingMode&) are in the range 0 to 35.
The Blend mode property value is shown in parenthesis after each blend mode title.
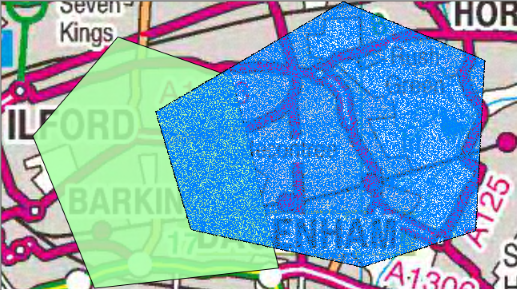
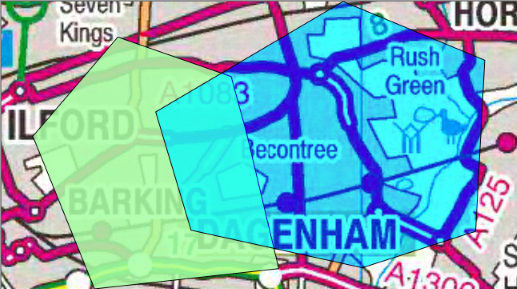
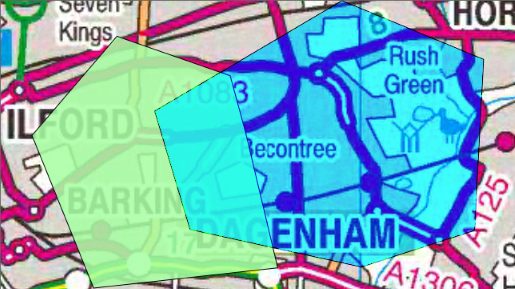
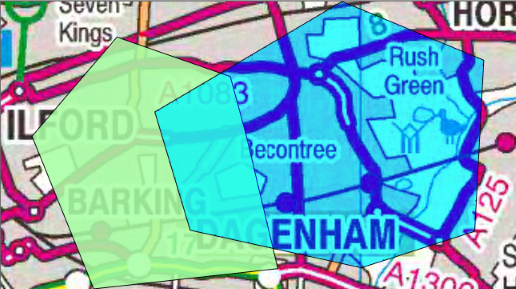
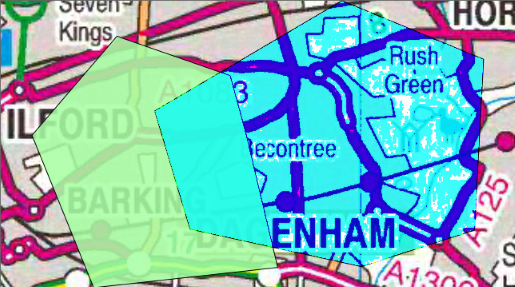
250k-mos.ecw is used as the backdrop for the following blend mode examples.
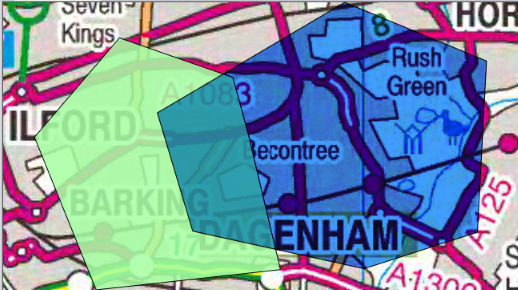
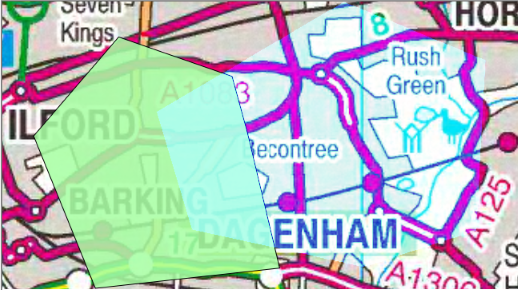
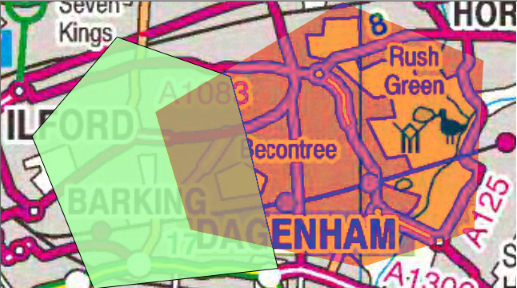
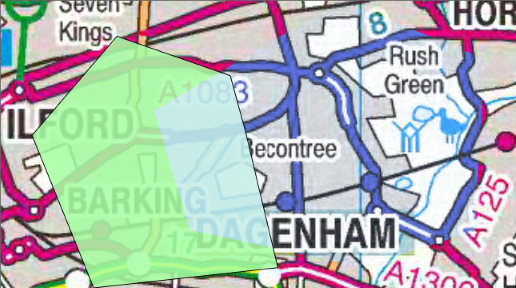
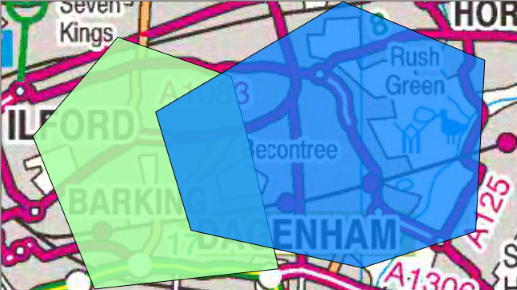
Normal (0)
This is the default attribute which specifies no blending. The blending expression simply selects the source colour.

Normal - Blend mode property value = 0
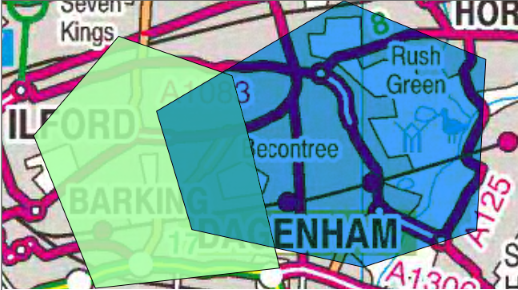
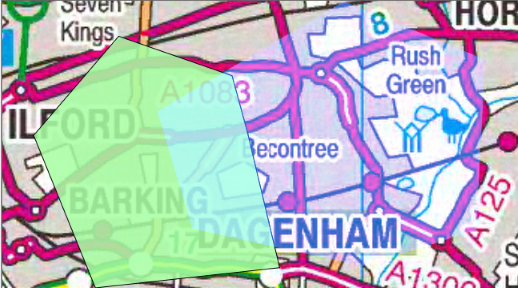
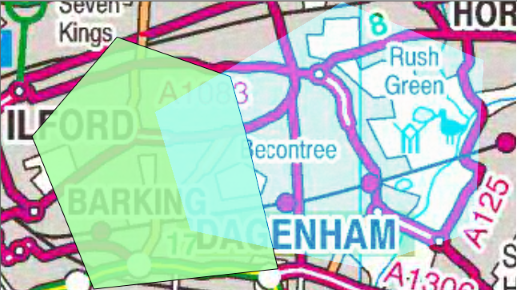
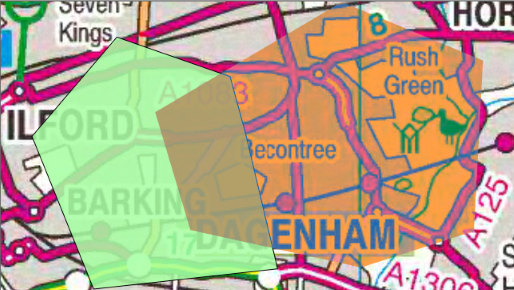
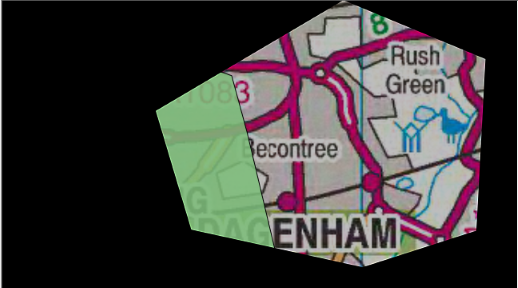
Dissolve (1)
Applies the blend colour to the base image in a random pattern of specks, according to the opacity of the blend layer. The specks are denser in areas where the blend layer is more opaque, and sparser in areas where the blend layer is more transparent. If the blend layer is 100% opaque, the Dissolve blend mode will look just like Normal.
Dissolve - Blend mode property value = 1
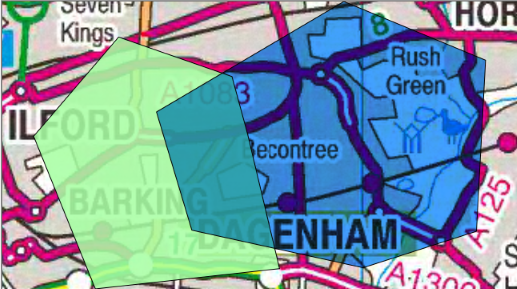
Darken/Lighten
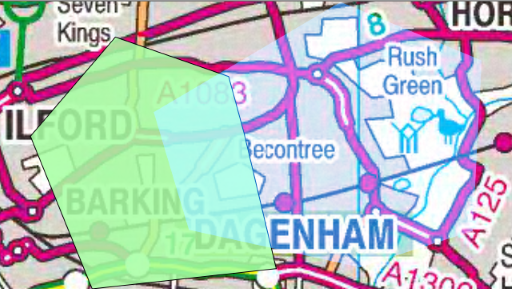
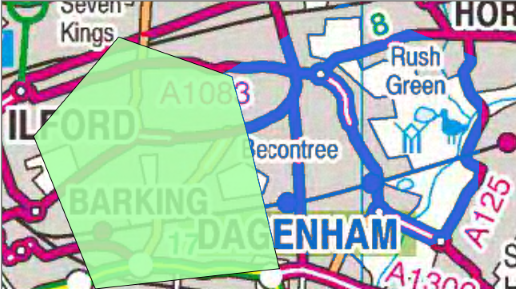
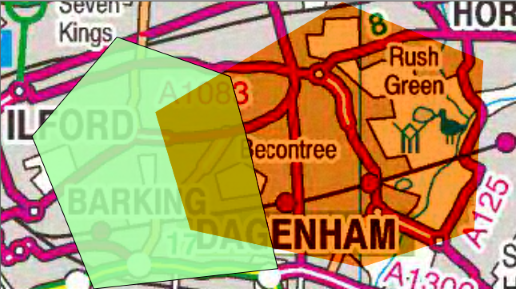
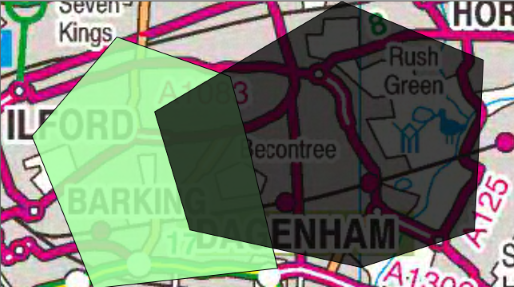
Darken (2)
Selects the darker of the backdrop and source colours.
The backdrop is replaced with the source where the source is darker; otherwise, it is left unchanged.
Darken - Blend mode property value = 2
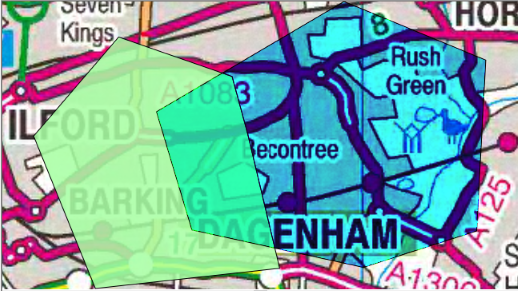
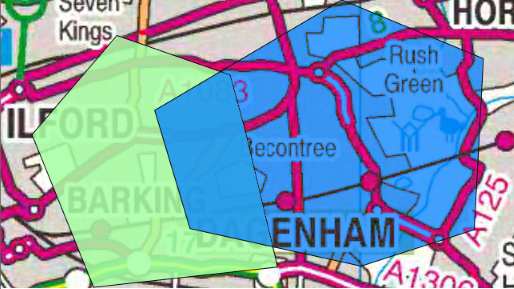
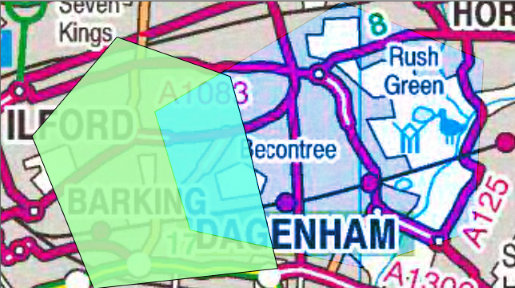
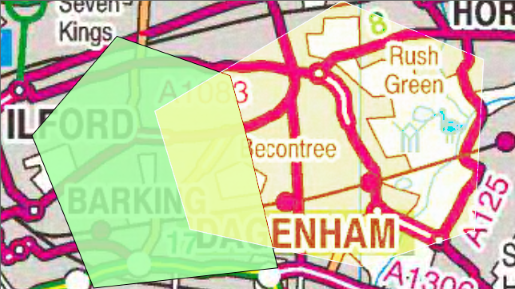
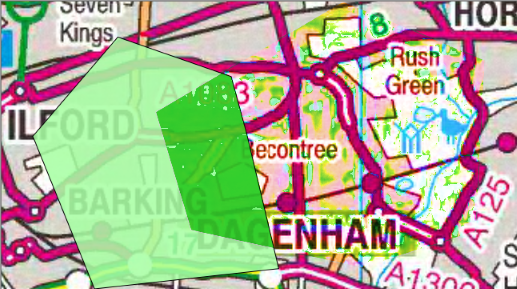
Multiply (3)
The source colour is multiplied by the destination colour and replaces the destination.
The resultant colour is always at least as dark as either the source or destination colour. Multiplying any colour with black results in black. Multiplying any colour with white preserves the original colour.
Multiply - Blend mode property value = 3
Colour Burn (4)
Darkens the backdrop colour to reflect the source colour. Painting with white produces no change.
Colour Burn - Blend mode property value = 4
Linear Burn (5)
Similar to colour Burn, but instead of increasing contrast, it decreases brightness to darken the base colour and reflect the blend colour. It is also similar to the Multiply blend mode, but produces a much more intense result. White as the blend colour produces no change.
Linear Burn - Blend mode property value = 5
Darken Colour (6)
Darken Colour - Blend mode property value = 6
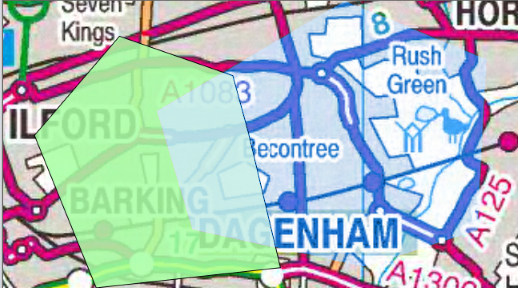
Lighten (7)
Selects the lighter of the backdrop and source colours.
The backdrop is replaced with the source where the source is lighter; otherwise, it is left unchanged.
Lighten - Blend mode property value = 7
Screen (8)
With Screen blend mode the values of the pixels in the two layers are inverted, multiplied, and then inverted again. This yields the opposite effect to multiply. The result is a brighter picture.
The result colour is always at least as light as either of the two constituent colours. Screening any colour with white produces white; screening with black leaves the original colour unchanged. The effect is similar to projecting multiple photographic slides simultaneously onto a single screen.
Screen - Blend mode property value = 8
Colour Dodge (9)
Brightens the backdrop colour to reflect the source colour. Painting with black produces no changes.
Colour Dodge - Blend mode property value = 9
Linear Dodge (Add) (10)
Is the opposite of Linear Burn. It increases brightness to lighten the base colour and reflect the blend colour. It is also similar to the Screen blend mode, but produces a more intense result. Black as the blend colour produces no change.
Linear Dodge (Add) - Blend mode property value = 10
Lighter Colour (11)
Lighter Colour - Blend mode property value = 11
Contrast
Overlay (12)
Multiplies or screens the colours, depending on the backdrop colour value.
Source colours overlay the backdrop while preserving its highlights and shadows. The backdrop colour is not replaced but is mixed with the source colour to reflect the lightness or darkness of the backdrop.
Overlay - Blend mode property value = 12
Soft Light (13)
Darkens or lightens the colours, depending on the source colour value. The effect is similar to shining a diffused spotlight on the backdrop.

Soft Light - Blend mode property value = 13
Hard light (14)
Multiplies or screens the colours, depending on the source colour value. The effect is similar to shining a harsh spotlight on the backdrop.
Hard Light - Blend mode property value = 14
Vivid Light (15)
Vivid Light - Blend mode property value = 15
Linear Light (16)

Linear Light - Blend mode property value = 16
Pin Light (17)
Pin Light - Blend mode property value = 17
Hard Mix (18)
Hard Mix - Blend mode property value = 18
Inversion/Cancellation
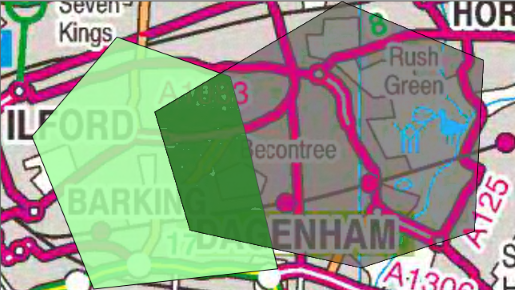
Difference (19)
Subtracts the darker of the two constituent colours from the lighter colour.
Painting with white inverts the backdrop colour; painting with black produces no change.
Difference - Blend mode property value = 19
Exclusion (20)
Produces an effect similar to that of the Difference mode but lower in contrast. Painting with white inverts the backdrop colour; painting with black produces no change.
Exclusion - Blend mode property value = 20
Subtract (21)
Pixels are subtracted from one another giving a darker result.
Subtract - Blend mode property value = 21
Divide (22)
Divide - Blend mode property value = 22
Component
Hue (23)
Hue - Blend mode property value = 23
Saturation (24)
Saturation - Blend mode property value = 24
Colour (25)
Colour - Blend mode property value = 25
Luminosity (26)
Luminosity - Blend mode property value = 26
Compositing
Source Over (27)
Where the source is opaque, the source is displayed. The destination is displayed everywhere else.
Source Over - Blend mode property value = 27
Destination Over (28)
Where source and destination overlaps, the destination is displayed. Where no overlap exists, the source is displayed.

Destination Over - Blend mode property value = 28
Source In (29)
Where source and destination overlaps and both are opaque, the source is displayed. Everywhere else transparency is displayed.

Source In - Blend mode property value = 29
Destination In (30)
Where the source and destination overlaps, and both are opaque, the destination is displayed. The source is not displayed where no overlaps exists.
Destination In - Blend mode property value = 30
Source Out (31)
Where the source and destination do not overlap, the source is displayed. Everywhere else transparency is displayed.

Source Out - Blend mode property value = 31
Destination Out (32)
Displays the destination everywhere the source and destination do not overlap. Everywhere else, transparency is displayed.

Destination Out - Blend mode property value = 32
Source Atop (33)
Where source and destination overlaps, the source is displayed. Where no overlaps exists, or where the source is transparent, the destination is displayed.

Source Atop - Blend mode property value = 33
Destination Atop (34)
Where the source and destination overlap, and both are opaque, the destination is displayed. Where the destination is transparent, the source is displayed.
Destination Atop - Blend mode property value = 34
ExclusiveOr (35)
The non-overlapping regions of source and destination are combined.
ExclusiveOr - Blend mode property value = 35
These buttons are described at the end of the General tab topic.
Send comments on this topic.
Click to return to www.cadcorp.com
© Copyright 2000-2017 Computer Aided Development Corporation Limited (Cadcorp).