.GIF) .
.You can select any raster image by clicking on its boundary.
You can also select a raster image by clicking on the picture itself (using the raster snapcode). However, this raster snapcode works only when the cursor is on the boundary of pixels with contrasting colours and/or shades, e.g. the edge of a black area on a white background - at this point you will see a bitmap tip shown at the cursor position.
The Raster snapcode is the only one which cannot be typed.
You cannot edit the contents of a raster data file in SIS, i.e. you cannot add, move or delete individual pixels. There are Windows applications available which provide tools for carrying out these tasks.
You can change various properties of the bitmap using the Properties dialog. One property that you may want to change is the pen, which is used to draw the border of the bitmap.
You can use the Transparent property to view data lying beneath the raster image. Set this to True and the Brush property to Hollow. This causes any light pixels in the image to be transparent and dark pixels to be opaque. On some displays white pixels will be completely transparent. In general high colour output devices will work better than low colour devices.
Colour raster files may be viewed in grayscale by using Convert to Grey [Edit-Bitmap] .
Original raster data has a maximum status of hittable. Therefore, if you wish to edit it, you must use one of the following functions:
Raster items can be moved and/or copied using the following methods:
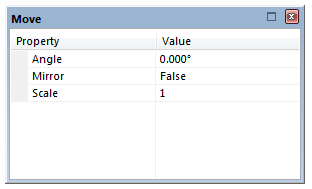
For details of displaying rotated or mirrored images, see Displaying rotated or mirrored images.
Note that rotated or mirrored raster images require a lot of memory in order to display them. See Computer memory requirements for raster data.
Zoom Raster [Home-Zoom]
.gif) works on the selected bitmap or grid item, setting the view scale so that one pixel in the bitmap or grid item equals one pixel on the screen, in order to achieve the perfect resolution. The view is zoomed in or out, without its centre being changed.
works on the selected bitmap or grid item, setting the view scale so that one pixel in the bitmap or grid item equals one pixel on the screen, in order to achieve the perfect resolution. The view is zoomed in or out, without its centre being changed.
The width (X dimension) will always be correct, and, if the bitmap’s pixels are square, the height will be correct too.
This command will also operate without a bitmap or grid item being selected. In this case, SIS searches for a bitmap or grid item and zooms to it.
Displaying rotated or mirrored bitmaps requires a lot of computer memory, so if your computer’s memory is not sufficient, you will find they are displayed in outline only.
If they are displayed properly, but you find the computer is becoming slow to operate, you can choose to display rotated bitmaps in outline only. This is done by un-ticking the Draw rotated bitmaps checkbox on the Drawing and Printing tab of the Options dialog (there is also a Print rotated bitmaps option, to speed up printing). Vector data can also be transformed using this method.
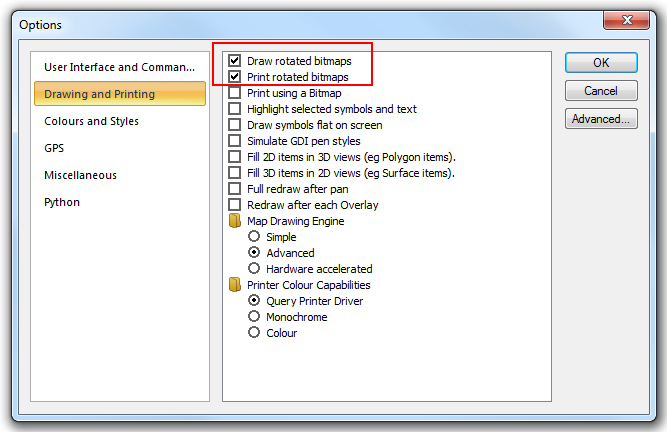
For the use of these options, and how you can cause rotated and mirrored bitmaps to be displayed properly, see Loading maps (and other data files).
An alternative to drawing your logo is to scan it and insert it where required using Paste From [Edit-Clipboard], see Loading maps (and other data files).
Compress [Edit-Bitmap] .gif) takes an uncompressed raster image and compresses it to an appropriate TIFF format so that the bitmap item uses less memory, and the overlay or SIS Workspace Definition (SWD) containing the bitmap uses less disk space. Compress is also available from the bitmap item local menu.
takes an uncompressed raster image and compresses it to an appropriate TIFF format so that the bitmap item uses less memory, and the overlay or SIS Workspace Definition (SWD) containing the bitmap uses less disk space. Compress is also available from the bitmap item local menu.
The resulting TIFF format bitmap item is saved inside the overlay. (If the original bitmap was a linked bitmap, the link is now broken, and the resulting bitmap is no longer linked.)
Once compressed, the image may take longer to draw.
Resampling is when several bitmap pixels need to be merged into one pixel, or when the colour halfway between two pixels needs to be interpolated. You cannot resample bitmaps which have been compressed (either read in as compressed files, or subsequently compressed using Compress [Edit-Bitmap]).
Once a resampling method has been selected for a bitmap, it remembers this method and uses it if it is ever resampled again.
If this is the first time this bitmap has been resampled, or if you wish to change its resampling method:
.gif) .
.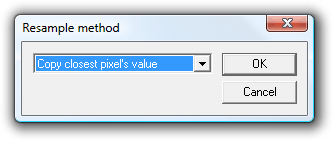
Copy closest pixel’s value - this is the fastest and most common method. It should be used for bitmaps which represent pictures but which use a colour palette.
Interpolate between closest pixels - this should only be used for true-colour bitmaps (i.e. greater than 8-bit colour depth), where colour quality is important. This is a slower operation than copying the closest pixel’s value, so use this method when quality is more important than speed.
Keep sum of pixels constant - this should only be used for non-picture bitmaps. For example, grid items use pixel values to represent linear values and not colours. Sometimes the linear value represents a count, such as the number of houses within the square occupied by a pixel. In this case you would want to keep the number of houses the same before and after any bitmap resample operations.
In the Resample dialog change the spacing between pixels. The current spacing is shown, the values being with reference to the map data underneath:
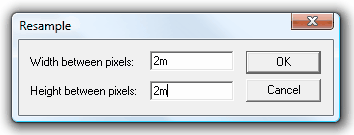
If you decrease the spacing, you increase the number of pixels making up the bitmap. If you increase the spacing, the number of pixels decreases, with a corresponding decrease in the resolution of the image.
Send comments on this topic.
Click to return to www.cadcorp.com
© Copyright 2000-2017 Computer Aided Development Corporation Limited (Cadcorp).