General editing techniques
Note: Ensure you are familiar with the meanings of the image status options of editable, hittable, visible and invisible before proceeding with this topic, see The Overlays Dialog.
Editing items
Deleting items
Moving, rotating, mirroring and scaling items
Moving single or multiple items
Rotating items: Rotate [Edit-Geometry-Arrange-Rotate]
Stretching items: Stretch [Edit-Geometry]
Notes on rotated or mirrored bitmaps
Copying items
Copying editable items
Replicating items
Placing multiple copies in regular arrays
Path arrays
Polar arrays
Rectangular arrays
Merging geometry: creating multi-geometry
Merging geometry: using Boolean methods
Breaking down complex items
Simplifying items
Summary of the OGC simple form
Generalising items
Editing items
When editing items, they must be hittable or editable, depending on the editing function chosen.
Hittable graphics, when selected, may be copied to the clipboard or replicated, but may not be edited.
Editable graphics may be copied to the clipboard, replicated or edited.
Back to top of page
Deleting items
- Select the items to be deleted, see Selecting graphics. The items to be deleted must have a status of editable.
- Either select Delete [Edit-Clipboard] or press the Delete key on the keyboard.
If the selected items are a mixture of editable and hittable items, only the editable items will be deleted.
Back to top of page
Moving, rotating, mirroring and scaling items
Moving single or multiple items
- Select the item(s) to be moved, see Selecting graphics.
- Select Move [Edit-Geometry], or Move on the local menu. This causes nine handles to be superimposed over the selected item(s). These handles can be used to pick up and move the selected item(s).
- The Move dialog box also opens:
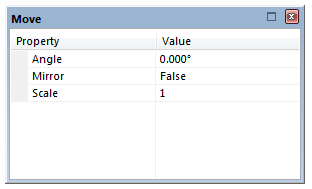
You can use this dialog to:
- Rotate - The Angle property rotates the item(s). A positive value will rotate it anticlockwise (in degrees), a negative value will rotate it clockwise (in degrees).
- Mirror - if selected, creates a mirror image of the item(s) around its/their Y axis.
- Scale - scales the item(s). A value greater than 1 increases the size, less than 1 decreases the size.
- Click on the selected item to choose where the item will be rotated/mirrored/scaled from. The items become locked to the cursor. Click again to move the item.
Use the Ctrl key as you place the items to make a copy, otherwise only the selected items will be moved.
Remember, the values input in the Move dialog will be remembered next time Move [Edit-Geometry] is used. You may want to change them.
Back to top of page
Rotating items: Rotate [Edit-Geometry-Arrange-Rotate]
Use Rotate [Edit-Geometry-Arrange-Rotate] to rotate selected items.
Back to top of page
Stretching items: Stretch [Edit-Geometry]
Use Stretch [Edit-Geometry] to stretch selected items.
Back to top of page
Notes on rotated or mirrored bitmaps
Displaying rotated or mirrored bitmaps requires a lot of computer memory, so if your computer’s memory is not sufficient, you will find they are displayed in outline only.
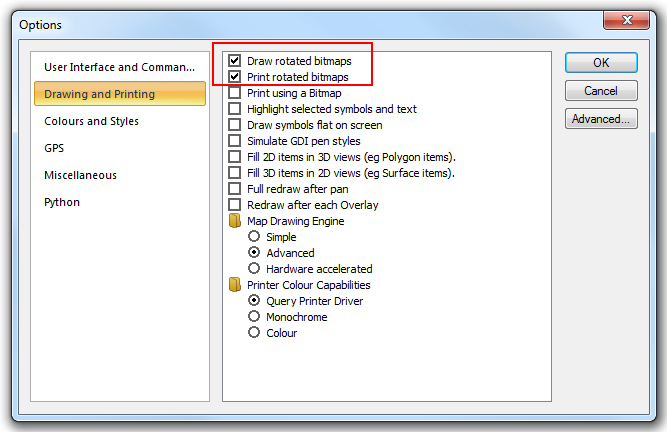
If they are displayed properly, but you find your computer slows down, you can choose to display rotated bitmaps in outline only, using the Draw rotated bitmaps checkbox on the Drawing and Printing tab of the Options dialog (there is also a Print rotated bitmaps option, to speed up printing), see System Options.
Back to top of page
Copying items
Copying editable items
- Select the items, see Selecting graphics.
- Select Move [Edit-Geometry], or Move on the local menu
- The Move dialog box will be displayed:

if required set the Angle, Mirror and Scale values of the copied item.
Click on the selected item and move to the required copied position, while carrying out the command keep the Ctrl key pressed down. This creates a copy of the item(s) on your map.
- Keep the Ctrl key pressed down and repeat the command(s) for multiple copies.
Back to top of page
Replicating items
Both editable and hittable items (see Overlay Status for details of editable and hittable status) may be copied using Replicate [Edit-Clipboard]. This command creates an editable copy of the selected item(s) in a user-defined overlay without using the clipboard. The new copies are placed in exactly the same spatial location as the originals.
Back to top of page
Placing multiple copies in regular arrays
An array is a regular repetition of an item or group of items. SIS enables you to create Path, Polar and Rectangular arrays.
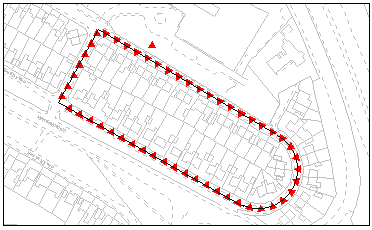
In the example below, an area of the map is outlined with red triangles to denote a particular purpose or zone.
Back to top of page
Path arrays
A path array is a means of placing items at chosen regular intervals along a path on a LineString item.
- If required, construct the LineString item along which to place the array copies.
- If required, construct the graphics to be copied, or alternatively place a symbol.
- Select the graphics to be copied, see Selecting graphics.
- Select Path [CAD-Arrays].
- Click a position on the graphics to be copied. This is the reference point by which the copies will be placed along the path.
- Click a point on the LineString item for the start of the path along which the copies will be placed.
- Either:
- click a point on the LineString item for the end of the path
- hold the Ctrl key down and click anywhere on the LineString item to make the path end at the end of the LineString item
- In the Path Array dialog, specify the criteria for constructing the copies:
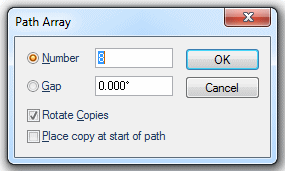
- The Number field enables you to specify the number of copies to be placed.
Alternatively you may choose the Gap option, which allows you to specify the distance between each copy instead.
- The Rotate Copies option means the copies will be rotated so that they follow the direction of the LineString item, or remain fixed in orientation.
- You have the option to Place copy at start of path.
In the example shown above on the map extract, copies were placed every 10 metres, with each copy being rotated to align with the direction of the LineString item.
Back to top of page
Polar arrays
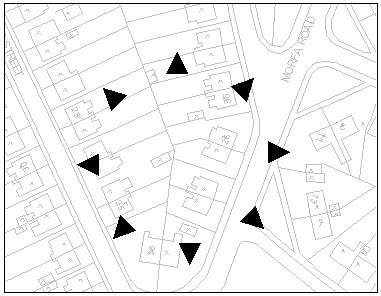
A polar array is a replication of graphics in a circular pattern.
- If required, construct the graphics to be copied, or alternatively place a symbol.
- Select the graphics to be copied.
- Select Polar [CAD-Arrays].
- In the Polar Array dialog specify the criteria for constructing the copies:
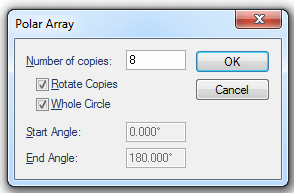
- The Number of copies field is the total, and includes the original copy.
- The Rotate Copies option means the copies will be rotated as they are placed around the circular array (as in the illustration above), or to maintain the original orientation.
- the Whole Circle option means the copies will be created round a complete circle (as in the illustration above), or to have them created around just part of the circle (in which case you select the Start Angle at which the copies start and the End Angle at which they end).
- Click a position on the graphics to be copied. This is the reference point by which the copies will be placed around the circular array.
- Click a position for the centre of the circular array. The copies will be arranged around this centre point.
Back to top of page
Rectangular arrays
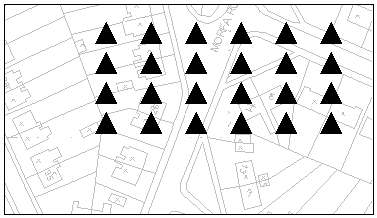
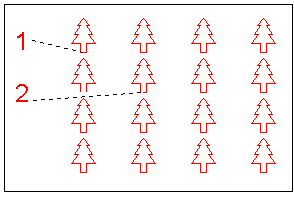
A rectangular array is a two dimensional matrix of copies. You can specify the number of horizontal and vertical copies.
- If required, construct the graphics to be copied, or alternatively place a symbol.
- Select the graphics to be copied.
- Select Rectangular [CAD-Arrays].
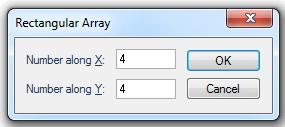
- In the Rectangular Array dialog input the number of copies required in both the X and the Y direction. This is the total number, and includes the original.
- Click a position on the graphics to be copied. This is the reference point by which the copies will be placed (point 1 in the diagram below).
- Click a position on screen where the second copy in both the X and Y directions will be placed (point 2 in the diagram below). The other copies then use the same spacing, to give a regular arrangement.
Back to top of page
Merging geometry: creating multi-geometry
Multi-geometry items are a collection of Point items, LineString items and/or Polygon items. They are created from existing items in the following ways:
- by adding existing items together using Add.
- by editing existing items, using a Boolean method, to produce a new item.
Back to top of page
Merging geometry: using Boolean methods
All types of geometry can be merged together using Boolean editing operations to produce new geometric items. Some Boolean methods produce multi-geometry items.
The new item takes on the properties and attributes of the dominant item, so the commands sometimes show a dialog for selecting which item should be dominant. This does not appear if a choice is not necessary (for instance, if all selected items have the same style, data and height).
The height of the new item is the height of the dominant item, or the height of the dominant item’s origin if the dominant item does not lie on a plane parallel to the XY plane.
For details on using these commands with LineString or Polygon items, see Editing LineString items and Editing Polygon items.
Back to top of page
Breaking down complex items
Items with complex geometry can be broken down into simpler, separate items using Decompose [Create-Edit]. You must first select the item(s) to decompose, then the command. For example, multi-geometry can be broken down into separate items, or a TIN can have each face converted to a separate Polygon item. Data to be decomposed must be editable.
This command is available in Map Manager, Map Editor, and Map Modeller.
Back to top of page
Simplifying items
The OpenGIS Simple Features Specification contains rules for determining what can be classed as simple geometry (these are summarised below). When SIS simplifies geometry it follows the OGC rules, changing the original geometry as little as possible. It also keeps any data associated with the item, as far as it can.
Examples of when simple geometry may be required are:
- when exporting data for use in other programs. For example, LineString items with self-intersections can cause problems in other systems.
- when carrying out Geometry Tests. Many of these (for example, finding items which intersect with the selected item) rely on the items tested being simple.
You must first select the items to simplify, then select Simplify [Edit-Clean/Simplify]. This converts the selected item(s) to the OGC “simple” form (e.g. by removing self-intersections).
Back to top of page
Summary of the OGC simple form
- A point item is always simple.
- A LineString item is simple if it does not cross itself and it does not touch itself (except possibly at its end-points).
- A polygon item is simple if its loops do not cross and its interior is a single connected region.
- Multi-items are simple if:
- all the components of the multi-item are simple
- the interiors of each component do not intersect any of the other components
- in a simple MultiLineString, every junction between component LineStrings has at least three paths leading out of it
- in a MultiPolygon, all the Polygons only touch at points
Back to top of page
Generalising items
Generalise [Edit-Clean/Simplify] can be used to simplify LineString items. It is based upon the well-accepted and documented Douglas-Peucker algorithm.
Generalise is available in Map Editor and Map Modeller,
Top of page
Send comments on this topic.
Click to return to www.cadcorp.com
© Copyright 2000-2017 Computer Aided Development Corporation Limited (Cadcorp).


